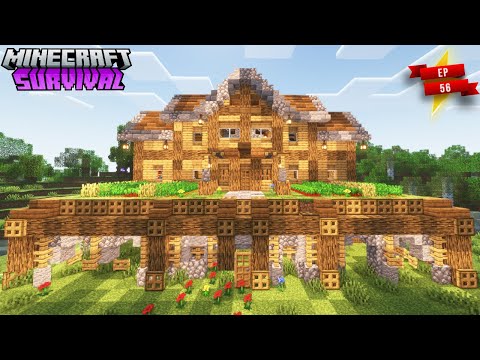
Building in minecraft is so much fun and is by far my favorite aspect of the game i can literally sit there for weeks if not months just building and building non-stop building up a town or a village And just watching it grow and one of the most common questions i get asked is how do i come up with so many unique designs and how do i make each one different from the last so today we’re Going to go over some of the basic principles that i follow and talk about my thought process along the way so let’s start with step number one build ideas and inspiration now this step is going to be Super important especially if you’re building up a town or a village and you want to come up with multiple ideas for different buildings so that things don’t look the same so you’re gonna need a lot of ideas and a lot of inspiration for building with in general this can be done in two Ways you can take the realistic approach or the non-realistic approach for me personally i don’t build in a realistic manner i build more in a sort of fantasy medieval style manner so this is not a realistic approach of building when i say realistic i’m talking more about Historically accurate side of sort of realistic so if you want to build medieval or fantasy then you want to use concept art concept is going to be the best way of searching if you want to build something that’s very realistic then you want to take a look at realistic buildings that actually Exist in the world today i would head over to google images or pinterest and we can do both searches this way it doesn’t matter whether you’re a realistic builder or a non-realistic builder where both of these can be done exactly the same way the only difference is for a non-realistic way We would use the word concept art in the search we head over to pinterest or google images or some imaging site like that where we can do a search for images and you want to search for the type Of building you want to look for for me that’s generally looking for medieval buildings medieval houses medieval castles um or something like that but you can do this for any style of building you could be searching for spanish villages or castles or houses in the mountains small cabins Winter lodges or something like that you can search up so many different ideas and you will come back with hundreds if not thousands of image ideas for references like i said for me i will always put concept art after the word i’m searching and generally these are the sort Of images that i get coming up on screen now these are the kind of things that i search and look at and for these we can take many different ideas and put them into a single build we haven’t Necessarily got to try and copy this building we can use many ideas to make our own so we could imagine that we like the base of a house from one building we like the layout of it but we want to Change the upper levels so we’ll look for some some better buildings that have a nicer upper level maybe a different looking roof um maybe we want to add a tower so have a look at some towers maybe you want some different entrances so take a look at some different entrances or stairways onto The buildings and take all of these into sort of account save the images that you like and keep them it’s easy access so that you can look at them while building and what you want to do Is you want to take these ideas and try and implement them into a single build with your own sort of take on it at this point you don’t want to pay attention to colors because colors are Not what we’re looking at right now what we’re looking for is shape once you’ve got enough images and you’re ready to start building we can head over and start doing some sort of planning but first of all just make sure you have plenty of reference images so that you can take ideas from Each one and switch things up as you please to make a build that suits what you’re looking for step number two block palettes and colors now this step can sometimes be quite daunting because there’s a lot of blocks to choose from in game and it’s not always easy to know what sort of Colors you want to go with so what i tend to do is i will build up a bunch of different builds with block palettes and i tend to do these in layers so i will make a little base which is going to be Either a single line across the bottom of the build or the entire bottom level of the build and i will just do a single strip at a bomb just to get an idea of what it would look like as you Can see from the examples in front of me we have a little strip that is different at the bottom the colors you see at the top are what i generally tend to use for the rest of the building or the Upper levels now don’t get me wrong we can divide more colors up into certain parts of the build we haven’t got to stick purely to the block palette if we have an area of the building that sticks out We could change the color to that as well but this is just to give you a general idea of block palettes and the colors that work well together for walls so this is a good way to kind of mess around with the colors until you decide of a choice that you actually like When it comes to building a build i generally divide it into three ways the bottom layer or the base the upper walls and the roof and i choose different colors for each but what i tend to do is I like to vary up my builds on towns and stuff so i don’t like every build to have the same colors so i generally choose between sort of three to five different block palettes that i’m going to be using throughout the build so i will choose several base designs several wall designs And several roof designs and then i kind of mix and match them up as i please through the builds to kind of create a bit of a natural flow another thing we can also do is work with gradients Radians are like a tall wall where we can start from darker colors at the bottom and blend them into lighter colors at the top now working with gradients we need to make sure that we’re using the same color tones so that we can blend a wall nicely these work great On large buildings such as town halls castles and also things like churches because they have high walls so we can blend them as we go up from the bottom step number three lay out some framing So this is a part where so many people get it wrong now of course you know the basic layout on the ground is pretty simple you lay out a few rectangles make sure that any of the long Walls you’ve got you’ve got some little stick out sections and make sure you don’t have too many flat areas where you’re going to have flat walls that are going to be difficult to detail later on now you want to make sure the build overall has a very good shape on the base But the problem is as we work up the build this is where people often run into issues a lot of people will create these little stick outs and jet outs off the sides the back and everything else to make It look nice but then what they do is they raise it all to the top of the roof to the same height and that just doesn’t look right because everything else is still stuck on that one Level and you need to create a bit of a variety on the build you need to have those different levels that are visible to really sort of make the build stand out so as you’re building up the levels make sure that you’ve got some roofs at different height variations if you’re finding that Most of your roofs are sitting higher try and find other ways to detail on the lower levels for instance creating a overhang on the porch or creating a balcony that sticks out on the side now of course at this point we are only framing so we’re not really planning or building the details But we do want to make a base layout to make sure that we can see where everything is going to be it’s important here that you don’t start filling in your walls and stuff like that until you are Happy with the shape that you have make sure that you’ve got your walls all covered you know what details are gonna go on them where you’re gonna add balconies where you’re gonna have overhangs so that you can come to those and build them straight up without any issues and without having To build the wall and then realize later on that it doesn’t look right you know you don’t want to have to be coming back and then having to change over a whole part of the house now this point you Can see we have two different colors one for the upper level and one for the lower level one way to really add a good bit of detail without really doing anything is to make the little areas That stick out at the house the same color as the upper level of the house what this does it makes them stand out from the color of the base with a different color and it just gives them almost A separation so that they look like their own separate builds but they’re not they’re still part of the same house and it just creates a really nice variety in the build and really adds to the Detail so i highly recommend giving it a try as it really adds a lot of detail with minimal effort step number five fill in walls and details now for this part i like to use what is called the kiss approach now don’t worry i’m not going to tell you to kiss your build But this stands up for keep it simple stupid and the reason i say this is because there are many people who go crazy on the details and they always show you a picture from a nice distance looking At the build and yeah the build looks great but what happens when you get up close to the build it looks a total mess and it doesn’t make no sense there’s blocks randomly placed there’s odd colors There’s big gaps and you can’t make two sense of what the build is supposed to look like up close this is why i say to use the simple approach which is adding simple details and plenty of them this Way the build will look nice up close and it will also look nice at a distance so you get the best of both worlds when it comes to texturing a build there are simple ways of texturing the build and There are awkward ways of doing it the awkward way which a lot of people will like to do is try to do it all at once where they randomly place their textures and build up a wall full of textures Which is very randomized and yes sometimes it can turn out good other times it might not look great what i personally like to do is keep it simple so i will use maybe sort of three four blocks at the Most in the texturing choose one of those blocks to be the main block say for example a stone wall i would then texture the walls with my additional blocks this would mean placing no more than two Or three in a closed patch and making sure that they are diagonal from each other and not side by side or above each other because we don’t want them to look like they are in one clump What this will do this will allow the wall to look more even and make sure that your textures are evenly coated through the wall and you’ll have your main base wall as a rain color and it just looks better in general rather than having scattered blocks all over the place to create your Texture just go ahead add a few of them together and make them evenly spread throughout the build and it would look so much nicer in the end at this point we need to remember to give the outside of The build as much love as we give the inside of the build by this i mean things such as small balconies small porches chimneys windows on the roofs we can add little bushes outside of windows If you place a window put a little ledge there add a flower pot put some flowers in there add some color to the build these sort of things are going to be the things that really make the Build stand out in the long run and don’t be afraid to make any mistakes of it because if there’s details that you put down that you don’t like you can always remove them you can always change them and add something else so mess around of it add plenty of details and make sure That if you have anywhere like a large section of wool make sure you do something to cover up so that it doesn’t look so large and plain that can be as simple as adding in a couple of windows And then maybe using some leafs to make some vines up the wall to sort of fill in some of the area so it doesn’t look like one big large blank spot so adding in small details and scattering them Throughout the build is the best way to fill it in and really bring that build to life now before we go i just have a few last finishing tips for you so first of all when you’re making your plans your builds prepare for your odds and your evens for this I usually tend to use mostly odd numbers but there are times when even numbers do work better for example if you’re planning to build a whole wall and you want a bunch of two-wired windows there it’s likely that that wall is going to work out better with the even numbers Now if you’re building a doorway and you want it to be based around a center you’re likely going to need an odd number but what if you want to create a doorway with two doors if you want two doors you’re likely gonna need an even number for that doorway So you need to plan these in advance and make sure that you make space for your even numbers and make sure that your odd numbers for your centers for your roof peaks and other things like that now most of you are already gonna notice one but leaves and flowers are your friends that Use them everywhere because they add so much to a build now i say use them everywhere but there are also a few things that you should be careful with for one don’t use leaves for too many things For instance don’t use the same leafs that you’re gonna use for building up the side of a house as vines as you are gonna be doing hanging vines on a house as you are going to be doing bushes and Trees and everything else don’t use all of the same leafs make sure that they are varied for instance i tend to use different leaves as vines on a house compared to leaves i use in trees And different leaves that i use for bushes around the house i do this so that we can see the break in the textures and the variety in the different leaves for different things which makes them stand Out and look more unique when it comes to using the flowers make sure you don’t over do too many colors in one area i like to use maybe two to three colors of flowers and no more than that In one area if i move to a different area we can change up the colors that’s not a problem so if you’re doing one house and then you’re doing a different house you can do different color Flowers on each house but around that one area of the house just make sure you stick to sort of a few colors and not too many because it just starts looking a little bit too much and a bit too busy The next one is quite a common question i get on the channel and that is people ask me how do they texture exactly the way that i do now there’s not really an easy way for me to tell you how to Texture exactly the way that i do other than to just texture carefully with with minimal amount don’t overdo the texture and try and add too many blocks you know a little goes a long way when it Comes to texturing just make sure that it’s evenly coated throughout your walls but the best thing i can tell you is don’t be afraid of making mistakes when it comes to texturing or any form of building You know we grow as people and as a builder and anything else in life when we make our mistakes mistakes are where we learn we learn from our mistakes and we improve down the line so don’t be afraid of ever making mistakes because that is where you’re going to learn the most Now above all this guys i just want to make it clear that no two builders built the same way everyone has their own way they like to build and their own way they like to do things there is no right and there is no wrong so above everything the most important thing is That you enjoy playing the game you enjoy what you’re doing and it encourages you to do more so have fun enjoy the process and i’ll catch you in the next one Video Information
This video, titled ’16 Essential Tips to Become a Better Builder In Minecraft’, was uploaded by BlueNerd on 2021-08-19 16:00:16. It has garnered views and [vid_likes] likes. The duration of the video is or seconds.
Today we will discuss over 16 essential tips to become a better builder in Minecraft. These are the general principles I follow when …


![[Hot Nether Portal Alert] Gegagedigedagedago! #shorts #Meme #memes](https://newsminecraft.com/wp-content/uploads/memechan/minecraft-meme-popular-7424.jpg)