Hey what’s up youtube in this video i’ll be showing you how to make a steve holding a giant chunk of land statue which you can then build an awesome house on top of side note this tutorial does not actually come with a house tutorial i only show you how to build The statue and the giant bit of land on top of it prices may vary so here are all of the materials that we will need to make our statue please do make sure that you have access to all those materials and enough of them as well and Now that we have all of that stuff we can get started so the first thing that we are going to do in making a statue is we are going to place a row of seven light blue concrete extending up from the ground so one two three four five six seven We are then going to extend that seventh block upwards and backwards diagonally by two so one two we then want to go left by seven one two three four five six seven we want to go down by three so one two three we want to go back on ourselves to the Right by six one two three four five six and then we want to join down to the ground and then back to ourselves so we want to have this rather solid shape here so the shape that we have created we actually want to extend it across in a Few different places so we want to extend the bottom of the foot here to the right by one two three one two three join together we then want to copy the shape that we actually have on the opposite side so if you raise up the corners and you copy the exact Same light blue concrete area that we have just created and just extend it open around like this we want to end up with something that should look like that so that is looking pretty good and that is one of steve’s legs so what else do we have to do well we Have to come back to the build here and we want to join at the bottom and top of these rows together the bottoms and the top of the road together like this and then we want to extend the top row across so we want to come to The top and we want to extend the cross and we want to extend across by four so one two three four just like this right we then want to go down by five one two three four five and then we want to extend backwards by Four so one two three four and then we want to join down to the ground like this what we then want to do is we want to extend forwards by seven one two three four five six seven and then we want to extend upwards i don’t think we have anything to connect To yet we don’t really but what you can do is you can actually extend upwards and you can join back onto the shape that we kind of first started so we end up with this kind of like l shape here it’s actually kind of like an i isn’t it really so actually it Is an l i don’t know my numbers my numbers i i’m losing my mind i don’t know my letters apparently that’s the l shape that we have just created i’m slowly going crazy in this tutorial what we then want to do is we want to take the bottom corner of What we have just made and we want to extend it across to the left by three so one two three and then we want to raise it up and we want to join it back to what we’ve just made so you can actually see the outline of steve’s legs as we Have made them here not only that you want to take the back corners of the build so these two back corners of the feet and extend them crossed by one two three and one two three and we can join them top to bottom like this And we can join front to back like this and we want to copy the same shape that we have there so we kind of want to turn it into an l definitely not a number or or an i uh we want to turn into an l and we want to Extend forwards and we want to join up like this so you can see the outline of steve’s legs he kind of has this um kind of like he’s down on one knee kind of like struggling pose um we also have to make steve’s boots these are quite simple so Steve’s boots are two rows thick and they are at the bottom of the legs so if you just leave a gap of two at the ends of the feet area and place a band of light blue concrete all the way through the foot like this then that kind of Marks out steve’s boots so that’s one here and then you can use actual blocks like i have to mark out two blocks i’m using diamond as that is going to be one of the predominant materials that we have and that will just mark out the Boots and we we can fill all of that in later on so the next thing that we have to do is we have to make steve’s torso so steve’s torso is upright i want you to come to the top front right hand corner of the build here where we have the leg that’s Kind of like straightened out that he’s kneeling on i want you to on top of this block place 12 light blue concrete 1 2 3 4 5 6 7 8 9 10 11 12. we then want to extend left one and then four by one and then Left by four with the white terracotta one two three four and then two of the light blue concrete one two and then we can just join down so just like this perfect so with the white terracotta area i’d recommend extending the two middle blocks each down by one Placing light blue concrete left and right of them and then light blue concrete underneath we can add a bit of detail by adding white concrete in the top left hand corner of the torso place a row of one two three four coming down and then the first block that you Can actually place to the right so it’s not the first white concrete the second white concrete concrete you want to place a white concrete block going right of that and also one in the corner opposite so just underneath the collar of the diamond chest what we also want To do is place light blue concrete in the bottom left and bottom right corners of the chest area like this and that just helps to shape the plate the back of the build is very simple you basically just want to take the back two corners of the hip area extend them Upwards and then forwards and around and it just wants to locate a little something like this right we then want to take the two bottom corners as well and we want to extend them inwards just to shape the plate a little bit as well and that will give us This so very very happy with that that looks fantastic the next thing that we’re going to do is make steve’s head because it’s one of the harder parts really but hopefully not too difficult on the top of the front of the body place a row of white terracotta and then one in front Then in front of this place two white terracottas extending inwards from both sides with a row of brown concrete in between on top of this next row i want you to place white terracotta on top of white terracotta place brown concretes extending inwards from them with white terracotta in Between the next row is simple by placing two brown concrete on the two middle white terracottas and filling the rest of the row in using white terracotta what we’re then going to do is the eyes if you start by going from left to right and place a white terracotta white concrete blue concrete And then two white terracotta blue concrete white concrete and then white terracotta and then place an entire row all the way up just above like this and we’ll actually leave it at that what we’re now going to do is come to the back we’re going to take the very first row Of white terracotta that we placed and we’re going to extend it backwards by five rows so one two three four five just like this and well we’re just going to extend all of these backwards aren’t we by five rows so that will give us something that should look like this So that actually is okay at the moment except for the fact that we want to place a white concrete in the two corners on the left and right hand sides of the face and now we have to make the helmet the helmet is actually going to save us a Lot of work in the term in terms of building steve’s head grab yourself the light blue concrete and place light blue concrete in front of and in between steve’s eyes we take the right side of the light blue concrete and extend upwards by one two and then go right by four One two three four we want to go up two one two and then we want to come all the way back where we first started which is this light blue concrete place a white concrete on top block of diamond on top of that and then extend to the left by Four using your light blue concrete one two three four and then you want to go up by two so one two and then you can just join all the way over to the right like this okay so to make the helmet we are going to take the bottom two corners of the Helmet and we’re going to extend them down so we’ll start on the right side and we’ll extend the corner down let’s make it easy and then we’ll from this corner extend backwards by three so one two three and then extend like bottom do a bottom right diagonal like Extending towards the back and then extend to the right by five so one two three four five i then want you to extend up by four so one two three four and then we can just join back on ourselves so not only can we do that but we can Then take the top corner of this we can extend it to the right we can extend it forwards like so we can copy the shape that we have on the opposite side there so i’m going to start off by extending this corner down and then extend forwards and then we’ll do a diagonal Extend forwards and remember there actually extends down on the front kind of like this so that is actually perfect so when it comes to the back of the helmet it is a little bit different so we want to take the back two corners of the helmet and we want to extend the Corners down by two so one two we want to extend them inwards one so like one two and then extend inwards one and then we want to join them together underneath diagonally like this so what will that what will that allow us to do is my grammar is so bad today Honestly i’m glad that i’m not an english teacher so what that will then allow us to do is grab some white concrete and in the top left hand corner of the helmet we’re going to place a little bit of a shine using white concrete so that’s basically What we’re going to be doing in a few different corners so like in the back corner of the helmet here in the back corner of the helmet here you can even add it in the front as well if you like like as long as you just add a little Bit of a shine to the helmet just make sure that it glimmers and gleams as one would hope that a diamond helmet would it’d be a real shame if you went to all this trouble and the helmet didn’t look awesome so um fill in the helmet using Diamond and just add little parts of white concrete in the corners like that just three blocks will do it and it will just make it look as though that the diamond armor has a shimmer to it so we’re just going to have something which should look like this oh we’ve also got To just fill the band in at the top of the helmet just in the front like that so you’ll now be able to see that steve is actually missing a little something so it’s quite easy to do this now fill in the remaining area on the left And right hand sides of the head the exposed portions using brown concrete this is going to give steve here and that will also simultaneously fill in the remainder of our statue so there’s only two things that steve is missing now other than well i mean most of his internal organs He’s missing his arms primarily so grab yourself the light blue concrete and on the right and left sides we’ve got to do the this identically um we have to place a row of take the top front right hand corner of the of the body here so just below the Headline and place a row of one two three four light blue concrete extending right we’re then going to continue extending right by two using white terracotta one two and then go up one right one and then up by seven one two three four five six seven and Then we want to go right by three one two three and then we want to go down by eight one two three four five six seven eight and then we’re going to go left down left down left down then we’re going to extend left by two And what we would then have right here if i was smart enough to place it in the first place is we would have a row of light blue concrete that actually extends down from the corner block that we started with extends down in a row of Three and then would meet us but we can then extend that light blue concrete to the left connected to the statue and then upwards to k to create its very own shape like this and once you’ve done that what we can then do is take the square that we’ve Made we can extend the corners back by three one two three one two three one two three one two three and then we can join all of the corners together like this and then we can copy the same white terracotta shape that we have so we just want to have the exact same Here we go so we want to have the exact same shape on the uh on the back as we do the front and later on we’ll just be filling this in you can even if you if it will help you you can even like connect the corners together a little Bit as well and there you go kind of like steve he it kind of looks like he’s in kind of like a victory pose at the moment little does he know that he’s going to have 50 million tons of concrete and grass suspended above him So now what we’re going to do is come to the opposite side of the statue and we’ll do the opposite arms so it’s the same it’s just opposite so we’ll take the corner of the chest and we’ll extend outwards one two three four this time we’ll extend down by three one two three We’ll go to the right we’ll join up we’ll take the top corner of the arm here and we’ll extend left by two using white terracotta one two up left and then up by seven one two three four five six seven left by three one two Three and then down by eight so one two three four five six seven eight and then we basically just have to extend writing down until we line up with here so right down right down right down take a look it does so we can extend connect like this we’re then Going to take the light blue concrete square and we’re going to raise it backwards each of the corners back by three and then we’re going to join all the corners together just like this so here here here and then we’re going to place the exact same white terracotta area Just behind us like this perfect so almost there nice nailed it so we’ll have something which should look in all like this so very very happy with this actually it’s actually kind of like an awesome statue it’s almost as if like steve’s had like a victory he’s you know He’s kind of like flexing his biceps he’s uh he’s looking pretty happy with himself right now so what we then have to do other than fill him in quite obviously we have to add a little bit of uh again kind of like shine to his armor so we’re going to use White concrete for this and we will start with his back so in the back all you’ve got to do is just every every so often just place a little bit of white concrete so perhaps in the top corner here and perhaps a little bit in the opposite Corner at the bottom it doesn’t have to be a lot it’s just a little bit when it comes to the boots i’d recommend for the boots it’s quite easy just to add say like one spot of white concrete in every in in like one of the corners at The bottom of the boots if you just add a little bit of white concrete like this that’ll actually do it perfectly so like here for instance you could add it just all the way around the left side of the corners like this and then that will do You don’t really have to do it so much for the legs because it’s kind of a small area we already have some for the chest i’m not interested in adding it for the shoulders there’s some in the helmet that’ll actually be more than enough detail so later on we’re not doing this just Yet fill the armor in with block of a block of diamond that will be done fill the arms in with white terracotta that will be done we don’t have to fill the top of the head in because what we’re now going to do is give steve His burden which is going to be holding up our house so here’s the thing if you have access to bedrock it’s kind of cool to use bedrock as the very base of it i mean it’s in the name bedrock but if you don’t have bedrock stone is a good Alternative but i have bev rock um you want to create just start off with a big rectangular shape on top of your entire statue so if you just place a giant rectangle of bedrock all the way just on top of your statue kind of like outlining it almost so like You know from each corner of the arms extending backwards along the top of the head all of that you guys get the idea extend it forwards and backwards and across just like this then you’ll end up with this shape so it’s not a bad shape it’s just a little Tan boring really isn’t it so all we can do from here is we can extend the sides out by an arbitrary number really maybe just like maybe by like one or two we can extend the sides out and i’d recommend shaping it a little bit so this is going to be different for Everybody because we’re not going to be going through this block for block necessarily so extend the sides out and then shape it a little bit maybe turn it into a little bit of a disc shape so then on the now that we’ve got kind of like an outline of our bedrock on the Front of the bank we’re going to add rows of bedrock and we’re going to add two rows of bedrock one that is three rows shorter on both sides as it extends outwards so like leaving a gap of one two three so that block needs filling in and we’re Going to add two rows of this so we’ll leave a gap of one two three and then a row of bedrock extending right and leaving a gap of one two three like this so it will give us kind of like an oval shape and the entire point of it is just so That it looks a little bit more natural as unnatural as this house is this house statue is kind of both simultaneously as unnatural as this is it kind of gives it a bit more of a natural look so now that you’ve got one layer of bedrock and i Don’t think that there’s any reason to add any more but feel free to um we’re just gonna add a layer of stone that is above and around the layer of bedrock so you guys might even be able to see where this is going you might also want to Make this a little bit messier although perhaps that’s a technique um for a little bit later in the video but and you don’t have to be so um you don’t have to make sure that it’s 100 perfect because the idea this is the idea right with the statue The idea is that steve is literally holding up a giant chunk of land with your house on it so i i highly doubt it’s possible that steve ripped out a nice smooth chunk of land gonna gonna say that that would be unlikely so it would make sense if some Blocks were a little bit sloppily like that one placed it would make sense if some blocks melded together so if if there was a little bit of bedrock mixed in with the stern a little bit stone mixed in with the bev rock grass mixed in with Either of them maybe maybe you went so far in into such a weird dimension that you have some end block in there i don’t know i’m just spitballing here but the idea is that we want to have kind of like a little platform of which steve has Ripped her house from and it can even be a little bit jagged underneath you guys get the idea right so we can have that and when you’re eventually sick of your layer of stone the idea would be to build up layers of grass okay so here’s the thing i have grass right um Dirt would be better for this layer really i suppose like a few layers of dirt and then the top layer or top couple of layers would be grass also depending upon where you’re building this you’re not going to have any bedrock and you probably won’t have Grass as i’m pretty sure you can only get in creative but the idea still stands stone and dirt will do just fine although you know dirt will eventually i think turn into grass given enough time um so this that’s exactly how it wants to go We want to build less and less and less and layers like this eventually as it reaches ever higher and at a certain point you’re going to be quite happy with it so i i would highly recommend like taking and taking these blocks here and you know just messing them up a Little bit maybe even add a little bit of grass i mean you know however however you want to do it you’re going to want to make it look or at least i would you you’re going to want to make it look a little bit more rigid a little bit more jagged it looks Better if it’s not just a smooth platform so anyway you build it up ever higher and eventually once you have completely filled it in once you have added your platform once you’ve filled in your steve’s statue once you have added a house on top of your steve you’ll end up with something That should look a little bit different let me show you here’s one that i made earlier so this is steve holding up the giant chunk of land that actually looks as though it’s been ripped from the ground you can see that we have all of the blocks that are Kind of like extended out from it and down like in a more natural way than just kind of like smooth slabs as we kind of had and i actually placed a mansion on top of the area so do feel free to place anything that you do want To have on top of your platform i’ve just have this kind of like mansion that i’ve made if you want to make this exact mansion i’ll actually leave a little link in the description for you that’ll be on my main channel but um any sort of house That you want to have on there it’ll look fantastic it doesn’t matter which one you choose if you want to make something bigger than what i have there then obviously you’ll have to make the platform bigger but you’ll be able to do that no problem so that’s steve Burden by holding up your house which you get to live in oh also i should probably show you how you get up to your house i don’t think that i’ve shown you guys that yet so if you place a door on the back of one of the legs it actually Doesn’t really matter which it is you can actually make a tunnel that will take you all the way down or all the way up and down technically it goes both ways it will take you all the way up from the ground all the way up to the tippity top of your house so Quite literally you can build the ladder system all the way through steve himself all the way up through his leg up his body through his head and then through the platform and it will take you to the top of the platform so that would be how you would get up and Down but that’s it i do hope that you guys enjoyed this tutorial if you did please do remember to hit that like button i’d really appreciate that helps me in the channel out loads and loads if you’re new around here please do consider subscribing clicking that little bell next to the subscription Button that will ensure that you get all my videos sent directly to your sub box and if you do want to make anything else by me check out the card system description below and the top of the comment section for more thank you so much for watching i love you all very Much and i’ll see you guys in the next one goodbye You Video Information
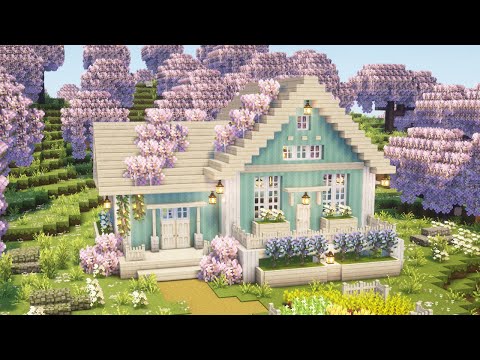
This video, titled ‘Minecraft: How To Make a Pro Steve Holding up a House Statue Tutorial’, was uploaded by Building Every Block on 2020-06-29 15:00:00. It has garnered 421469 views and 3047 likes. The duration of the video is 00:25:42 or 1542 seconds.
In this tutorial i show you how to make a Pro Steve statue clad in his beautiful diamond armor holding up a huge chunk of land. (i also placed one of my main channels modern mansions on top of the dirt which can be substitued with any structure of your choosing)
Cartoon House Playlist – https://www.youtube.com/playlist?list=PLbl9rZ8kEiF-BnnrouT0oeDpZt_HEyzKh
#Minecraft #Cartoonhouse #Minecrafttutorial


![🔥HUNT DRAGON NOW! 🐉[MINECRAFT ADD-ON] #ADSA](https://img.youtube.com/vi/pmoP3_R4czw/0.jpg)