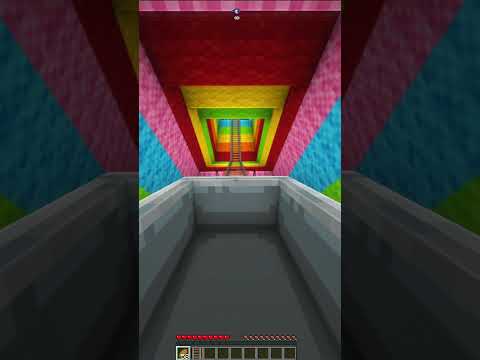
Hello guys it’s me your friendly neighborhood pack maker today i’ll be teaching you guys how to make a custom sky background for your texture pack and note that you will not be able to do this on mobile you can do solid colored backgrounds but nothing like like this custom background Um or like sky that i found on the internet uh because the programs that i’m gonna use and only work for pc to make a sky you’ll need three things uh first of all you’ll need a sky obviously secondly you need this cube the sphere program Um which i’m having a very hard time finding a download link so i’ll just maybe send give you a zip file with the installer in it and you’ll also need paint.net you can use a free version or you can just buy it because it’s a pretty cool program but The free version will be more than just enough um and yeah that’s about it alright so step one um in making a custom background is you’re gonna go into the environment folder in your pack if you’re using the default minecraft vanilla resource pack um that’s just gonna be the same folder Just textures environment and you’re gonna make a new folder called overworld cubemap next thing you’re gonna do is you’re gonna rename your image that you want to use for the background uh into cube map the extension doesn’t matter just change the image and and you name it to Cube map that’s going to be way easier later on when you’re going to have to rename stuff next step is you’re going to click on open on cube the sphere and get the uh background that you’re gonna use for this guy uh let me just go in here there we go This is it are you gonna open it that’s what it’s gonna look like uh now you’re gonna choose a resolution to use for your background now note that if you’re using a 4k image which i recommend because that usually works the best because the program has to make these huge squares And it has to sometimes duplicate pixels if you choose a too high of a resolution if you have a 2k image don’t choose um this 2048 um resolution you can choose the 1024 but only sometimes if it’s like a really simple image and doesn’t have like all these lines and stuff um Otherwise i would i would recommend 512 that’s also um usually the best um for fps wise um it’s not gonna like your device too much especially for mobile devices if you make it too high of a resolution sky then it’s gonna unlock the players too much and they’re gonna Have to turn off the sky you can also choose a custom resolution but i don’t recommend that because sometimes uh when um cube the sphere does the squares it has like white lines on the edges um because it can’t render that much so i just recommend to keep it one of these set Um default options next you’re gonna click on file again and you’re gonna click on extract all and now you’re gonna like keep these features under every single um square of the background all right there we go keep the sphere is now done you can now close this up and here You go here are your six squares if there’s one square missing you’re gonna have to delete all these um or what you can do you can just open keep the sphere again and when you click on file you can um choose one specific square that it should render so if you So if one is missing you can just always render one specifically again or if one has like a render mistake or something like like huge white lines or something you can just render that one again now we have our six backgrounds you will notice that there are three images that just don’t look Quite right this one which has a clear line um going through the middle of the image you have this one which is like all like centered or something uh this is normal by the way in skies but it has also a slight line moving downwards And you have this one which has a line going upwards now you don’t want to have these lines uh but this is this is where paint down that comes into play so you’re gonna open these all with paint.net um let’s just open these all with paint.net There we go now what i’m about to do um requires a lot of precision if you do something incorrectly can just ruin your entire sky um so pay very close attention if you want you can just slow the video down or on every single effect that i click I’m going to say which effect i’m using just so you know what i’m doing but if you want you can also just slow it down to know where everything is on the screen okay so first of all um you’re gonna click on rectangle select and you’re gonna zoom in quite a bit And you’re gonna make sure that you choose um the right half of the image where the line goes down just the right half don’t choose the left half the right half there we go now that now we’ve got that selected and you’re gonna click on copy You’re gonna go down here and click on add a new layer paste and click on layers up here not image layers flip horizontally paste again and now it looks like this now you’re going to move this layer so you’re going to click your mouse and drag it down and you’re going to Click on the bottom image now you’re going to go on eraser you’re going to um choose a pretty big brush brush with a hundred is good if you have a higher resolution image um higher is obviously better yeah i’m going to choose this you know and put the hardness all the way down And you’re gonna and have these two things on you’re gonna have anti-aliasing enabled and anti-aliasing selection quality on now you’re going to zoom in again because this line is just barely visible on my screen it’s pretty bright in my room i’m now going to just um click on the eraser and just slightly Go over the line just slowly go over it and you can just move up and down too if you want there just slowly do that and now the line is just entirely gone you you cannot see any sign of a line anymore so that was the simple part now you can also click On merge layer down you can also just do that later when you’re done with every single image just do it now because sometimes i forget and when you want to save these up it saves it as a pdn pdns um they won’t work um for so they don’t work as backgrounds only pngs Work and at this point you might be asking well why are these called bmps you’re going to rename these later so don’t worry don’t rename them now we’re gonna rename them later um we’ll do that later that’s that’s unimportant right now okay so now we’re here in the second Image and you’re gonna do the same thing that we did with the first image um you know again select half of the image from the line like you can see in the middle and click on copy make a new layer paste it flip horizontally paste again move down click on top one Deselect eraser and erase boom now this one i’m doing this a bit faster just for the tutorial you can obviously take more time to do it you can also turn the eraser like way up and like make sure that you do it like really well um like you can make like the slightest Um change like if you want a really good face then the higher you go the better the fade is going to look but this since since this is black on black it doesn’t really matter that much also i mean sheen just turned on which i do not appreciate i’m recording a Youtube video smh priorities first um okay so now the line is completely gone um again like if you you can also use like a really small eraser and and try to make the line really thin thin lines do not look good believe me like look at look at how bad It looks thin lines don’t look good i recommend don’t go too high and don’t go too low on your width um choose something good in between um like any don’t waste too much time on this by the way because this is not going to look the best either way So you don’t have to worry about like perfecting every single pixel or stuff don’t don’t go crazy over this just a minecraft sky okay so now we’re on the last image again you’re gonna um choose one half of it the right half i’m gonna select it with your square selection And then click on copy create a new layer paste at the merge and flip horizontally and paste again drag down click on the top one deselect eraser and erase and boom that already was it i think yeah i really lost it okay epic okay so now you have all the annoying um Skies with the lines done um but but you can’t just like have these in here you’re gonna have to paste these uh in the cube um overall cube map folder um just like drag these on here or um copy and paste these in here um there we go Now they’re all in the overall q map folder um now i wish we were done but we’re not done in fact um the hard part is coming you’re gonna have to rename these um into numbers and also change the bmp to png so uh first of all um i’m gonna in the Pin comment below i’m gonna have um what numbers every single um name has to have so right is gonna be one front is zero um back is um two if i’m not mistaken then left is three um top is four bottom is five if i’m if i’m correct but let’s start with Front um let’s change this to zero dot png um click on yes because we want to change that right is to be m01 png yes and then back it’s going to be 2 2 png yes um left is gonna be three dot png and now it’s just gonna be the bottom One which is gonna be five dot png and it’s the top is gonna be four dot png four dot png um all right now i’m gonna be done with this guy um i’m gonna show you what it looks like in minecraft uh but there’s one more thing that i want to Show you um which is how to um make some skies that are a bit more complicated um because of like how how cube the sphere rendered it so right here right here i have an image um from the sky um which it looks terrible more than just Terrible like you have this like line going down here and like in images like these where it’s graphics and it isn’t clouds and and um i can show you right now if you were to erase this with a with an eraser it wouldn’t look that great it could still look Nice but the thing is that um like like um some other colors will like merge over it’s just not gonna look fantastic you can do it don’t get me wrong you can do it but it’s not going to look fantastic it’s not going to become the best energy they cost that possibly Could become now i’m going to show you what i did um this is the result that i have as you can see right here this is like basically the perfect image the perfect equivalent um let me just open this up and paint um actually it doesn’t allow this File let me just click on copy a new okay paste there we go now i have them both in here uh now you can see um boom you can see that this one is basically perfect this one is imperfect disgusting ill um now what i did here What i did is i took paintbrush i took paintbrush i clicked on the color and i’m going to set it way lower this is way too big and i just basically went over all the mistakes in it and i also with the paintbrush um you i i Chose i mean you can choose any resolution as long as you have nta listing enabled and selection quality and enable because that that creates this this like blur when when drawing a line i’m going to make it a bit bigger there we go it creates a blur when making a line And that makes it makes it look natural in this image now this blur is a bit too big i’m going to um go down a bit um i know h because because the hardness is all the way up all the way down i mean uh now i think it should be Uh it’s a bit better this is not the best obviously i worked with a smaller with a way smaller paintbrush that’s why it’s way sharper um on the other image but that’s basically what i did i just covered covered all this up manually this is a lot of work especially on paint Um but it’s definitely more than just worth it um i can just like hang on let me just select this stuff real quick and just Okay so as you can see here i made a very good transition now with the paint brush uh i did it a bit different right here but still this looks pretty good um same thing with all this other stuff um i just like covered it up with with the color Um and yeah no i it took about 30 minutes but you can like if you if you take your time you can make the background look very good if it doesn’t look nice um so yeah that’s that’s how to like make make make these ugly lines right here Um into into something a bit more pretty but yeah guys that was it for the video i hope you guys enjoyed if you did do smash a like and subscribe because i would really appreciate it thank you guys for watching and i’ll see you guys tomorrow bye Video Information
This video, titled ‘How to Make a Custom Minecraft Sky!’, was uploaded by Chr7st on 2020-08-19 17:59:38. It has garnered 41885 views and 911 likes. The duration of the video is 00:14:05 or 845 seconds.
A Tutorial on How to make a Custom Bedrock Sky! Stuff you’ll need: CubeTheSphere: https://cubethesphere.software.informer.com/1.0/ Paint.net: https://www.getpaint.net/download.html Wallpaperflare: https://www.wallpaperflare.com ═══════════════════════════════════════ 🔎 Minecraft Settings: – FOV: 100 – Sensitivity: 25 – DPI: 1200
════════════════════════════════════════ ⚔️ Texture Pack: 1. 8x Redemption – https://mcpedl.com/8x-redemption-pvp-8×8-pack/?cookie_check=1
══════════════════════════════════════ 🕹️ Social Media: – Discord (Social Media I guess??), MichaelBricks#4477
════════════════════════════════════════ 🎵 Song: – Nothing
I do not own or take credit for any song. ════════════════════════════════════════ ✅ Other/Credit: – Ranked Eggwars ~ https://discord.gg/Pr8VhGs
════════════════════════════════════════ ツ Teams:
════════════════════════════════════════ 🎮Tech: – Mouse: Glorious Model O – Keyboard: Ducky One 2 Mini -Microphone: [Nobrand]/Similar as Rode NT1