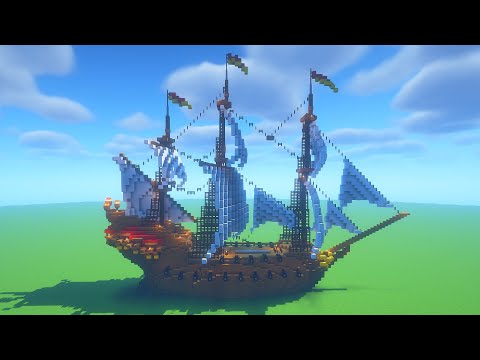
What’s up everyone how you doing a blue nerd here and welcome back my friends to another minecraft tutorial today we are back with the ship builder from our medieval docks and guys this is gonna be a pretty big build and there’s a couple of things i just Want to quickly go over before we get started so the first thing is i have made a few changes so the ship might look a bit bigger but it’s actually the same size it’s just because i’ve enlarged the sails a little bit and i’ve made them white so that you guys can Just either do them in white wall or you can make your own colors up as you go along now the ship as you can see the cells are up so this is a docked boat um this isn’t for out in the ocean unless you want it to be anchored down So this is just going to be a dock boat for the moment now also guys it’s a pretty big build this is a 45 by 19 block space you’re gonna need to build this one and there is a small chance guys that while i’m building that i might make the odd Mistake in this one and then i have to go back later on maybe and correct it now if i do that guys you might want to brief the video first to avoid yourselves having to go back break something and rebuild it so you might want to just go through the video first And just make sure that i don’t go back and make some changes because there’s a lot of blocks a lot of different angles and stuff like that in this one so there is a small chance that i could make a small mistake now with that being said guys let’s take A quick look at the blocks we’re gonna need to build this one okay guys for this build you’re gonna need a spruce door some spruce planks stairs slabs trapdoors and fences some stripped dark oak logs dark oak planks stairs and slabs some oak planks stairs and trapdoors some smooth stone blocks some Cobblestone wool iron bars and some glass panes of your choice some white wool or whichever color wall you want for the color of your sails so go ahead and choose any one you want and then just some decorational blocks for the ship so i’ve got some note blocks a Cartography table and some barrels and then just some ladders as well so that we can make a ladder up to the little crows nest at the top and with that being said guys let’s go ahead and build this alright guys before we get started as you can see the blue marking here this Is where the water level is going to be so you want to bring a pillar up from under the water and then once you get to the top of your water here you want to place one block above the water like so and that is going to be our starting Block okay and it’s going to be right in the center here of these five windows that we have on the main bit of the boat here okay so we’ve got these two here but on this one piece of sticks out we’ve got five windows we’re gonna start Right where that middle window should be okay so go ahead and do that get your first starting block and then we will start from there right guys once you’ve got your starting block and your one block above the water here you want to go one two three blocks On this side and then three blocks on this side making it seven in total okay then we’re gonna place a block just in here for the moment and go one two we can break that one behind then we’re gonna go in place one here and then go one two again and we can Break that one behind then we’re gonna place one here place one there break that one and then bring this one inwards like this okay so we should have two two and two and then seven for this one here now around here we’re going to do the Same thing on this end so place one there and then we’re gonna go five blocks so one two three four five and then we’ll break that end one then we’re gonna go with two so we place one there and then go one two break this block here Then we’re gonna place one here place one block there break that one behind and again one here and then we’re gonna go one two three four and then we’re gonna break that one there okay now that is one half of the ship we’re gonna have another piece through the Center here which is gonna be where the dark point is for the for the uh center of the boat okay so what we’re gonna do is come to the back here we’re gonna place a dark oak plank there then we’re going to use our spruce again and basically repeat the same pattern on The opposite side but reversed so we’re going to go two like that then we’re going to have two there another two then we’re going to go seven so that’s two three four five six seven and we’re gonna place one there and we’re gonna go one two three three four five Break the back one then we’re gonna come in and do two then one and then place one there and then we’re gonna go four just like so okay and there is our pattern for the boat right guys once you’ve got that done let’s go on to the inside here now this Is where it will be awkward if you’re doing this in survival because what you have to do is put one here one underneath and we’re gonna have to start working down under the water now okay because this would be above the water level this would be the water level here okay So bring seven across like this so we have matching up with the seven that we have there then we’re gonna go one there and bring two over we can break that one for now place one here one here break that one and bring another one over here okay and Then the next one should be the center block so we’re gonna leave that as it is down this end here we’re gonna place one there temporarily and then we’re gonna go one two and three break that one at the back then we’re gonna place one here and then go one two three four Break this one here and then finally place one here and then we’re gonna go um one here break that one and then underneath here place one there so we have two okay so on this next row here you’re looking at two four three seven two and two i want to basically reverse It and repeat it onto this side over here okay so if we come down to the very front now we can go underneath where the uh four at the front here is placed one underneath then we’re gonna go one there to make that two brace one there one there break that one And we’re gonna go one two three we’re gonna put one behind it one over two three place one there one over and bring it down seven one there place two behind it break that one one there one there break that one and one over like so And there we go we’ve got the next layer in place okay now we’re gonna go further down again so this time we’re gonna go down and again guys here remember you’re gonna be underneath the water so once you’ve got this area in you probably want to try and use either sand Um and then you can dry the water out or use some sponges but you want to make sure you get the wood in place first and make sure there’s no holes so the water don’t leak back in so let’s get this face in first so for the next one Find the center here of this seven block long one and then you want to place one on the lower one there and then one underneath break the top one place one two and then one and two okay so we’ve got five this time now going towards the back of the boat We’re gonna go one like this okay so we’re diagonally in from one so there will be a gap there for the moment then we’re gonna go in by two and then one on that corner just like that okay just a little twist right that’s perfect now down to the Front here place a one right there for the moment and then we’re gonna go one two break that one there place another one there and again we’re gonna go two blocks break the one behind and then here we’re gonna place one here and then we’re gonna go one two three Four like so and break that one behind now we are in the center guys but we can uh that we don’t need to worry too much about that at the moment this is just for the shape now again we want to reverse this onto the opposite side of the boat so here We’ve got the one already in the center so let’s go one two and then one down diagonally to bring one in and in fact what’s going we’re wrong net this let’s do that again place one here then one in okay because we need that two block gap like we’ve got there Then we go in by one in by one again and then two three four five then we’ve got two so let’s place one there one two break that one two again so one there one two break the back one and there we go okay that gives us the shape for the Bottom of the boat so here guys what we’re gonna do is where we’ve got these seven let’s place a stair upside down there and a stair upside down there and then we’re gonna run the upside down ones across and join it like so and then on the opposite side Do exactly the same thing on the seven long one so one there one there and then bring it all the way across now guys i’m gonna try and remember and keep this all the way it needs to go but there’s a chance here we could make a Mess up so ignore the top ring for a minute and that second ring where we started let’s go a stair facing towards the back of the boat then we’re gonna go a stair facing inwards to the side and then one to the back like so yeah now we’re gonna place one on this Side matching up with there and again we’re gonna go around to this side here one to the side and one inwards like that this place a plank there and a plank there and we might as well just place a plank in the center for the moment Now down to the front of the boat down here we’re gonna place a stair that way okay so we’ve got these seven blocks here so we’re on the next one across then we’re gonna place one there and then one that way okay here we’re gonna place one uh sorry one inwards like that One sideways one that way okay just like we did on this piece here and then this one here let’s place a stair there and then a stair there as well facing towards the front okay so i hope that makes sense guys it is a little bit confusing um but Hopefully it’s easy enough for you guys to follow along let’s go around to this side and we’ll do the same thing so there’s the front of the boat so we’re going to place a stair going in sideways and then inwards inwards again sideways and then inwards and then inwards and inwards perfect Okay on the top ones here guys we’re going to go stair stair stair and a stair like that okay all coming down from the front of the boat and then at the back we’re gonna go stare stare stare like that and then stare stare and stare Right guys for the next layer here what we’re gonna actually do is we’re gonna actually place two there one there five across here two there two there and then four across there okay so basically just doubling up the width of that bottom level again at the back here we’re going to go one Then we’re gonna go two five two two and four like that all the way across now at the very back here we’re going to place an upside down stair this side and this side of the five blocks on the bottom there then we’re going to place another upside down stair there On the side here we’re going to place an upside down stair there one there leave the center one for the second um yeah leave the center one and break that one and that one actually for the second we can leave those then here we’re gonna go a full a um a stair And then we’ll face a stair inwards then that way and that way and then again of course on this one like that okay so i hope that makes sense for you guys okay so now from this side here again guys we’re gonna place a stair and this Is facing towards the front of the boat there okay so we’ve got a stair there we’ve got a second stair here then we’re gonna go a stair and one two slabs and then in front of this one here we’re just gonna place a slab okay And if we come around to the other side here we’ve got a stair there so we’re gonna go stair a stair slab slab and then a slab on that one there and that should give us a little bit more of the shape that we’re looking for for the bottom of the boat now So what we’re going to do now is get our spruce planks and what we’ll do is say what let’s just go in there place two in here join these ones here all the way over so basically you’re filling in the floor for the boat so just place all of this in here Just like so and then what we do is we’ll get a dark oak plank in there and then we just cover two in there for the dark oak planks and one two three four in there for dark oak right now what we’re gonna do here is if We come underneath we’re gonna place in a plank right there so that’s right where the slabs are at the very front here let’s place in a plank there as well for now then we’re going to place a dark oak plank there we’re going to run that all The way down to the back of the boat right to there and then break that one at the end there and place one in there okay so we get this little bit of a groove and we will be thickening this up to make a bit more of a different peak For the front of the boat but let’s get the upper levels in on the boat first of all so that we can get sort of uh a full idea of the shape and then we can get the sort of extension through the center there in afterwards All right guys before we move on let’s just quickly get in a little slab just underneath here so where this stair is here the one that curves around so you’ve got a stair facing backwards sideways and then one faces back again place a slab just in front of that one And do the same on this side here which is that one there perfect and we did actually miss on this side we’ve done the stairs and that down this side so let’s make sure we go ahead and get everything on this side as well so stair stairs there and a stair And i think that is good we’ve got everything all in place all the way around now okay so now at the very front we’re gonna go ahead and place a slab here and a slab here and if we come down to where these seven bits where the bit that Sticks out on the side is at the most place a slab there and we’ll do the same on this side here a slab there then we’re going to get our planks and we’re going to go one two three four five six seven eight nine ten across like so again from this side here One two three four five six seven eight nine and ten okay now we should be able to place one here and then we’ll be able to place one on every other block like this and then on this end there’s two okay so one at that end skip one block All the way across and then place two just here okay that looks good and then we’re just going to put a block on top and then run a row all the way across to this one here let’s go ahead and repeat that on this side So if we start from this side we can place two here and then leave a one block gap between the rest one on top there and then bring it all the way down until we get to the top of that right guys i did make a little mistake Here so let’s just quickly go ahead there’s um let’s fill these holes in here for the moment okay and we’ll fill these holes here for the moment as well let’s fill those so now we’ve got that in place we’re going to go ahead and get a stair and We’re going to place a stair like that upside down just one above the slab and out over this side same over here then we’re going to place one two and one two just like that okay out down the back here we’re gonna place another stair here and another stair here and again we’re Gonna raise those by two as well and i think now we should be able to place one here so we’ve got one block there then go two three four and five and that leaves us two blocks there which is perfect so we’ve got five windows across the front there Over this side here this is the side with two so go down one block leave two blocks there then break one two three four and five and that’s perfect let’s place an upside down stair here i’m upside down stay here and we’ll do the same for this side here Okay that’s perfect in fact guys this stair isn’t here this stair will actually end up being one up so if we put a block there and a block there then we’re gonna put the stair there understand there okay guys for the next bit here we’re gonna place a stair right next to the Upside down stair there and then three more to bring them level like that then we’re gonna place one here one here and then one two three across the top there now that gives us an extra little window just there right next to the window here we’re Gonna put an upside down stair with a full block just on top there and then an upside down stair facing from the side like this okay and then let’s go ahead and repeat the same thing over here so four blocks across the front one here one here three across the top Stair just on the si on the level where the window is a full block on top and a stair from the side okay guys the next bit is pretty easy we’re gonna place two blocks in this bit here we’re gonna place one there one there one in front and break that one there And then just behind here we’re going to place a full block on that one i think we can get away that’s it let’s actually just connect those two there just to make a little full kind of pathway there for the window then we’re going to place a stair here And then a stair here a full block up here and then a stair facing outwards like that at the very top and then of course we’re gonna repeat that on this side over here so again we’re gonna go two blocks like this place one block there one block there And there we can break the middle one and then join those up there and stick one extra outwards like this and then we’re gonna go a stair a stair and then sideways there like so now the next bit of the front here guys is going to be a stair this way and then A stair that way okay and then it’s the same again around here we’re going to go stair and then a stair like that okay so now we’re gonna do is go one two three blocks like this with a stair on the front then one two three blocks here with a slab on top Then we’re gonna go one two three blocks with a sideways there and then a slab like this okay and then repeat that on this side here so we’re going to go a st a block right next to the stair two free to bring it out just level that one Below then we’re gonna put a stair again where this stair is here one block two block three block and then slab where that stair is there we’re gonna go one block two block three block then a sideways there and a slab in front of it All right guys so for the next bit here we’re going to actually come right down to the bottom here we’re going to break that slab and turn it into a plank and then we put that’s going to put a slab break the stair here that’s going to be A full plank and then a slab here like so let’s do the same on this side so go ahead break that slab put a plank slab break the stair put a full block and then a slab oops wrong one slab okay just to give us a little bit of a Smoother transition up at the front here okay now we’re gonna place two blocks here like this and then two more in front like that and again we’ll do that there just like that to bring that out like so and then place a slab on the front of those two Right guys we’re just going to slightly change that actually we’re going to go ahead and break that slab there and that slab there so where these stairs are here you want a full block and a full block like this okay then the slab goes underneath that one Break these two slabs and then put a full block like this and then i think let’s see how do we go then we’re gonna go a slab there a slab there and then one more slab underneath that one there okay that’s looking a bit better and Then i think here we’re gonna go a stair and a stair like so let’s get our blocks and place three blocks here and three blocks here like so we’ll place another stair on front like that and then again we’re gonna do the same thing so three more blocks stare on front like that And then the very top here is going to be slightly different so we’re going to go one two and then stick one out extra by three so one two and three the extra one slab and a slab so we have something a bit like that right okay what we’re going to do let’s Place two full blocks here okay of the spruce planks like that right next to where we’ve got the stair on this long section then for a second what we’re going to do is just place where we’ve got this area we want one block just in Front for a second and we want to upside down stair facing backwards and then we’re just going to run stairs all the way back and join up with that like that okay and then on at the last day here we’re gonna put a slab and then we’re gonna put planks across like so Let’s do the same thing on this side because we don’t do too much without confusing ourselves so let’s place two full blocks here one block in the front of that one and upside down stair heading backwards then we’re gonna bring the stairs all the way down like this There’s a slab here and then four blocks across like that right okay for the next bit guys let’s get our planks we’re gonna go two blocks here right on top of this stair okay so now we’re at the back of the boat here and then we’re gonna put a stair here And go one two three then a stair then we’re gonna go what actually one two three one two three and then a stair on top like so okay and then this is gonna be i think where the window is so we’re gonna go one there one there like that and that’s gonna be The window and then we can just connect it across the top like so okay let’s do that on the opposite side over here so let’s grab our planks we’re gonna go one two and then a stair then we’re gonna go one two four one two and then a stair on top Then on top of this one we’re gonna go one two three then we’re gonna go one two three again a stair on there we’re gonna place a block here a block here and then three like that to cover the top like so okay right let’s put a stair here and I’m going to put a stair here just like so and i think that is looking pretty good all right guys before we move on i did made it like a little mistake there let’s break that stair there and that’s there there we’re gonna place a full block on top A full block on top a stair here and a stair here upside down okay and then that way we should be able to do our next little bit of um sort of like a railing like this that will come around at the top here okay so let’s Just place another one and i think it might be two blocks like that and we’ll do the same around here one two right okay guys for this next bit we’re gonna place two blocks here two blocks on top an upside down stair then we’ll place one block on top uh with another Block on top of that then we’re gonna go a sideways stair like this and then two blocks on top like so okay then at the very top here where the first block is place a stair facing outwards and a block on top like this and then at the very back here Place two more blocks on top of there now onto this side here let’s do the same thing so we’re gonna go two then two place there one block one block stair no sorry stair facing like this block on top stair facing outwards one two one two right guys i am slightly struggling on Getting this next bit right so just bear with me first of all let’s place a block behind this stair here okay and we’ll do the same on the other side then we can place it one towards the back and one underneath like this okay now we’re gonna put in a Stair upside down like this and then on top of this we’re gonna go one and two one and two and then join them together across there in the middle let’s go one and two okay so we’re gonna put an upside down stair there and then two normal stairs like This okay for our window at the very back then we’re gonna put an upside down stair in there right okay guys we’re gonna come to the inside now and behind these two stairs let’s place three blocks like that and then three blocks in here like so Then we’re gonna go one two here and one two just there then back on the outside here we’re gonna come into here and i think we’re just gonna go and upside down stair that way that way and then one in the center like that just to finish off that piece of the Window there and i think that is actually looking pretty good um i think this one here we’re going to face that one in sideways and this one here face that in sideways and i think it might look better we break those two and put some full blocks across here and Then we can go three stairs underneath like so right okay now above the windows here we’re gonna come over one and place five upside down stairs like that okay and then we’re gonna place five four blocks on top perfect okay so now in the center for the minute I’m going to actually not say now we place a temporary block there and then the same on this corner here and we’re going to place two stairs like this two stairs like this break that one and break that one and a slab in the center now again we’re gonna actually place Another block there temporarily and another one there and then have two stairs like this break that one two stairs here and break that one right okay now so for the next level here guys what we’re gonna do is place again a temporary block there and we’re Gonna go one two stairs like that and we’ll do the same thing over here temporary block two stairs break the one behind it like that right so now let’s put a stair a normal one on there and a normal stair on this side of two okay just to kind of smooth the transition Onto the stairway now again over here guys just put a temporary block there i’m gonna go one two three and then a normal stair there and break that one over here again temporary block one two three upside down stairs and a normal one like that break that one at the back Okay now first of all guys let’s go ahead and get our dark oak block and we’re gonna place one here and one actually no we just leave that as it is and we’re gonna put a stair and a stair okay and then i think right in the middle Here we’ll go ahead and use a stair as well and then we might as well finish it into this final bit with a full block just like that um i’m not going to bring it out a bit i don’t think we really need to if you Wanted to you could bring it down by one so you could have the full block here if you wanted it just to have that little bit more of an indentation so you could do something like that go ahead and put that in stare just there and then some full Blocks like that just if you wanted it to have that little bit more of an indentation um but i don’t think you really need it but it’s uh it’s entirely up to you guys if you wanted to run it all the way up you could i mean like i say you could Bring it up to here like that and then have you stare about there maybe even one one further down which probably looks a bit better actually to be honest with you let’s break that stair there and let’s put a slab and maybe a second slab as well Just to bring a little bit of a nicer curve in right okay guys so now let’s just get the rest of our radians and part of the front of the ship in now so what we’re going to do is place a block on top of this upside down stair here And then we’re gonna place one two three upside down stairs leading backwards to finish off the rest of the banner there and we’re gonna do the same over here so one block there and then one two three upside down stairs okay right now that we’ve got that in place We’re gonna actually um i’ll tell you what let’s actually place a full block there with a slab there and then a full block and a slab there oops make sure that’s a slab and then we can actually break that block then add in an extra stair and an extra stair Just makes it look a bit longer i think right okay so now here we’re gonna actually start bringing this just up a little bit so let’s go ahead and place a block on top of all of this edge like this okay we don’t need to place one in the Corner pieces here just on the outer edge and we’ll do the same over here so let’s go ahead and go one there across there and across there like so and where we’ve got our slab let’s go ahead and actually just put one in there as well Okay now get your spruce slabs and we’re gonna go one two three like this so one on that four block on the corner right there and then two three that looks pretty good and then we’re gonna just place a slab on there like so and i think we actually place a second Slab and one underneath just to make it look a bit smoother let’s go a slab there there and there okay so now we’re gonna go four blocks across the wrist just like that and i think we go something like that that a full block and then an upside uh then A slab on the top so upside down stair full block full block and a slab and then right at the very front here guys just place a full block and then a slab poking out like that and i think what we’re gonna do is change this bit down the bottom here so Break the block on the slabs here and put in a stair maybe like that and maybe a slab instead of a full block underneath it yeah that looks pretty good right guys i do apologize what we’re gonna do is break this layer off the very top front part of the boat here Just break this layer this is a little bit off and then what we’re gonna do is break these two slabs here and these two slabs here and then we place two there two there in fact three bring it all the way up to the front a slab there a slab there Then we got one there one there and a slab there and a slab there okay just to bring that sort of a bit more at a better level now for the front of the boat here where we got these slabs let’s put some full blocks across like this let’s go for Let’s go for four of them at the moment okay so the first thing i want to do is create this peak that comes out here now the reason we need to do this first is because we’ve got to make sure that this can land on a full block okay If we don’t land on a full block and it ends up on a slab we ain’t going to be able to connect our fence and that’s very important for the look so let’s go ahead and we’ve got one two three four so now we’re gonna put a slab there Then we’re gonna go one and two like this so we should have three then we’re gonna go up by one more and then we’re gonna go one two three four five underneath here we’re gonna go two inside there and then one here one here one underneath that one there Okay and i think that should should do the job that’s about right now let’s start bringing this this dark oak piece down through the center here as a kind of uh the guide in the water so um let’s see we’re gonna start by going because it Starts to thicken up as it comes down so we want to go with a full block in there let’s put one behind another one behind that and we’re going to do is wherever we’ve got these stairs and slabs here let’s just put a full block by the start side of the stairs And the slabs like this all the way in just to fill that up now what i’m gonna do is go underneath here bring this dark oak planks all the way up until you reach this slab on the very bottom it’s the first slab on the end of the line And then we want to have a stair underneath it in the center there so we’re going to go a stair we’re going to place a full block another stair and then a slab and then make sure you’ve got a full block above it like this okay Now we just want to basically create a kind of smooth bit that goes arched up to that point so now what we’re going to do is we’re going to go a full block here and here okay we’ll go ahead we’re putting a stair here and a stair here And i think we can actually do that a bit better let’s go with a full block and a slab two full blocks here let’s put a full block up there and in fact no that’s that’s going a bit funny let’s break that one break that One we’ll have to go with a slab there so stair slab stair here and then we can put in a stair on there a full block and it’s still not quite as smooth as i would like about a stair a stair there in there that’s not bad let’s see if we can bring It in just a little bit it still looks like it comes out a bit too far or maybe we need to thicken this bit up here yeah let’s go for a slab there a slab there yeah that actually looks better actually like that and then we’re gonna break So we’ve got a top stair there one two break the third one the fourth one like that we’re gonna place in a slab just there and then this slab here will break that and we’ll put in a stair looks better but it’s still not quite as well as the Other one let’s break that one there let’s put in a stair there how does that look i think that looks better actually and that full block there we could change for a stair probably as well yeah that’s good i like that that’s looking good now that’s looking much better um Yeah i think that’s good i think yeah i think i think we’re gonna stick with that i do like that but it still looks like i’m very fussy guys i am too fussy let’s place replace that stair with a slab yeah there we go that looks much better Right okay so now we have finally got the outline of the ship in place and guys i really hope you have been able to follow along to this point okay if you have any issues please be sure to let me know in the comments and i will do my best to help you You can also come on to my discord and ask many questions on there probably a little bit easier talking on discord and i can also share pictures with you as well on there which makes it a little bit easier to explain things so be sure to check the link out in the description For my discord okay right now we’ve got that in place let’s start working on our platform so first of all we’re going to come on to the inside here and right where these little stairs are across here right one level down is going to be the floor so Let’s go ahead and just fill a floor level in all the way across and we’ll break out an area to get underneath afterwards so let’s go ahead and fill this in all the way across all right guys once you’ve got that all in place just come up to the front of The boat here let’s go ahead and just put in a few around this little edge like this and then we’re just going to grab our oak slabs and we’re just going to put a few of those in at the front here as well so let’s just go something like that just To create a little bit of shape here like so now these blocks here that i get seen they do get seen so let’s go ahead and let’s put stairs in that way like that so break those out put two stairs in just like so this one here can be broke so we can Replace that with a oak plank these ones down here we can break that one we can’t break that one though that’s where one of our windows are okay that’s fine so again over here let’s break that one and replace that with that and i think that’s probably good can we Do that one no and it doesn’t matter because these are gonna get covered up anyway right let’s go ahead break this one here and put in a stair like this and i stare like this which just gives a much nicer shape to the front of the boat here and guys i Gotta say i actually think i prefer the way this one has turned out then my actual one over here i think the front of it actually looks much better so i think maybe go two and two like that to finish that one up just break that One like that we could put one of those and i suppose actually you could leave that as a full one like that all right guys okay so for the next level what we’re gonna actually do is where the windows at the back here are break these five blocks across the top And put in your oak planks across like so then from the center count one two three four five six seven and then we just want to basically fill the floor all the way out until we reach that point okay all the way to there do the same over here Okay what’s down here we can replace that one with a full block as well just like that now what we’re gonna do is place two stairs here two stairs here and two stairs here and again the same here go two then go down by two and down by two okay Get your spruce planks and you can just place basically cover in the gap there so you are level with the stairs okay so there’s a block by the side of the stairs do the same here block by the side of the stairs fill it into there and we can just Actually take that one back if we wanted to like this okay now place upside down stairs across these ones okay upside down stairs here and here then we’re going to place oh how do we do this one again i think we’ve done a normal stair at the Top and then an upside down stair facing inwards like this and then this is going to be where we have our first pole coming up here at the very back for the sails now come to the very center of the boat here where the stair is and right where The upside down stairs here which is this block we’re gonna go one two three break the fourth one and then we’re gonna go actually no we’re gonna break the fifth one this one then break one that side one that side one there one there one there okay Just like that and then just put your oak trap doors all the way around the edge like so right okay guys so first of all we’re gonna get the poles in for these cells here so let’s start with this one at the very back which is gonna be right in This little gap here that we left so let’s go one there i’m gonna go two three four five six seven eight nine ten eleven twelve thirteen fourteen fifteen sixteen okay now staying in the center of the ship here on the other side of this hole here Where the trapdoor is go one block and then two block gap uh two blocks so leave a one block gap between it and go one there two three 5 6 7 8 9 10 11 12 13 14 15 16 17 18 19 20 21 22 23 And then over here at the very front here right in this little gap here at the very front place one there i’m gonna go two three four five six seven eight nine 10 11 12 13 14 15 16 17 18 sorry 17 huh one too many so we’ve got 16 17 and then 23 in the middle okay working on the top of the poles next we’re gonna go ahead and put in a smooth stone or you can even use polish andesite i think it works just as well then we’re going to go cobblestone wall polish dander site another wall Then we’re going to go two spruce fences and then three iron bars okay just like that and we’re going to do the same thing for these two so a smooth stone block or polysandocite it’s called cobblestone wall another another smooth stone then a wall two fences and then three iron bars And then we’re gonna do the same for this one over here again okay guys we’re gonna start putting in the connections for the sails so at the very back here on this back pole we’re gonna go from the very top here we’re gonna go down by three so one two three On the bottom half of that block put a slab and then place six out to one side so one two three four five six one two three four five six go one in and place a slab on top and one in and place a slab on top just like that Now on the middle one here we’re gonna have a two so let’s go to the very top and where the dark oak is go down by two blocks on the bottom half place a slab then one two three four five and then this side here one two three four five Okay and that’s all we need to do for that one now from the very top again go down by one two three four five six seven eight nine ten eleven okay on that level eleventh block down place one there and then go one two three four five six seven eight on this side Leave these two place at one on top of that one and then this side do the same again so one two three four five six seven eight leave the two on the end and place one in just there now on the very front here you’re gonna Come to the dark again at the front from the top block one two three four five down on the bottom half place a slab one two three four five six place one on top one two three four five six and then one on top of that one Right okay that is all of our posts all in place and ready to start getting ourselves in place but before we do that let’s go ahead and put in the little kind of um crow’s nest at the top here so let’s first of all grab our spruce stairs And what we’re gonna do is at the very top here on this dark oak um the strips dark oak log we place a stair there upside down low place one here okay make sure it’s facing backwards like that then place it one here and start wrapping it all the way around Once you get here we want one like that and we’re gonna leave the bit here empty because we’re gonna have some ladders going all the way down so if we quickly grab our ladders and what we do is from right there bring your ladders all the way down to the bottom All the way down like that and then at the very top here what we’re going to quickly just do just temporarily is place a bunch of slabs all the way around the outer edge these are only temporary we’re going to break those in just a second but it just makes it easier for Us to place our trap doors so we’re going to place one two three one two three one two three and one two three and then open them all up and then break the slabs around the edge okay and there we go we’ve got our little crow’s nest at the very top of The masts and i think that is looking pretty good now let’s get in our spri let’s get our spruce fence and right at the very front here we’re gonna go ahead and we’re gonna go on this one here i think okay so place a stair a fence there then Place one on top and we’re gonna start stepping them up like this okay so go um two at the front there then go up one on there and just keep going up like this one out one up one out one up and you want to do all the way until you Join up with the pole in the middle there okay guys right we’ve got that one connected as you can see we stair stepped it all the way up to the top here and we’re gonna just add one more in there like that just to make sure it looks connected Then from behind at the back here we’re going to go just up one more block so we’re one block below the top here let’s go one two like this and then we’re going to add a third one let’s go underneath place one here one two three go down one more one two three And join up like that and it depends where you want the curve to go you could put it there if you want it depends how you want it to connect but i think that looks pretty good okay right now on the side here where we’ve got this full Block let’s go ahead and place a fence there and then we’re gonna go one and two just like that let’s go down one one and two just like that then we’re gonna go over to this one go one two two three in a row then we’re gonna go down one out one One and two then we’re gonna go down one and join together like so then we’re gonna repeat that over on this one here again very simple so one two three then we’re gonna go down add another two another three underneath like that place three against this one here one two three Here like this and then we just want them to join up so let’s place one one down and then connect them up like so like that there we go okay right now the rest of them we’re gonna connect up a little bit later actually no we can get two in at the Back here so right at the very back right on this one here right where that stair is there so you come up the stairs it’s the block right in the corner there and the corner there let’s go one two three one’s already there two and three and Basically you wanna make a connection up to this point here okay and one on this side to this point here so it depends how you really want to do it it is literally one block over so let’s go up one more block making that one four then we can go one block here One and two and three one over this way one two and in fact let’s go one one there we go one over one there just break that one and then come down once more to this one that looks pretty good let’s go one more on top one more here one two And was it free i think it was three one on the side here one on top one on the inside one up and then one there and one there there we go that connects up the cells now we will be connecting one more up over here as you can see this one here But this is going to connect to the actual sail itself okay so we’re going to do that one after okay right so now getting in the cells now guys these are going to be dock cells like i said so this boat is going to be docked somewhere in a harbor or Something like that so the sales are going to be up now if you want to put the sales on yourself and decide how you want to do them or how you want to connect them that’s entirely up to you you’re more than welcome to but for me guys i’m going to do it Fairly simple so basically underneath here you just want to create a bit of a shape now for the ones over here you can see i’ve kind of just made like a little kind of sort of i don’t know like a sort of hanging shape almost as if like as if there was A big cell hanging down and just something’s pulled in the center to give it a little sort of hook okay so let’s see if we can kind of do that for this side so first of all starting on the corner i’m gonna go one there two Then we’re gonna drop down and go one and two maybe we’ll go one more go across by two then we’re going to bring it back up maybe about here something like that go across do the same again here and repeat the pattern for a minute and bring it over one two Two down this side and then two down again was it like that yeah i think that’s how it was don’t do that and then what we’re just gonna let you do is fill out the front of it like this just in front of the um in front of the hanging piece in front Of the empty spaces only like that let’s do the same over here and then here you could just kind of fiddle around with it so break some extra ones where you want to just changing it up a little bit if only if you want to though you haven’t got to Just to make it look a little bit more like it’s sort of sort of dangling down a bit properly um you know almost like the wind is just blowing in it even though it’s only sitting still but there could be a bit of a breeze just blowing in that just to Bring it out a little bit so we get something kind of like that for the sail here now for this piece going up here this big sort of um this big connection here where we have another cell on the front for here we’re gonna just kind of um just keep it quite Simple here so first of all let’s run some wall all the way up and then again you can just skip a block just so it doesn’t look like it’s folded on there perfectly place some down the side again now and again you can skip a block or just place them slightly unevenly Something like that then again this side will go up here maybe something like that just makes it look like it’s possibly sort of just been a little twisted as it’s gone up and then from here guys because we’ve got these big bits sticking down we don’t really need all these you can just Go ahead and break some of them like this something like that just to make it look a little bit sort of better and if you wanted something you can still just cover some of these if they look a bit out of place so yeah now so we’ve got that one in Guys we’ve got the front one in now do you all we got to do now is just make some big sales up for the other side uh so basically dangling us out up here here and here and obviously this one’s going to be a big sale so make this one Your biggest salad dangling this one’s going to be a little bit smaller and then the one at the back again maybe a tiny bit smaller because it’s the sound right at the back but try and judge it by the size that they would be so over here guys i’m not Going to do and let you know exactly how they’re placed but you guys can kind of see the idea because it’s a little bit awkward to show you so if we go down say free we could go say two one possibly even bring it over a bit more like that It’s just kind of playing around until you’re happy with the kind of shape of it really so you can put say some in here like that and then just put one on the outer edge here and start filling in the spaces one in front again so that it Looks like there’s a little bit of wind from behind blowing the cells even though they are held up and again let’s put one in the center here let’s bring this one down again try and make it look a little bit different to the other side maybe um i Mean even if you wanted to you could even bring bits further back so like that so it almost looks like it’s blowing in the wind you know go back a little bit further which actually looks pretty cool actually i like the way that looks yeah that was pretty cool Yeah i think something like that guys and then we’re gonna obviously go ahead and do the same thing for a little one up here again trying to do the same kind of shape but again this one’s just gonna be a little bit smaller all right guys and one more cell at the Back here again doing the same thing so again we just want to curve almost like an upside down b shape if you like so you kind of come in like this make it in there so you’ve got a bar across there and then you got a rounded shape and then another rounded Shape here yeah something kind of like that maybe one little bit down there all right guys so our cells are all connected up now so let’s connect the sails to the boat so let’s go ahead down here and we’re gonna go from this little gap here one two three somewhere oops So we’re in line with the um trap door there i think we’re gonna do it from that one and go to three and we just want to choose a point really to connect the um connect them up so maybe like in here we can come down something like that And then we just really want to come up and sort of over towards it something like that i think that would be pretty good you know if you don’t want to you can leave that bit there if you want if you don’t want to have it connected at that point Let’s do another one over here and obviously this out this side’s a little bit different so we’re gonna probably connect it slightly different but then again that makes it look more realistic as well which is good let’s bring it up and i think actually we’re gonna connect it Straight on to that point in there in the corner like that as you know we’re going to connect it over to this one so one here has come in down let’s connect it in this side i think like that break that one now i think we’re connected one down yeah that looks good All right yes guys i am definitely happy with that now so that’s looking really good we’ve got everything pretty much in place the only thing to do now is really just a little bit of decorating so i think we’re going to put some fences across the grate here these are the oak fences Then over here let’s place in a bunch of barrels at all different angles like this maybe even throw in a few um of our note blocks like this when you’ve got little gaps like this where some of the wood is seen you can go ahead and cover it up with some of Your note blocks or barrels um spot just you know drop things about wherever you want guys something like this you can even get some melons on pumpkins if you wanted and just load up a few of those on there so it looks like you’ve got some food Let’s go ahead and let’s get some yeah let’s get some pumpkins why not we’ll do the pumpkins so you could go ahead and just stack a pile of pumpkins up somewhere like uh just over here maybe something like that that might look good you can even Combine it with the two of them so melons and pumpkins so we can make it look like there’s a bit of a variety there something like that maybe i just put one of those there let’s put that one there yeah that looks good so i got a bit of food storage there Okay so this bit here is looking pretty good you could go ahead probably put some more things around here if you wanted guys but i’m gonna leave that bit there like that at the back here i’m going to go ahead i’m going to put in a cartography table in the center here With two upside down stairs at each side so create like a little kind of little work space um what else can we do let’s put in a lantern each side like this over here where the mast is to one side put two fences like this and then your Oak trap door like that to make it look like a little steering wheel then we’re gonna put in a stair there a stair there and then i think we’re gonna get some slabs actually for the next bit yeah we’ll get some slabs let’s get our slabs Um and the slabs just place two slabs in there and again let’s put a lantern right there so the the captain who’s driving a boat can see what he’s doing and again guys up here just just throw in a bit of storage you know throw in a Few barrels a few chests you know whatever you want for your storage is good you know something kind of like this it doesn’t matter how you do it and i’d say that’s good okay and again you can also throw things like the cartography table in here and There you know randomly you think they look pretty good so you can throw those in um that looks pretty good and sometimes a little once something that does look pretty effective if you get your ladders and you can throw things like ladders onto some of these it just looks I don’t know like little straps that are holding them this adds a little bit of a little bit of extra detail there i think all right okay so now we’ve got that in place let’s go in here let’s get ourself a spruce door first of all And we’re going to go on the inside and place a nice door right there where the where the pumpkins are here let’s just place in some planks there just to fill that section up and over here can we break that no we can’t so we’re gonna do let’s fill all Of this wall in here like that nice little gap and we’ll do the same over this side here fill those in with some planks let’s put a window here of your choice this is the glass pane guys and you can use any one you want i’m using the white Stained glass um with my texture pack um but it’s entirely up to you which ones you want to use okay so i don’t know why i’m coming out here right can we break those no we can’t break those so let’s just pillar them once to the ceiling then like that Makes it a little bit nicer now in here guys it’s entirely up to you what you want to do in this area i mean i would do something like put in a upside down stair here make a little kind of table maybe you know like the captain might have Like a little table here um maybe a little chair here you could put something like that actually we could put in right here we could get ourselves some scaffold i could put in a little desk there maybe he wants to do some work um just put a lantern on here so it’s a Bit brighter in here you could put a map down or something like that um but i’m gonna just keep it fairly simple for in here guys because this tutorial has already been a very big long build and there’s gonna be a bunch of editing to go in um and then what i Would do is i would break where this window is here break one to the right hand side then two three four like that um we’ll go ahead here i think and we’ll use these spruce stairs because downstairs is all going to be spruce so place a spruce there there One down one down and one down there fill the gaps underneath like this and that looks good now where the windows are down here what i’m gonna do is i’m gonna actually bring planks all the way across here with the spruce and then fill that gap in like that And i think that looks pretty good i think the floor i’m gonna actually keep the floor one up so let’s just raise this bit of floor here like so all right guys once you’ve done that and you’ve got all of your floor in place go ahead and just place some planks across This like so so that your windows look a bit better and then what i would do down here is i would grab something like the oak trap dogs i think it just fits in here pretty nicely and then i’ll go ahead on the outer block like that and then open up the shutters Make sure they’re opening on that outer one like that and then this one here as well and this one here and then again repeat that for the other side and then once you’ve done that go ahead put a plank here and here fill this up then For this bit here i’m just going to just fill this section here i think and then this one here again go ahead one across here and then just fill this gap here gives us a bit more room here at the back here i’m gonna go ahead and The stairs are over here so what i’m gonna do is i’ll tell this work from the stairs first let’s make one level up here something like this we’re going to get our dark oak our stripped dark oak days and what we do is right where the stair Ends there we’re gonna break that one there make a little bit there and then i guess break one here do the same on this side put a single stair there so you can kind of just come up into here it could be a little storage area or something And then put some of these across here yeah and then underneath here break these ones and then put some upside down stairs that was pretty cool a nice little storage area and to just keep this section looking a bit better let’s just put some of these trapdoors in like this Just to cover up that little section there of the stairs and then at the back here we’re gonna do something again very similar so we’ll go maybe to about there so we’re where that where that window is where we’ve got the five windows in a row where that stops so one Block gap and then we’re going to bring this all the way over here fill one level in like this now i don’t really know too much about how boats and how ships and that all look inside guys i’m not um i’m not much of an expert on that so if you guys have A better idea for the decorations then feel free to go ahead and do so then it’s gonna break actually no i’m gonna leave that i’m gonna then go ahead and get some stairs again let’s place two here and then we’re gonna place upside down ones all the way Across here let’s put the stripped dark oak log up like so and then we’re going to just put out trapdoors like this and i think that is pretty good in fact we can just move that back once it looks a bit funny on that edge so let’s go Ahead and just put it back one like so and then if we come around here we can actually um actually can do it from in here place one there temporarily and one on top break that one underneath and there we go got a little ledge there And i think that looks pretty good you could put some little sleeping area down here then you can have maybe a storage area over here so you could fill it up with things like um like a bunch of barrels maybe something like that a few barrels stacked over here in the corner um Yeah it’s kind of entirely up to you guys how you want to decorate it down here but i’m not going to go too crazy what i am going to do though is put a lantern just there like so over this side here i guess i’ll put a lantern maybe about here And we could also throw one up here somewhere as well let’s go you know but again you could put the lanterns on like if you’ve got something like this you could go ahead and put some lanterns like this rather than dotting them on top of places like that Just to make it look a little bit more um a little less hidden suppose there we go that bit more storage over here maybe could then put another one in there there we go go ahead the decorator up as you please guys put some beds in here Some storage you know make this your own however you want to do it is entirely up to you um and if you want to just go ahead and bring that out just to make it look a bit neater but guys i gotta say this has actually Been one of the uh the most trickiest tutorials i’ve done but i’ve actually really really enjoyed doing it um next time i do a boat i’m probably gonna do one a bit smaller we’ve got a right this is a really big ship for the docks but I’d like to get in a bunch of smaller boats as well so i think maybe next time we’ll work on some smaller boats as well and remember as well you can go ahead and make the um make the sales as you please you know bring in some other Colors of your own if you want so if you want to bring in some reds and stuff now bearing in mind these these sales are have been pulled up so the boat is docked so the pattern that would be on on here would be a little bit messed up So you would want to probably put them a little bit all over the place like this you know you wouldn’t want to put them sort of all in line or anything like that and make a pattern because the pattern is going to be folded up if it was if it was sort of Realistic the pattern would have been folded up so doing something sort of like this maybe you know just kind of a very random looking sort of color pattern and it should look pretty good all right guys before we go i thought i’d give you a quick look at how it Looks in the docks and i’ve got to say i think it looks pretty awesome i’m really happy with the way that this one has turned out and uh yeah i think it is a really really cool so yeah i’m i’m really happy with it i think it’s going To be a great addition to the little docks here and it really adds such a bit of life here just kind of seeing the ship there just creates a really nice atmosphere so i absolutely love it guys i hope you guys have enjoyed it too if you did please Don’t forget to smash that like button and if you’re new to the channel then please consider subscribing but for now this is blue nerd signing out and i will catch you guys in the next one Video Information
This video, titled ‘Minecraft: How to Build a Medieval Ship (Minecraft Build Tutorial)’, was uploaded by BlueNerd on 2019-10-14 16:20:25. It has garnered 220075 views and 4727 likes. The duration of the video is 01:13:05 or 4385 seconds.
Minecraft how to build a medieval ship.
welcome back to another minecraft build tutorial where we will be building a medieval ship. This is going to be a little tougher tutorial and I hope you guys can follow it OK.
Thank you so much for watching, hopefully i’ll see you on the next episode!!
► Want more like this? See the playlist: https://www.youtube.com/playlist?list=PLKZ36uW8BdjhTh0iS5xWsyvJRXDzr2rye&playnext=1&index=1
► World Seed: -3818011030321027201 ► Coordinates: X= 2108 Z=1381
► Texture Pack (edited version of JermsyBoys pack): http://bluenerdminecraft.com/bluenerd-1-14-vanilla-plus-texture-pack-download/
#Minecraft #Tutorial #Medieval
*******************
Want More? Subscribe and Never Miss A Video ► https://www.youtube.com/channel/UC1ANc72wQdusmOHwOL1-93g?sub_confirmation=1
Connect With Me:
► Website: http://dm-gamez.com ► Facebook: https://www.facebook.com/BlueNerdYT ► Twitter: https://twitter.com/BlueNerdYT ► Discord: https://discord.gg/mmPqzEK ► Patreon : https://www.patreon.com/bluenerd
*******************
Intro/Outro Music By No Copyright Sounds ► Marin Hoxha – Endless