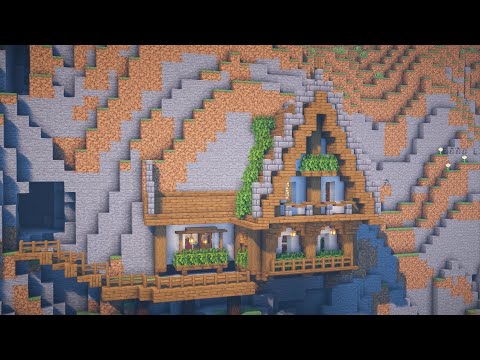
Hello wonderful people it’s wild here in today’s video I’m going to be showing you how to build this fantasy Wizard’s towerhouse This Whimsical build features Two Towers connected by a bridge and both Towers have a tall amethyst spire on top with its swooping curves and Amethyst shards this build makes for a showstopping base and is a great addition to any fantasy world if you’d like to get a world Download for this check out the description down below and head over to patreon the materials you’ll need for this build are on your screen now keep in mind that it’s always useful to have a few extra of each supply on hand and if you can’t get anything leave a Comment and I’d be happy to offer substitutions here is the outline for today’s build you can see that it’s two separate circles one for each Tower the one on the left there our larger tower has an interior diameter of nine blocks across and the one on the right the smaller Tower has an interior diameter of seven blocks there’s also a five block Gap in between them you can put in an outline like this one to help you build your Towers we’re going to start on these wizard towers by working on the smaller one first now the base for each of the Towers is going to be a mixture of Mossy and regular stone brick and I’m just going to be placing these in to create a randomized texture and of course the amount you add depends on the look you’re going for so if if you want to have an older looking Tower include more Of the mossy stone brick and less if you want your Tower to look newer you can see I’m starting by creating these little upside down t-shapes on each side so it’s three across the base and then two up in the center now in each Corner we’re going to create a shape like this I prefer to build little shapes like this going all the way around when I’m working on a tower that way you can make sure that each side is even There we go I’m going to build up three high in these two gaps Now 1 2 3 1 2 3 and then I’ll join them in the Center you can see that I’ve also got some cyan stained glass here and that’s what we’re going to be using for all of our Windows another useful thing to have when building is some temporary blocks so I’m going to be using purple wool but dirt or any other block would work Fine okay there we go we’ve completed all the sides and it’s looking like this next I’m going to take some of those temporary blocks and I’m placing one on each Corner that way I can place a stone brick or Mossy stone brick in the Gap and one here then I’m going to place A cyan stained glass on top of here and another block on top of that And of course I can remove these temporary blocks now there we go next I’m going to build up three high in the center of each Side like this now for these sections here we’re going to be building up three High to either side of the window so it’ll be like this 1 2 3 and then 1 2 3 creating a shape like this and filling in that Gap Completely when you’re creating your texture it’s always useful to take a step back and check that you like the distribution and don’t be afraid to go back in and change things to get the look you’re wanting so that’s that last section filled in and if we take a look from above the Shape of our Tower is looking very different now for our next layer we’re going to be connecting this up into a sort of rounded off Square so we’re just building straight along these sides like this and I’ll add an extra block on top of Here I’m going to transition into using less Moss from the rest of this build I can mix in a little bit here and there but I’m going to have less than at the base I’m going to add in my windows next so we’ve got one coming up here that’s Three high and that’s facing towards the front of the tower one on this outer facing side again three high and then one on the back and I’m leaving this side free instead what I’m going to do is I’m going to build up two blocks with my stone bricks and I’m going to grab Two of my temporary blocks and and stack them on top of that that’s where our door is going to sit to fill in the rest of the height of this Tower we want to end up four blocks above the height of the window so 1 2 3 4 and so I’ll build Up these walls to that same height remembering to add in just a little bit of moss here and there So there’s the base of the smaller Tower complete let’s move on to the larger Tower I’m going to begin by marking off the doorway which is two blocks high here at the center Front then using a mixture of my two stone bricks we’re going to create a shape like this so on This front panel I’ve got to go above the the doorway but on the other sides we’re just filling in that Gap so it’s like this we’ve got a step of one then two and then one so let’s do this on this other Side there we go and continue our way Around Now to fill in these Corners we’re going to build up two high in each of these spots so one and two like this then we’re going to build three High to either side 1 2 3 1 2 3 and we’ll fill in these spaces as well If you ever get lost when building this Tower remember that the important thing is to have a gradual slope going from this wider base at the bottom to our finished height and I’ll show you the section for the circle at the top when we get there There we are we filled in all of those sides and we just have these very corner pieces but we’ll get to that in just a second I’m going to build three across each of these gaps and this is where our window for this layer is going to Sit so I’ll place a single glass in the center of each of these sides which I’m then going to completely surround with blocks so it will look like This there we are now to fill in these Corners I’m going to place in a temporary block on each side and I’m going to build up three High 1 2 3 And I’ll go ahead and remove these placeholders there we go I’m again going to build three High to either Side and we should have fully filled in each of these Corners Now And this is what the circle should be looking like at this stage of the build for the next layout I’m going to start by building up two high in the center of each of these sides this is the layer where I’m going to start to transition Into using less and less of the mossy bricks next I’m going to take some temporary blocks and I’m placing them in the joints between these two here in the corner so that way I can place a pearlescent Frog Light on top and I want to make sure that they’re All facing upright like this and I can go ahead and remove these blocks for now on top of that is where I’m going to add my cyan glass building up too high and we need to fill in the walls around them so we’re going to need some of these temporary blocks Again what we’re going to do is we’re going to build up an round over the top of this Gap and over the top of the windows so let’s build up three High to begin with and join Here then we need to go over the top of the windows so we’ll just go around like this and I can go ahead and remove these so if we take a step back here is where we’re at next I’m going to Mark in my doorway so I’m going to come to the Center of this section here and line myself up and it should match up with the door on the other Tower I’m going to build up too high with my temporary block just adding in that space on top of here I’m going to add in two stone Bricks followed by a cyan glass for the window for that layer I’m going to take some more stone bricks and add one more layer on top of here going Around and we’re ready to add in our windows so we’re going to build up four high on the remaining three sides 1 2 3 4 and that should finish at the same height as that small Window and let’s build up our walls so we end up one above here just following this circle Shape if you’re enjoying today’s video and would like to access some additional benefits like world downloads for this and all my other builds as well as access to a multi-world server check out my patreon I’d love to have you join my community and I appreciate your Support for the final layer of the base of this Tower we’re going to start by placing a pearlescent Frog Light in each corner with two cyan glass on top for the windows then all we need to do is build up our walls so we end up two blocks Above here so I’ll mark that in at that height so let’s get filling In Now before we work on the rest of the outside I’m going to come inside my Towers to work on some floors so for the lower floor of both of these towers I’m going to dig everything out and I want to create a intricate pattern using some of these stripped dark oak logs we’re Going to be kind of creating a basket weave or Herring bone pattern okay so there’s the space dug out what I’m going to do is I’m going to start by building two in like this with my logs then I’ll add another two here and I’ll place in a temporary block and add Another two here from this I’m going to add two coming this way this way and this way kind of joining into each other from here and I can continue extending the pattern so this is where we’re going to have it join out from for this layer and then I can continue this Way and this is going to allow me to zigzag back and forth to fill in the Space taking a moment to make a floor pattern like this which is a little bit more complicated can really enhance the overall look of a build so we need to add in a block here coming out so we can continue along this way and create another row of Zigzags So that’s that section and we just have these two gaps to fill in there we go and over to this side just like that now we need to work on the next floor and that is going to sit just above these windows and just below these windows so I’m going to be Using some dark Oaks Slabs to reach the next story I’m going to leave this Gap free so I can place my slabs around it and leave a gap there and to reach from the first floor up to the second I’m going to use twisting vines that way it doesn’t have to sit across the wall but If you wanted to use ladders you could easily place in some blocks here to build them onto let me see let’s grow this this up here there we go and don’t forget to place in some torches as you build these floors in as we come up we’re going to Transition into using some ladders but let’s add in our floors first so they’ve got to go just below these windows leaving a one block Gap so our next floor is going to go here this also makes sense with where our door is and I’m going to leave a gap for my Ladder let’s have it at the back we’ll Place some torches in and our ladder going up and I can continue this all the way up to the top of the tower height for the rest of our floors we have one more going in here and we’ll have one more at the very Top for the attic space in the Spire of the tower let’s move over from this Tower over into our small Tower you can see that in the base of this smaller Tower I’m starting off by creating the same floor pattern there we we go let’s place In a couple of torches down here now I’m going to come up this is the layer that our door is going to come in on but we do have our Windows coming down a bit lower so I’ll be placing my main floor in here like this I’m going to leave a Gap on this side to add in a twisting Vine going down to the basement level and let’s just have that come up to like this now to access this doorway I’m going to place in two slabs and I’ve got a ladder coming up this way which Will go all the way up to the top of the tower I can then place in a couple of dark oak trap doors for railing and another one in here so that way when you walk into the door you’re kind of on a little mezanine level and can go down to This floor or up to the attic and of course I’ve got to place in my torches let’s start adding in some decorations beginning with these windows I’m going to start on the largest tower on these one wide one high Windows around the base I’m going to place an Amethyst block above and below like this then we’re going to create a circular shape so we’ve got two dark oak stairs on either side just like that and then two upside down ones in this Gap here I’m going to use some dark oak trap doors to round off the shape and also Cover up that amethyst at the top and I’m going to place in some signs one here and let’s grab another one to put here I’m going to be using end rods throughout this build but if you don’t have access to these you could switch them out for chains and I’m going to Create this same design on all of these Windows next we’re going to decorate these windows where we’ve got the pearlescent Frog Light below for these we’re going to add a dark oak stair facing in towards each other at the bottom and then outwards like this to create an almost arched shape at the top Then we can add in some dark oak fences and we’re going to be adding in some amethyst a little bit later so let’s go ahead and add in these this will be all of the ones on this layer as well as the ones at the top Here those are all in place so let’s decorate these large Windows next I’m going to start with a block of amethyst above and below then we’ve got some dark oak stairs one on either side facing forward and then at the top they’re going to face in to create an archway I’ve got some di walls now for like that and then we’ve got some end rods on either side I’m going to go in with some dark oak signs and we’ve got some trap doors above and below let’s repeat this design on the other sides of the Build Now that all of the windows on this layer are decorated excluding this one here above the door I’m going to take some amethyst clusters these are the largest amethist ones and I’m going to place them like this on the large windows and down here like this on the smaller Windows And I think we’ve got them all covered oh just one more up here it adds such a wonderful fun Sparkle let’s move over to the smaller Tower windows for these we’re going to follow a similar design so let’s start on these larger Windows first we have amethyst above and below Then we have our stairs on either side and creating the arch at the top we have diate walls going in and this time we just have one End Rod but like before we’ve got to add in our dark oak trap doors and some dark oak Signs Now on This Tower we’re going to be using large amethyst buds they’re a little bit smaller than the Clusters and that works better for the smaller scale here so let’s repeat this design all the way Around for the smaller Windows on this Tower here at the base we’re just going to be placing some stairs around the top and the bottom like this and then we’ve got dark oak fences connecting them we’re trying to mimic a smaller version of the circular windows on that Tower let’s take a step back and have a look at what we’ve got so far next we’re going to create a bridge between our two two doorways let’s start with some quartz stairs I’m going to place one on top of here and then on the other side I’m going to come one below The door and add in another stair we have two on top of these followed by two more we’re creating a nice arched shape next we’ve got a couple of quartz slabs and then I’m going to use some purple wool or a temporary block so that I can place two Quartz pillars so I can see this texture from the side to complete the rest of the archway we’re going to have two quartz slabs with iron trap doors on top and then we’ve got a quartz slab in the center I’ve got some anmethyst clusters next and I’m placing three underneath the Bridge like this I’m going to replace these temporary blocks with my warped doors like that and we’re going to be using some white stained glass to create these railings we’re going to start by building two out on either side and then we’re going to place one on top Of here one on top of here one here and one here and connect these Up just like this I’m going to take some end rods next we’re going to be placing them leaving a one block Gap which means I’m going to end up with one on the center of each side as well as right beside these doorways here’s how it should Look now above each doorway we’re going to create an arch so that’s going to consist of a dark oak stair on either side followed by a slab in the Center now on this side here that’s going to be part of the frame for this window so I’m going to add an amethyst cluster on top then we’re going to have a diorite wall on either side of the window and I’m placing my end rods so This kind of gray section as at the top there we are I’m going to place an amethyst Block in the center with stairs on either side then we’ve got a dark oak trapo and a dark oak sign next let’s add in our front doorway for this we’re going to again use a Walked door here we’ve got quartz pillars on either side followed by diate walls then I’m going to place a smooth quartz slab in the center with stairs on either side of that to create an archway and we’ll finish off with an amethyst cluster on the top we’re going to use some more of These smooth quartz stairs up here on the tops of the turrets to create some spiraly details let’s start on the smaller turret first I’m going to start with placing a stair facing outwards like this then one facing inwards and then I’m going to use a temporary block To to place in one more stair curving down so let’s do this all the way Around there we are we’re going to create a more intricate version of this up here on the largest turret so I’m going to start by placing a stair upside down with a right way up one on top then I’ll build out and add in a stair curving downwards again then we’ve got a Stair right way up below here and I’m going to crouch and click on this corner here to place in one more facing downwards so let’s do that again we’ve got an upside down one a right way up one and one coming out then we’ve got a right way up one And we’ll Crouch for our very last stair let’s do this on our other two sides it’s time to start working on our two spires let’s start on the smaller one first I’m beginning by placing two dark oak planks coming out around like this from each of the Sides I’m then going to place an extra one in the corner I’ll place a ladder in here and fill in the rest of this space with some dark oak slabs and of of course I’m going to place in a couple of torches as well now we’re going to go in with some Quartz pillars one is going to come out from each side and we need to connect up these Corners with some stairs and some chiseled quartz blocks so I’m going to place in a couple of stairs curving around like this and I’ll fill in this corner Gap With a chisel quartz block you can see I’m placing them so that you can’t see any of the dark oak through this Edge so I place them forward and forward and one to the side forward and forward and one to the side and then fill in the corner with a chisel quartz Block you’ll see that if I start by curving them around as I go I’m not going to be able to get it to curve around Right there we are and we going to be placing our roof on top of this before we build the roof itself we’re going to add in a few more things I’m going to place three slabs coming across the front and I’m using smooth quartz slabs here I’m also going to Place two in the corner again three follow it by Two this is just making this circle a little bit bigger now let’s go in with a couple of details on here I’m going to place a extra slab on on top of these chisel blocks we’re going to be having some walls coming in next we’ll be building Two up here on top of each of these pillars and then we have a slab coming to either side of Those let’s place in a few more walls they’re going on either side of the slabs we’ve just Added and then we’ve got some amethyst clusters and end rods so we’re going to start by placing an End Rod in front of each of these taller diorite walls with an amethyst cluster on either side of That then we’ve got a couple more end rods and they’re just filling in the rest of this Circle so it should look like this let’s add the roof on top for that we’re going to be using a block of amethyst and I’m going to start by building up two high with one to either side on each Face then I’ll build up two high and then two high again to either side of that to fill in the Corners I’ll also build up too high to fill in the gap between Here for the next section we’re going to need to place in some temporary blocks and I’m going to build up two high in each Corner remove these temporary blocks and connect them up creating a little square like this we’ve got another grouping of two here and that’s just going on the centers Leaving these Corners free and then for the very top we’re going to build up three High next I’m going to take some diyite walls and these are just going up either side and I’m going to build three at the very Top let’s take a step back and admire this spire we’re going to start our larger Spire in much the same way building out two blocks all the way around like this using our dark oak planks then to fill in these Corners I’m just going to create a little 2x two Square once again I need to add in one extra ladder and fill in the rest with some dark oak slabs and I need to add in my to t as well there we are coming out from here I’m going to place a quartz pillar on each of the Centers and I’m also going to add two coming out from each Corner now to fill in these gaps we’re again going to place in two quart stairs facing forwards followed by one to connect them up just like we did on the smaller Turret and we’re going to be left with a circle that looks like this once again we need to add in a few more details starting with some slabs we’re going to build three across the front and I’ll do this all the way around and then I’m going to add in one in each Corner one here as well as one to either side so we’ve got three slabs going across like This and you can check that you’ve got that right because your circle should look like this with three Follow by two Follow by one and then three uh two then three again two 1 2 3 2 1 2 3 and so forth all right now we’re going to go With some diorite walls we’re going to build up two high on top of these four points then we’re going to go in with some slabs we’ve got one to either side and again I’m using my smooth quartz slabs for This next I’m going to take some walls they’re going on either side those slabs we’ve just Added and we’ve got a couple more slabs these are going on top of the other quartz pillars to finish it off we have four more walls then we need to go in with our amethyst clusters and end rods we’ll start with an End Rod in front of each of the two high Walls with an amethyst cluster on either side Then to finish it off we just have a couple more end Rods there we go now we can add the spire on top to create this spire with our amethyst blocks we’re going to start off with a little upside down t-shape like this on each Side then to fill in the corners I’m going to start by zigzagging my way up like this and I’ll do this from either side to create a point like that then when I rotate round here I’ve already got my first block in place but I can continue my Zigzag and our very last zigzag for this side just like this I’m going to use a placeholder block just so I can add in a block in the corner here and I can go ahead and remove those now we need to fill in these Corners I’m going to start by placing in A temporary block in each corner and I’m going to build up two to either side and we can remove these temporary blocks let’s join them up and build up one Higher and we need some more of these temporary blocks again once again we’ll build up two high remove our temporary Blocks and connect these this time we’re going to add an additional two on top of each to fill in the last block we’re just going to build up four high 1 2 3 4 now for some diorite walls these are again going up the Sides and then at the very top I’m going to add an additional four 1 2 3 4 let’s step back and have a look at this spire our towers are really coming together now and it really has a magical feeling but we’ve still got a few more Finishing details to go so let’s add them in here is our Wizard’s Tower and I’ve added in all of the finishing details let’s have a look at what I’ve done for starters I added in these leaves at the top of all the spires and I have these draping down in an organic Way not only does this help to add an extra pop of color to this build but it helps to break up the purple of the roof and give it a more organic feel so you can see I have them hanging down at different heights and of course to Balance the height of the tall roof they’re hanging down lower here and just a little bit over here on the small roof to balance the greenery up here at the top I’ve added some bushes with some matching leaves down here now I’ve gone with a xia around this build because They have such a bright color but any Leaf shade would look great with this build as for the rest of the decorations around here I’ve stuck to the colors within the build so we’ve got this dark oak we’ve got the purple of the amethyst we’ve got white and then we’ve got the Cyan color in the doors and the glass so if we look around the landscaping that’s exactly what I’ve got here let’s take a look at what that is as for Greenery I’ve gone with these purple alium flowers as well as the new picture plants which have a really magical feel They work so great for a Whimsical fantasy Wizard’s Tower like this I’ve also got some ferns here and then I’ve added a little bit of grass here and there just to add to that Lush Vibe you can see that I’ve also used little patches of these nether plants to frame The build so you can see there’s some over here some over this side and then some at the back and this involves a few of these twisting vins and we’ve got some of the Warped roots and some of the nether sprouts to tie in with the wonderful amethyst Spikes of the roof you can see I’ve created these custom amethyst spires I’ve got some taller ones and some shorter ones and like with my warped plants I’ve used these to frame the build as well as the pathway and I’ve placed in a few of the smaller amethyst Crystals as well for that framing effect next let’s take a walk along this pathway and have a look at some more details at the very entrance I’ve created a small Archway like this with some Banner which perhaps are showing you that there is a magical wizard Living in here they really do have a great fantasy feel if we come along this way I’ve used some little sections of dark oak fences to place my lanterns on here and I’ve gone with the soul lanterns for their blue hue over here I’ve got a little spell casting area so I’ve got a spell book with a candle and an amethyst Crystal and then I’ve got this cauldron here it has a spiraling effect and this is using a respawn anchor and again to tie in with the Banners at the front I’ve added in this flag post here with a more intricate Design extending on from the design from the front one more organic element that I’ve added to this landscape are these custom ponds and I’ve placed some campfires underneath here to give them a real magical appearance and of course I’ve gone with some lily pads just to Add a bit more Greenery so I’ve got one here and then I’ve also got one at the back of the build as well so now you have an absolutely showstopping Wizards Tower base if you enjoyed today’s video I’d really appreciate it if you consider liking and subscribing and check out my Patreon to support me further I’ll see you in another Video Video Information
This video, titled ‘minecraft Fantasy Wizard Tower | Double Mage Tower with Bridge Tutorial’, was uploaded by Jax and Wild on 2024-01-14 16:45:02. It has garnered 270 views and 44 likes. The duration of the video is 00:38:44 or 2324 seconds.
How to build a stunning Wizard Fantasy Double Tower with Bridge This minecraft build tutorial takes you step by step through building this stunning double wizard tower with lots of space to create a eye catching base You can follow along with my step by step build tutorial or customise the build as you want
❤️Play on our Patreon Multi World Server Check out our Patreon : https://www.patreon.com/jjaaxxthelegend Get tutorial world downloads or play on The IceCave patron server, a multi world whitelisted server
🔔 Hit that subscribe button to be notified of our latest videos
💻 Join The Ice Cave Discord and chat with other fans: https://discord.gg/D2QcemP
Follow: Jax and Wild Twitter: https://twitter.com/jjaaxxthelegend/ Instagram: https://www.instagram.com/jjaaxxthelegend_ Patreon: https://www.patreon.com/jjaaxxthelegend
A minecraft build tutorial video from #jjaaxxthelegend #JaxandWild