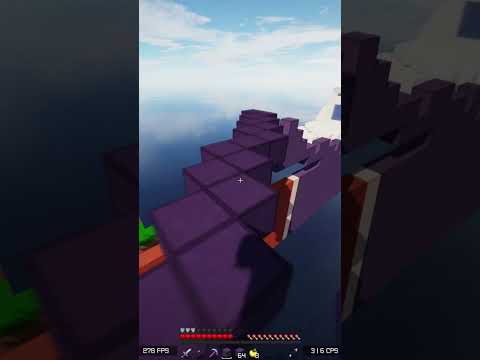
Hello and welcome everyone today in this video we are going to make a minecraft type of scene inside blender and our focus is on a sprite is a sprite gold for blender or not or is it even possible to make something like minecraft inside blender or is it good enough or It turns out bad we have to look into it and i’ll be making some props also in this video so stay tuned for that also and after doing everything we’ll combine the whole scene and by using some modifiers we’ll be rendering an output so let’s get started Make a new project in blender press a and delete everything again by pressing shift a and plane let’s scale it by five times press sn5 once that is done we can have a look and we can start building our terrain after this press tab go to edit mode and subdivide by right Clicking i think hundred divisions would be good and once we have hundred divisions you will see there are lots and lots of faces here so our idea is to make a proper mesh for this which looks like minecraft landscape so go to sculpt mode and here you can find this layer brush I think this brush is very good for making a terrain which is kind of rectangular but this brush will make sure that you are able to build a table top surface that is very good so i’ll make a mountain in the middle part by expanding And you can press f to scale your brush size and then again on the top part of this and again i’ll add one more layer to this after this mountain part is done i think it looks more or less ready we can focus on the other part of terry And i’ll use the simple draw brush for this i think it will give a little bit of curve because i don’t want the sharp mountains on the side it needs to look like a normal terrain after that is done let’s move to the modifiers panel in the layout and add the remesh modifier In that go to the block mode because you won’t see anything in voxel and increase the octree depth by 1 and see the difference for example 5 and 6 you can increase it to 7 or even check the 8 value but for me i think 8 is too much Detailed and it doesn’t look very good i’ll go back to seven and you can see there is some vacant part in the middle so we’ll select everything in edit mode and extrude it up so our terrain is ready let’s move to a sprite once we are in a Sprite let’s start by making a basic canvas of 16 by 16. i think that is the default canvas size for minecraft also per unit block i’m not sure you can tell me in comment section and we have this unit here but before that let’s type in the palette section minecraft so we Have all the colors of minecraft in our palette after this go to view tile mode and in both access so we can make a proper repeating tile so let’s get started let’s start by making the ground and for the side of the ground i’m making a simple tile by using some dark colors And i’ll tell you a simple technique which you can also use and you don’t need any prior knowledge of color theory or anything for this i’m just using two colors and i’ll be using the shade of these colors to make the tile so i’m using this green color at the top Which is light color and there is an option in the left bottom side you can see this palette is there through which you can put shades of colors and you can change the color so my idea is to use the darker color and i’m slowly increasing the lightness of the Color i’m not changing the alpha value that is set at 100 that will be using for another grass style that will be i think bushes and other things here again i’m using a darker shade for the bottom part and for adding some dirt again i’ll use A little bit of darker color in the middle parts so again you can see also it needs to be a bit irregular if it is too repeating it may appear like a pattern and i don’t think in minecraft there are many patterns that are followed it looks very irregular and That is the beauty of it so that is what i am doing here slowly i’m putting the other colors so it looks like that it’s dirt at the bottom and in the top part we have a grass layer also make sure that these sides are matching The top and the bottom if there is something extra you can always erase it but the left and right should be matching if the pattern is irregular the tiles will not be matching in one sense that they are not connected to each other so there should be a little bit regularity but the Overall shape of the block should be regular after doing this after doing the bottom part you can see i’m just doing the edges so that’s an important factor and adding a little bit more of darker one darker shade let’s disable the tile mode and select this whole block with marquee tool Now it’s time to make another canvas and i’ve made another canvas of 128 by 128 i’ll tell you why i’m doing that because i want everything in a single image or it will be used as a map inside blender so copy this paste it in the bigger image on the bigger canvas And you have your tile ready similarly we’ll be doing it for the top grass so i’m telling you a shortcut technique let’s select top part of it so we don’t need to redraw the pattern and quickly what i’ll do i’ll duplicate this blocks and i’ll make it irregular so I don’t have to use the same shade of colors and i don’t have to make everything from scratch so i’m just copy pasting it multiple times so this is the top grass you don’t need to worry about this much just use darker colors and again make it irregular And the edges should be matching and once it is ready i’m adding a few more colors so the pattern looks like it’s a block and it’s a bit unrecognizable from the top view so let’s disable the tile mode and paste that also here as well i’m putting A gap so you can see clearly in this video i don’t want it to be confusing putting them together similarly i’m fast forwarding this bit i’m making the tree texture or the trunk of the tree and using some darker colors just like we did in the earlier parts And you can see the process it’s very much similar a repeating pattern is here and once all the colors are fitted i will be going towards the edges after that because i want the tree to have because we’ll be repeating the blocks and tree should have the regular pattern Once the tile is almost ready i’m again putting some lighter colors so it looks a little bit more detailed and let’s disable the tile mode copy this repeat our drill and paste it on our canvas where we are making the maps okay one more is ready after this we Need leaves for the tree this is important we’ll be keeping some portions of the canvas empty for this so i’m using a two pixel brush and don’t rotate it put it in square shape only and make just like you stamp on a paper make some stamps of this color lighter green And after this you can make darker shades just like the other process we did and make a pattern like you can add a shadow to the bottom of the leaves again we’ll be doing it with much more darker so you could use three color layers or four color layers But do make sure that you have the empty spaces in between because once the light is passing through it it will appear like it is those portions are transparent and our light can show that okay the tree is not just like a trunk it’s not a solid object But it is something through which light can pass and that is the idea let’s copy and paste it here in a different place after this we have one last thing that is the grass so i’m using again this i have not deleted anything and erasing a few parts of it because I think the minecraft glass is very pixelated in the bottom side you can add some darker shades and as you go from bottom to top you can make it lighter so we are adding this dirt little bit more details would be fine for this but the idea is these leaves are Connected and they are also transparent so in the render in the seed they will appear as transparent so leaving the space just like we did for the tree leaves so our grass looks more or less ready let’s copy this and repeat the drill paste it on the main Canvas which will be used as a map after this let’s save this and export it as a png so we can use it inside blender let’s do it so back in blender we can look at our scene and one thing you need to do is you can Have a look at the scene you can unwrap and also apply the modifier i forgot to do that so go to layout apply the modifier and unwrap this after unwrapping what we need to do we can go to material section and add a simple material that is principle psdf Now go to the image wherever you have saved it drag and drop this image and connect it to color after this very important set it from linear to closest this is texture interpolation very important for making it more pixelated and less aliased after this we can select the faces from Any one of the side for example for testing i’m selecting two or three of these faces and putting it over i think yeah garage style is fitting perfectly so let’s select all of the faces from side view press three in your keyboard and do this so you can do maximum Mapping in one go after everything is selected scale it over the place you can press ctrl key so you can have it in proper numbers and once we are here we can see oh it is there but it is rotated improperly let’s press ctrl g so we can have the selection back And rotate it so our cross style looks perfect i think they are facing top okay i can have a little bit of preview how it will look like let’s do it from the other faces press one so to select all these faces i’m going to orthographic view By pressing one three in the numpad and you can do that too again put it here i think it’s again rotated not properly and we can see again we can rotate it slowly and it’s done similarly for the other two faces i’m just fast forwarding it a bit and you will see that We have almost done all of them for the top one i did it just like that and we will move it to the grass some of the tiles were left and i was doing them manually later on so our grass is ready you can have a Look at the terrain it looks more or less ready so what we have to do after this is that we need to add our pushes or sharps to the scene and add a plane and resize it to the size of the blocks that we have in the scene After you’re done with it add the same material and let’s select one of the faces and scale down this material and put it over the map but you’ll see there is a small problem i am seeing black color but it should be transparent and i know how to fix this so let’s go To shading mode and connect the alpha values after we have done that you can come back and go to the bottom side of this material and this blend mode set it to alpha hashed and the other option shadow one also to alpha heist so you see it looks like the grass from minecraft Rotate it and you can duplicate the object parent one of them to the other and you have something like this i’m just fast forwarding again and putting them across the scenes quickly and we are ready to move to our next object after this that is a tree so Add again this time a cube not a plane scale it down and to the size of a singular block of a terrain now tab to edit mode at the material select this to the block i think it’s very easy and rotate it so it looks better and connected to the other Similar faces i’ll do it for all the sides quickly and similarly for the other face for the top face of the tree i forgot to draw something in a sprite so i’ll add this face only because it won’t be visible anyways after we are done let’s go to the modifier tabs and Add an array modifier and we have this you can just change these x y and z values of factors and have a look first of all increase the count and let’s increase the values and check what happens put this to zero put this to one You’ll see it changes the axis from x to y but we want it in the z the z axis so make this instead of one minus one because this is the base block everything else is built on top so five blocks you can have a look i think it looks good And after this we are ready to add our leaves also into this so let’s duplicate this block and take the texture to leaves i think it’s fairly easy again repeat the process add that array modifier once more and change its shape and size according to your preference i’m Thinking of making it look like a cube only for now and i’ll duplicate that cube and put it over that a tree block two times so it’s a very simple tree but i think it will fit the theme of minecraft and that’s the idea so we have one of The cubes ready let’s duplicate and put it resize it here if the origin is shifted you can set the origin back to its original position and make a bigger block for the bottom side and resize it on the z-axis or z-axis and you have a tree ready so let’s duplicate this tree to Some of the different places on the scene wherever it will look a little bit decent or good because i need to render this scene out so i want to see how the output looks and we’ll be adding an hdri also in the scene now let’s add a camera to this Scene so go back to layout to solid mode and let’s shift a and add a camera if the camera appears at the wrong place just like this press ctrl alt 0 on your keyboard and the camera will align to your viewport angle at whichever angle you Are looking at it press ctrl alt zero and let’s have a look our camera is set up now you can press shift and the tilde key and press wasd to move the camera around the pan it around to whichever your preference is i think this scene looks good So we can go to rendered and currently there are no lights in the scene so i need to fix that by adding an hdri and after we have our hdri you can go back to its shading properties and connect the nodes in a proper way you can add the node Wrangler add-on from preferences and change the direction of the hdri to whichever you prefer it’s basically based on the lightning that you want in the scene i think this looks good for me and go to the bottom part of the eevee render and make it medium high contrast so let’s have a Look at our renders so i rendered a loop video for this i hope you liked it and my verdict for this is a sprite is a very good tool to make low poly assets inside blender or your scene or your animations it’s a very good tool you should definitely use it And stay tuned for more have a great day ahead bye bye Video Information
This video, titled ‘Aseprite & Blender Let’s Make Minecraft terrain’, was uploaded by Pix Spaces on 2021-07-05 19:15:02. It has garnered 889 views and 40 likes. The duration of the video is 00:14:58 or 898 seconds.
This time we are testing Aesprite for Blender. Both are amazing softwares when it comes to their individual domains 2D for Aesprite and 3D for Blender. But will they be better if used together for making a cool Minecraft like simulation or and animated video render. So this time I am using Aesprite and Blender to make a minecraft styled terrain. Try and follow along and see how it goes!
Follow along for this learning journey!
–Timestamps–
0:00 Intro 0:31 Starting with Basics 1:43 Important modifier 2:17 Aseprite time! Canvas Setup 2:46 Tiling begins, First block 4:59 Top grass & shortcuts in Aseprite 5:47 Tree texture quick 6:27 Leaves texture Aseprite 7:25 Minecraft bushes/shurbs in Aseprite 8:14 Setting UVs in Blender for Aesprite texture 8:30 Texture interpolation (Aliasing fix) 8:54 Mapping stuff 10:15 Grass/Shrub setup 11:11 Tree Trunk in Blender 12:14 Leaves setup & alpha fix 13:21 Add a camera & hdri 14:19 Final Renders and Verdict
Coming up with more fantastic stuff like this soon!
PixSpaces Instagram : https://www.instagram.com/pixspaces/ PixSpaces Twitter : https://twitter.com/PixSpaces
Stay tuned for more Pix Spaces!
Music resources are open source bgms from sites like opengameart, etc. Music for this video from HeatleyBros. Free Music For Your Youtube Videos https://www.youtube.com/user/HeatleyBros
#blendertutorial #minecraft #rendered #3Dlandscape #lowpoly #aseprite #pixelart