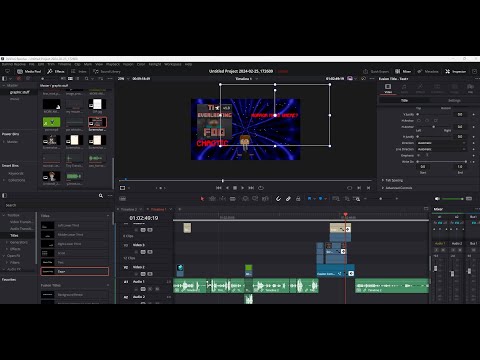
Hello everyone my name is planning pepper and welcome to part three of tear rain generation oh boy am I excited because in this episode we will be turning our pentarian generator into a tile based terrain generator and using it to create paper Minecraft terrain this will make it so much easier to use In an actual game and also Minecraft is cool uh if you haven’t watched the previous episodes I would definitely recommend you do that before you watch this because obviously we’ll be using Code we wrote before I have seen some of your projects and I’ve noticed it a lot If you haven’t added caves if you don’t want caves then that’s fine but if you think you might want them in the future you should probably add them now while it’s easier to troubleshoot with the old patentary engine rider that’s my recommendation but anyway this video may be the most complicated If anything I’ve done I’m not sure I think it it could very well be the most complicated video If any I’ve created I’m excited I hope you are too let’s let’s get cracking now as always the first thing we need to do is to get Assets and you can go over to my assets project for that and the link will be in the description now here we are in the assets project you want to find the Sprite with the grass block terrain gen 3 and if you look in the costumes we see We have a whole bunch of Minecraft tiles right here so we’ll just open our backpack and drop the whole Sprites into the backpack close the back back up and head back over to our another thing we should probably do before you get coding is save this as a copy because you know You never know what could happen to it maybe you mess something up and you’re not sure how to fix it you need to go back it’s always a good idea just to save it as a copy or maybe you just like how it was before so we’ll name this episode three We’ll open up our backpack and drag the Sprite into the Sprites pan we’ll rename it tiles so let me just explain how this is going to work so each frame we are painting with the stamp block and depending on what number is in the grid list at a Certain point is what costume will appear there start with number one on the bottom left that’s index one of the grid list then we move up two three four and then after we get to the top we loop around back from the bottom five six seven Eight and so on now the numbers that each of these those places will correspond to the title there so two is the air let’s see three is grass Force dirt so the numbers in those indexes will signify what tiles there and the index is what place in the grid it is Alright so now we can begin coding fish took onto the generation actually and we’ll separate off the current generation scripts instead broadcast a message start game the tiles we received start game forever now make a block called Paint all right that’s screen refresh now this is the bot where we’ll be painting the Tiles alright now I’d like to make a variable that will hold the size of the tile so we can easily modify them we’ll call it tile size that’s going to be the size of every single tile we’ll set it to 32. and make sure to drop the paint Block in The forever Loop so first beginning of the frame will erase all the tiles and out before that then we can set our size based on the tile size block set it to a hundred and we’ll multiply it by tile size divided by 16. the costumes are each 16 by 16 so that’s Why dividing it by 16 and if it’s 16 should be a size of 100 so that is that formula now we also need to make a new variable for camera why First Coast will be scrolling upwards as well side to side now we can right go to use The camera y if we’d like just do that right now I’ll also change this to start game just like that name a little bit better I’m going to separate off this block because we won’t not use that for now change camera y by up Arrow minus down arrow Right Moving vertically And if camera Y is less than 180 [Applause] and we’ll say 280 that’s the lower bound now we’ll make a new variable by content the title Sprite called grid X for the spray only and create a y now I should take a moment to thank Griff patch for this title scrolling Code he uses it in his scratch RPG series and its rate code I am using it here because it is great code and if you haven’t checked out gross patch if you don’t know who he is if you haven’t watched his tutorials I highly highly recommend it it’s taught me a lot about Scratch anyway going to set grid X 2 camera x minus 240. I’m going to start in the lower left of the screen to stamp the tiles all right we’re going to start in the lower left and then move our way up then come back down and then move our way up again So do they get to the lower left we need to subtract 240 subtract 180. so good y camera y minus 180. like another variable called create index for the Sprint only the grid index is we’ll keep track of the current index of the grid that we’re stamping at to find the grid index Let’s start by setting grid index 1 plus the floor of grid y divided by tile size now this is essentially just finding the Y position on the grid of the bottom left of the screen we’re dividing it by tile size because one tile is 32 x 32y Each this isn’t the full index yet this is just the Y position now we’re going to change grid index here’s where we’ll count for the X and change it right floor have grid X divided by tile size that we’re going to multiply it by and here you make another new variable World height For all Sprites now the world height is the price the price the height of the world remember when we move over one column we’re increasing the number by the full height of the world if you remember from the little diagram I showed you now we found the grid index now we need To move the to the correct position so we’ll set X to we’ll set X to tile set divided by 2 minus 240 minus grid X multiplied so what in the world does this do well the first part the test I divided by 2 minus 240 ensures that rather than being in The very bottom corner to a little bit out of the bottom corner so the full tile show the grid X multiplier size will change it based on where the camera is so as the camera moves to the right it will move to the left then eventually once it gets goes to Full tail our screen doesn’t need to stamp that tile anymore so it will move back to the one on screen which is the one to the right of it next for the Y it’s very similar instead of Y to tile size divided by two next but here we’re Going to minus 180 right because screen is 180 tall and create a y my type of size you may know if you’ve been doing scratch for a while it’s quite annoying the spreads can’t move off screen right they just Bunch up on the edge well if we make the Sprite bigger then it can go all the way out screen we have a big costume for it called off screen fix this will if this is big enough to let the tile travel fully off screen if it needs to so that they don’t Bunch up on the edge now Let’s get to stamping the tiles first we’ll move up the screen is 13 tiles High each time we’ll be changing the Y by a tile size and changing grid index by one at each position we will switch our costume to item grid index of grid so we’re finding the tile at the current Index with a grid list then we’ll stamp and switch back to the off screen fix then we can replace this that’s all you need to stamp a con now we have 16 columns to stamp because the screen is 16 columns wide so around this Make sure the ink up is the set y also we’ll repeat 16 times and at the bottom here change X by tile size if this height of the grid is taller than the height of the screen then we’re going to change need to change our graded X by more than just One here what change it by grid height minus 13. and a fair warning in my notes the world hide variables called grid height so I’m going to keep calling it grid height you know what I mean now this is all fine and dandy but it does nothing if we Don’t have anything on our grid list to stamp so let’s write a little bit of code to add some things to our grid list so we can test this out I’ll just code it up and you can pause the video afterwards and write it out So here’s the code well 10 it’ll make a little Q as it were of height 10 and width 10 I know it’s 2D so it’s not a cube it’s a square each each column will have a bedrock and then five bits of stone then two bits of dirt Piece of grass and a piece of air so if we click this and we should see our grid list is all fill up it should have a length of a hundred oh and here I forgive my mistake this floor this floor block should be inside the times by mistake sorry about that But anyways I think it’s ready to try out if you press the green flag see looks like it’s working right we can move left and up and down up and you’ll notice that they repeat up and down why are they doing that is there some easy way to fix that well The truth is is that there may be a way to fix it but it’s not really worth it because once we have a bigger World we’ll just limit the camera edges so that you can’t see these repeations we still need to do the main point of the video which is making the Generation Sprite generate our terrain as in the form of tiles so I’m going to delete the grid as it is right now you can keep this block here in case we need it we will be not using that to make our tiles but instead using our terrain generator Here we’ll kind of replace this message with strip cam I used a different message for some reason for now I’m going to remove the cave parts of these just so it doesn’t complicate things let’s separate off these for now and just take a look at this generation may remember that this Is generated in columns each column will be one tile wide and we’re going to go with a height of 256 256 times tall which is 128 above the surface and 128 below the surface right now we actually have a height of 360 but that gets to be quite big you Can make the height even smaller if you want to but I wouldn’t make I wouldn’t recommend making it bigger because that can get a little bit laggy if the grid is really large so that’s our way of the refresh pit from the bottom of here and create a new question block We’ll call it fail grid so the first thing we want to do is delete our previous grid our previous world so delete off grid now we’ll set the world height to we decided 256 and we already set the world with at the beginning of the game so we do Not need to set that I’m actually going to change it down a little bit so it is more manageable now we’ll make a new variable called I for this part only which we will use to Loop through our grid so we’ll create a for Loop you may know what a for Loop is If you don’t that’s fine basically each time the loop repeats we change I by One so it will Loop through y positions it’s time changing diagram one and in each iteration I corresponds to an index of the Y position list or in other words the which y position of the grid is so Each of these times we want to add a column to the grid right we want to add one of these columns so I’ll make a new black ad column to Grid it’s going to have a number which is the X position now in this block we are going to start At the bottom of the column and build up each time adding something new to the grid so we’ll set the Y to zero and we’ll use the Y to signify how far up in our column bear at the bottom of the world is bedrock so we will repeat a random amount of times From 1 to 3 each time we will add 7 to grid we’re adding 7 because Bedrock trial is number seven each time we will change y by one because we’re going up one time now we can add the Deep slate so to add the Deep site [Applause] We’ll add 64 minus y because the Deep layer is 64 blocks deep We’ll add a random amount from negative one to one just to add a little variation in the border and this time we will add 6 because 6 is the Deep Side time next for The stone so here we need to repeat all the way up until just below the dirt layer so we’ll repeat item acts of Y positions so that’s what level the surface is on the column at X position X we’ll put that in here you may remember it goes from zero zero Is the very middle of the screen not the bottom of the screen so need to add half of the the world height divided by two and from that we need to subtract the Y plus four and the Y right we need to subtract the Y because we get the difference and The 4 because of the four blocks of dirt and grass okay speaking of dirt we’re going to repeat three times and add 4 degrees out and this should be five right because five of the stone four is dirt and then at the very end we will add three to grid and then We’re going to repeat until we get to the very top of the column and fill with air so just repeat the world height minus y adding 2 to the grid and then that is our column and then we need to put the add column to grid here add column to the grid I tiles I can attach this here and we run it we get a big row of deep slate moving up turns to Stone dirt and finally grass on top so here is our Terrain you can see it has our Hills awesome you will notice that every now and then we get little One black holes like this or a little one block out croppings like this and they are just a little bit unpleasant they make the terrain look a little bit Jagged and not smooth like we’d like it to be so we can make a custom block to fix That make a block called Smooth tearing because that’s what we want to be doing you will put the block right above the grid again we’ll start with i we’ll make a for Loop set I to one and loop through the Y positions list length of Y positions Each time changing I by One standard stuff for each of these we want to check if it’s either lower than the two y positions left and right of it or it’s higher than the two watt positions left and right of it if we’ll get an and If the item to the left of it is lower so item I minus one positions is less than item if y positions [Applause] and the item to the right of it is also lowered I know I plus one is less than well no it is up a turning point and so We need to lower it we’ll replace item i f y positions with item I have y positions minus one all right and you need to do the same but for checking if it sticks down so I will replace these with a greater than [Applause] and replace this with a plus let’s try that So if we run along the terrain here we should find that we don’t have any of those anymore I think this looks a lot nicer you remember that we have water right let’s so let us add the water that shouldn’t be too hard we’ll do it in the head con to grid block So right here this section are the blocks that add the dirt and the grass so if the block above the current y plus 1 is less than the water level then that would mean it would be underwater but remember the water level is measured at from zero from The Middle Zero is the metal that is so we need to add half of the world height to it just like we did to five positions now in the else position where it is not under water we’ll put what we have before in the if position we’ll add two bits of dirt then we will Add two bits of sand let’s check what tile that is 41. and then we’ll repeat water level Plus World height divided by two and then subtract y That’s How many times we will move up adding eight if you try that here we have our water we have we notice we have some sand Outside the ocean too which I quite like and that is what this y plus one does right so even if it’s a little bit further about the ocean still gets its bit of sand we have more biomes than just our planes we have a forest we have Tiger and we have desert so let’s add the grass for those plants notice I have a slightly different colored grass block for the forest biome and then we have sand on Sandstone for the desert and snow for the tiger alright so we’ll put that in the else condition so start with the desert We’ll check if item then we’ll use the X from up here random acts of biomes equals three then repeat two we will add Sandstone which is to 42 and then repeat another two wild sand 41. and otherwise we will always add dirt but if it’s the planes if it’s bottom One then we’ll add the normal grass if it’s by M2 then we will add tile number 40 I believe yep and the tiger will be 43. that will be band 4. so here we have a desert oh now this biome is a snowy biome yeah you will notice I don’t know I didn’t have to do this but the water is not animating it is just standing still it should be animating you’ll notice we have a whole lot of Animation frames 32 to be exact and we can animate those pretty easily I’ll make a block called animate We will stick the animated block right before the stamp we only want the water tile to animate so we’ll check if the title that is the item tile index of tile grid green index of grid here um we’ll check if that is eight so the grid index Is the index of the current Tyler’s being stamped and if that it at that position at that index is an eight that means it’s a water tile so we should animate it so just switch the costume to the current costume plus floor of timer times 30. the higher this number the Faster you go the smaller the number the slower it goes and we need to make sure to mod that by 32. there are 32 costumes so this means once it gets above 32 it’ll go back to zero so let’s try that here we go it’s nicely flowing downwards There’s more looks lovely one thing I do want to do with water is it should be set down a little bit from the surface shouldn’t be just flush with the surface like this like it’s a solid block the question is how do we do that because I have so many animation frames I don’t really want to have to make a separate one for each different state the water is in and maybe later if you want to add water to six don’t want to have to make more costumes for each possible position the water could be in Uh if we go down to the bottom all right here we are we can stamp this on top of the water tile and it will make it look like it’s just air so we do need to fill this with the correct color of the sky your Sky will probably be a different Color so just eye dropper the sky and fill in the thin all right so now we can check if the iron graduated at X great is eight then after we stamp it also want to crop the water so make a new block called crop water we’ll check if item green type grid Index plus one that is the tile above it is not same item I create index upgrade the current there current tile we’re checking so if the tile is not water above it or we could use this on a different tile too it’s not the same then we’ll switch costume To the Wonder surface crop and Stamp so now let’s move on over here see now it’s a little bit lower than the edge of the buck I think that’s quite nice now our surface area is looking fairly bare and I think it could do with some trees or At the very least grass or foliage flowers we have some flowers here and we have some tree blocks down here I’ll do the flowers first because they’re simpler go to the add column to grid custom block now down at the bottom and we have the grass Might also want to add some flowers here so let’s start with the desert here we’ll check if random one to say eight that’s one then we’ll add a dead Bush then bushes are here tiles 59 so we’ll add a 59. and then we can’t forget to change y by What next is the planespire I will put up the probabilities for here and then you can copy them if you want or create their own so here we are these are what I have you can look over them and copy them it’s in this block of code Okay so that adds flowers up here tall grass and short grass now in the forest so this is this is the flowers for the forest I know it’s really big you could probably make it simpler if you wanted but here you go you don’t have to use it all If you want so this is the one doll flowers these are the two tall flowers and this is the grass Masters the forest all right so this is the the Tiger so this top part is the two dolphins and the bottom I still want dolphins and that I see you know it did bush 100 dead bushes in the desert noted bushes underwater that’s good we have grass growing and Appliance and flowers some nice flowers all right I think it’s time for the trees we’ll go back to the field grade custom block now want some more code Again set either one but this time repeat length of Tree positions and then we will make a new block called add tree to grid and input of X and input of Y the input of type we’ll add tree to grid back the first number will be item I of prepositions The next will be item I have three positions we have five positions next will be a I have two positions of buttons so item I have three positions is the X then that’s how to find the Y and the bottom we may add more tree types later but for Now I’m just going to use the biometries and to signify what tree then we want to add World height divided by 2. to the Y positions just like we did in the past now let’s code this block this will be a block that just has a lot of numbers Lots of numbers because we’ll just be adding all the different tiles but before I do that we need to find what with the index of the grid is so we’ll make a new variable called create index we’ll set the grid index and here we need to find the grid index so first We’ll set it to y and then we’ll change the grid index by x times grid height because remember each time you move right the number of changes by an entire height of the world first we’ll check for the first tree that will be type of one or two type equals one Or type equals two these will be the standard oak tree first we should check if the tree is growing on ground that is not on water we’ll check and not item create index or grid because this is what third is if the tire is not three That is the grass or if it is not 40. so three these are both the grass tabs if it’s not the grass tile then we’ll just move down a little bit and make sure the tab below that isn’t the grass tile change grid index by minus one then check again If it’s still not the grass tail then we know for pretty sure that the tree should not grow so we’ll stop the script if it does pass these checks however you replace the block at the base of the tree with dirt so now so we will replace item grid index of grid With four now we’re going to do a lot of replacing created extra grid with a number so I’m just going to code up the code for making the tree and then you can copy it if you like decode for the trees is right here and yeah it looks a bit complicated but um It’s really just moving around the grid stamping stamping tiles and yeah you can pause the video if you want and build this up I do want to slightly increase the probability of the trees appearing so you can just see more of them so I’m going to change that 25 to say a 10. and we can try that out aha there’s a tree looks wonderful [Applause] there’s another one now let’s do the other trees so the tree in the desert is a cactus so that’s tight number three because if I am three here we’ll check Instead of being a grasp I will check if it’s a sound tile number 41. here we can simply place it with let’s hook 67. tile number 67. and let’s drop the script at the end that should be simple ah here’s the desert we have the cactus another Cactus perfect now we have the Spruce trees type of four here we’re going to check acetyl below is a snow tile 43 here is the script for the pine tree history I mean all right let’s try that out here we are here’s a nice big pine tree here’s another yeah those are looking nice now before We move on to the next thing I’d like to fix a problem with the cacti that I missed so here we check if it’s sand but remember the bottom of bodies of water are made of sand so we need instead to check if they are the air time which is two Or they could replace dead bushes so we’ll check with an ore if it is tile 59 which is the dead Bush Style [Applause] now I’m still going to make sure that the block below the cactus is the block of sand we’ll check here if I have grid index minus one of grid Is set 41. then we’ll stop the script we should also take our change Grid in X by 1 and move it up to here so we make sure to get it out of the ground before we check for the air let us try that all right so we should still have cacti growing Which we do but they should absolutely not go in bodies of water and here we have some water and we don’t see any cacti now on the subject of treason I feel like if Forest should have more trees than a plain spam because I mean it’s a forest right forests of trees So let’s go over to our ad tree custom block now here we have this very simple script for adding trees um we can make this a little bit more complicated so the top will check if biome equals two the biome is two we’ll put this one in The else condition and we will move this block of code up to here and duplicate this to here so if the biome is two we’ll repeat pick random one to two times that seems like a lot right but remember the tree seemed to be spaced at least Five blocks apart so this actually won’t make them too close together let’s try that aha here’s our forest plan and we have a lot more trees much more fitting for a forest in this custom block you could add more probabilities for different biomes all of these oak trees look Exactly the same besides their height let’s make a list called tree type for this spray only when we add the X position to Tree positions we’ll also add the number to tree type it’s the forest so we’ll add a two and the other biome will add biome but here Let’s say we want some of our trees to be birch trees we can say Bridge trees will be type 2 because right now both types one and two are the oak tree you’ll get an if else and we’ll check random from one to four is one so one And four trees will be birch trees in the if condition we’ll add two that’s the birch tree and in the elsewhere I’d want drop this back here now in the beginning we should also delete all of tree types go to the add tree to grid custom block here We’ll change this to just be a type equals what now we can actually duplicate this block for the birch trees because they’re very similar to oak trees we’ll stick it right down here type equals two for the code for the bridge trees first I’ll start by making them a Little bit taller two to four let’s say and then we’ll replace each of the oak tree tiles which with their equivalent Bridge Street Tile 63 will be replaced with 72. 65 with 74. 66 for now right off the bat we see some birch trees you see in the forest all The trees are birch trees the reason is we still haven’t modified the film grid block to add the trees based on the tree type what we’ll do instead of saying item item I have three positions of biomes they simply say item I of tree types now in the forest we Should see we have some oak trees right here we have a bridge tree it’s taken me a couple of attempts to find one so we could consider making them a bit more common say one and three chance rather than a one in four chance of course you could Add all of your own tree types you could have variations on Spruce trees and oak trees for example let’s get back to our field grade custom plot because we still have stuff to do here we have our main columns and we have our trees but we haven’t added our ores yet or our Caves start with the oars same dealio for those and either one repeat length of oars this time we’re going to be changing I by 3 each time because each or has three items in the ores list we’ll remove the add tree to grade custom black make a New one called add or to grid and without screen refract and this one will also have three inputs x y and type we’ll put our new add order grid Block in here we’ll put item I of oars that’s the X and then item I plus one of ours which is the Y And we’re going to need to round that and then add to it the world height divided by two like we did before [Applause] and in the left position we’ll do item I Plus two or fours can you remove this and start to code this block now if we look in the tiles right You’ll see I have a whole bunch of or tiles here now we put we won’t use all of them I’ll just use the coal iron gold and diamonds this should just to make it simple these are the ones that you already have code for but it’s very easy To make code for new ores to go to add or and then make some more probabilities here right so temp is the depth that the or is at right so these are the ores that spawn above y negative 60 these are this Force this bottom above y negative 20 and then the Rest is fine at the bottom of the world now it’s good we’re in this block because remember we shortened the height of the world so we need to change this negative 60 this is previously and a third of the depth of the world the third of 128 is approximately 40. In this one we can replace with a negative 80. there are more modifications to do to that or block rather than using one two three four to determine what order we’re making we’ll use the tile number 76 for coal 78 for iron 79 for gold and 80 for diamond And if you look down here you see we also have deep site variants and the same ores so if temp is greater than negative 40 instead of adding the current of one to two we’ll check if Peak random one to two equals one and if it does We will add 76 dollars that’s cool and otherwise 178 that’s iron now we’ll duplicate this temp is greater than negative 80 and check if it’s greater than negative 64. that’s the border between this John and deep site [Applause] again epic random one to two is one here sometimes we’ll add coal sometimes we’ll Add iron and sometimes We’ll add gold if we end up one to three is one we’ll add our coal and then in the else if random one to two is one then they’re at 78 or 79 that’s cold now for the 10 is greater than negative 80. This is when it’s below negative 64. so we’ll use deep slight tiles [Applause] here we’ll add on the iron and gold all right 86 is iron deep slight and 87 is gold tubes like at the very bottom [Applause] is where diamonds can sometimes spawn diamonds are number 88. again iron is 86 And gold is 87. okay now we’re finally ready decoder add or to grid custom block [Applause] now the way we’ll do this is we’ll start from a certain tile and then move out either up down left or right and then again up down left to right from the new tile After that we’ll come back and do that a certain number of times I know that’s not a great description but it will make more sense once we start coding we use our A and B variables to indicate how big the or deposit is because different order deposits are different sizes if The type is 76 or 84. those are our cool then the gold ores are usually pretty big so we’ll set a and b to a big amount a to 4 and B to 2. if type is 78 or 86 which is iron in this case we’ll set a to five and B Just to 1. if type is 79 or 80 7 that’s gold I’ll set a to 4. in B to 1. if type is 80 or 88 those are our diamonds a will be just 3. and B will be one after all this we’ll repeat a times each time we need to find the Grid index of the tile so set gradient X okay and then we’ll get the X and Y variables from up here why plus x times grid height this is the same formula we’ve used before to find the grid index of a certain X and Y position so we’ll just make sure That the tile that is item create index of grid is not equal to either five or six and if it isn’t equal to either of these then it isn’t a stone tile and so we do not want to replace it we’ll check up at the top actually [Applause] So if it isn’t a stone tile we will stop this script the bottom inside repeat a will then Repeat b that’s our second variable for determining the size of the or now in here we either want to move up left right down or diagonally and the diagonally is going to happen Less often we’ll start with the moving up random one to six equals one will change grid index by one the else if one to five is one then we’ll change it by negative one to four is one change it by real height if one to three is one then change it by World height times negative one so this goes up this goes down this goes right and this goes left now more than half of the time it will move in this manner but sometimes it will move diagonally so we’ll duplicate this change this to one to four one two three one to two and This will just be in the plane else here we’re not doing not only changing it by one but also by World height see I’m doing here here we’re changing it by negative one and by World height here we’re changing it by one and by World height times negative one In the final position we’re changing it by negative one and by World height times negative one hopefully this all makes sense I know it’s a bit complicated but this just makes you go in a random Direction up down left right or diagonally now at the bottom here but not at the very bottom We’ll get a replace blocking we you want to put it after all these but before the blocks with two little arrows on them replace item create index of grid with and here we’re going to get the type variable [Applause] this is the type of or replace it with type and then we’ll Repeat again so now maybe you see more What A and B do you should try to make sure to understand this because that will allow you to make all your own Wars right you can add all the rest of the ores that I have in the tile Sprite B times it will move out in a Direction and then it will go back to the center and do that again eight times briefly I’m just going back into the add or custom block and change the set time here we’re setting temp from negative 175 to Y minus 10. we’ll replace this Negative 175 with a zero minus World height divided by two and I also don’t want it to be too close to the bottom so I’m actually going to change that to the 5 minus World height divided by 2. and this we can say y minus 5 right Because our dirt isn’t too thick and I’m also going to increase the probability going to repeat between one and three so now we should see a lot more of course back into the add order grid custom block there’s one thing I forgot to do in addition to replacing the side block For doors we also need to replace the middle block so we’ll put a replace item grid index of grid with type right here just underneath the repeat a second index two blah blah blah all right run that [Applause] so now we should see our order deposits are not lacking their middle block the Diamond is way too common so the diamonds right down here at the bottom I’ll just make that a one to five equals one so diamonds should be slightly less common see how I did that it’s pretty simple right you can match with the probabilities all you like yourself next order business is Adding cave I’m actually going to make the world even smaller for this one I’ll change it down to 240 and the reason I’m doing that is because if you remember the caves make the generation quite slow so stick in the ad cave and extend the cave block here And down at the bottom before we move the Terry NFL grid again repeat two repeating 200 times we’re going to extend the cave now we can go to our fill grade custom block we’re going to do something very similar again set I to one repeat length of caves this time And here we’re changing I by five each piece of cave has five items in the cave list make a new block add cave to grid with X Y then radius and with that screen refresh now we’ll put the block right here item I of caves for the X and then Take this from the oars again item I plus one but this time I have caves and then the radius is item I plus two I have K does now we do have one modification to the ad cave block to do the last episode I forgot to modify the Cave radius in the extend cave custom plot we’ll get ourselves an if else I’ll dump it over here in some free space if pick random one two ten is one then I’m going to bring our item draw into X plus two of caves remember to here put it in the Alice and The if of it plus pick random negative five to five divided by 10. okay now this is just very slightly changing the radius of our cave at 1 in 10 times it extends because item draw index plus two if K is is the radius we’ll go back To that give to grid custom block and let’s code it so the way that this box works as that it draws a circle it starts from the Middle Point and then it moves out in a bunch of directions and it puts tiles in each of those directions we’ll use the actual Direction of the generations frame we’ll point in Direction zero that’s straight up then repeat the ceiling of radius so that means the bigger the radius the more times we have to repeat to fill the circle which makes sense a bigger Circle means more Rays to make that actual Circle shape look correct and we’ll multiply that by four so because if it has a radius of 1 then it will need to move around four times it has a radius of two makes sense that we need to move eight times and so on and so forth each time it will Turn right 360 that’s a Full Circle and then divide it by the amount of times we’re turning right we’ll use our X and Y variables to hold the X and Y start by setting X to X and Y to Y and then we’re going to repeat [Applause] the radius So that we’re moving out from the center of the circle we are changing X and changing Y and here I’m going to basically recreate and move steps block we’re moving slightly less than half a tile each time so 0.49 and we’ll multiply it by sine s i n of Direction And then for the Y we’ll we’ll multiply it by cosine of cos F Direction now after we do that we’ll set our grid index we’ll set it to round y then change it by round X multiplied by grid height and now it’s time to replace the block so replace item grid index Of grid with two which is the air tile but not everything we want to replace I’ll get an ear of blood here and put it around here now we’ll use it contains block to check this not and it contains and then we’ll put all of the tiles we Don’t want to replace separated by underscores so these will be things like trees and we’ll check if this list of forbidden tiles contains underscores on either side of item grid index of grid if the gradient X isn’t one of these and we will replace the item with the air Tile now having this here would mean that it would just leave trees floating in the air which is not something we want there’s an easy way to fix that we can simply move the loop that Loops through the trees to the very end so it will loop after we’ve already done the caves Let’s try that aha it appears we have a cave here descends straight down this one it looks like a very nice cave okay wonderful seeing this Bedrock makes me remember that we should probably include Bedrock is one of the tiles that the caves cannot replace rock is number seven Don’t want any void kids ah yes like this one there we go I was just saying thank you kid for demonstrating well these kids have certainly made the underground a lot more interesting okay now that brings us to the end of this episode it has been a great episode And good job for you for making it to the end of this video because I know this has been a long video and quite complicated but I think it was well worth it and now that you have this wonderful tile based world I’m sure some of you will add your own stuff To it maybe some of you want a player yeah maybe some of you will add you know more ores more biomes more trees I’m really super excited to see what you do with this and I definitely encourage you to add your own stuff if you ever need any If you ever need any help with things if you have questions about how things work please ask them down in the comments I will answer them and if any of you want to share your project link um I don’t think it will let you do that in YouTube but Because of that I have a great studio for all the terrain generation projects and you can find the link to that studio in the description of this video I hope you have a great rest of your day and I’ll see you next time toodaloo Video Information
This video, titled ‘How to Generate Paper Minecraft Terrain in Scratch – Terrain Generation Episode 3’, was uploaded by FindingPepper on 2023-07-12 17:24:55. It has garnered 520 views and 21 likes. The duration of the video is 01:01:38 or 3698 seconds.
How to Generate Paper Minecraft Terrain in Scratch – Terrain Generation Episode 3
This episode we’ll be turning our pen terrain generator into a tile based terrain generator and using it to generate 2D Minecraft terrain. Enjoy!
Add your projects to this Scratch studio: https://scratch.mit.edu/studios/32662603
See an example of this generation in my Paper Minecraft game: https://scratch.mit.edu/projects/874629438/
Chapters 00:00 Introduction 01:13 Assets 02:17 Tile scrolling explanation 03:11 Scrolling modifications 05:06 Tile scrolling engine 11:53 Terrain 17:48 Smoothing terrain 20:00 Water 21:46 Biomes 23:06 Water improvements 26:28 Foliage 29:13 Trees 37:31 More trees 41:09 Ores 52:46 Caves 1:00:09 Summary
So this video does not accidentally “harm the Minecraft brand,” NOT AN OFFICIAL MINECRAFT VIDEO. NOT APPROVED BY OR ASSOCIATED WITH MOJANG OR MICROSOFT.