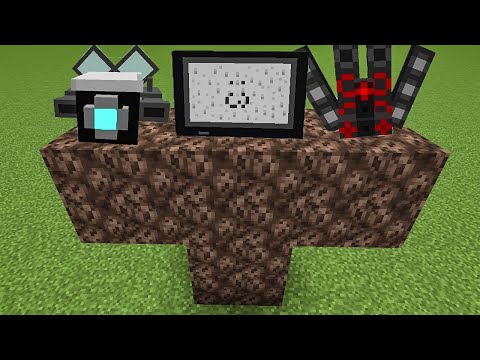
What’s going on guys my name is love cubs and welcome back to another video on the channel guys today we are talking about hats yes minecraft hats they can put them on your head and they just look absolutely amazing and you know you can just see normally it’s it’s a really Fun little treat you can do in minecraft and you can do this on your own computer on your own servers whatever you guys want to do it’s a lot of fun and i’m gonna show you how we can do that today you can have so many different kind of hats right we’ve Got like cars on our heads they look really cool you can have a wall-e sitting on your head you have pikachu so you can even have your own character sitting on your head there are so many options it’s completely limitless the only limit is what your creativity is willing to make I got a freaking ufo like trying to like beam me up right now on top of my head i love it i love it we got a wither head i got three heads now that is absolutely amazing and then of course we got a sword Stuck in our head these are just some of the options that we can do in today’s video so with all that said let’s hop into the software that you guys are going to start with blockbench all right so ignoring all the thousand things i have open i want to start with Where i’m placing my models and texture files so we’re gonna do a resource pack if you already have a resource pack that’s great we can edit that one or we’re gonna start a new one so i’m gonna go and open up a folder and we’re gonna start a new resource pack Okay so this is me in my resource pack folder you can see that up here minecraft resource packs and i’ve got two other packs in here we’re going to ignore those for now and i just created the resource pack called hat pack we open that up and Inside here you’ve got an assets folder and a pack mc meta file so i will actually leave down in the description the hat pack once it’s done so you guys can kind of have a template to work off of if you guys choose to do that but we are Going to open up this file so you guys can make your own nc meta file if you want to and inside this is just you have to pretty much copy this exactly so you get your left curly bracket pack and then you got your pack format I typically do six six tends to be working for 1.15 1.16 as things update you may have to increase your pack format to work for pack format number seven for 1.17 etc etc etc you know that kind of stuff and then you can do your description i Just put half pack you you really don’t even need the description the most important thing is the pack format once that’s done your resource pack will work in minecraft open up your assets folder inside that you need to have a minecraft folder inside your minecraft folder this is where things start To happen we will put our textures for our hat in here and i’m actually going to create a brand new folder and call these hat textures just like that hat textures we’re going to go back and we’re going to do models and then these have to be Model files for an item we’re not doing blocks we’re doing item and we are going to be editing a carved pumpkin so we’re going to open up this here and we’re going to have a carved pumpkin model file so i’m going to just take this location quickly come to blockbench We’re going to add a cube for now and we’re going to hit file export block model and inside this folder item we’re going to call this card pumpkin as you can see now we have a carved pumpkin hat essentially this is exactly what we need to start So now that we have our model file inside this folder let’s head back to the textures quickly the hat i want to make is actually a member’s hat so i’ve got my members folder here for my badges for new members and i’m actually going to use this texture so the texture is important It needs to be a png file and it needs to be a perfect square so this one is 320 by 320. so you can just actually take this texture and put it into hat textures and this is where the text is going to be if you want to have your own file then You can open up paint photoshop anything and let’s try that quickly and we’re going to resize this thing to be 32 by 32 i want to not do percentage i want to do that so you got to make sure you turn off maintain aspect ratio And you have this set for 32 by 32. that is your texture file now right so you’re gonna hit file save as and in that texture location we’re going to call this new hat texture it’s you know we’ll find new hat texture that’s it so now we’ve got a Blank new hat texture here because these are in my resource pack file i can drag this over here and i can drag this over here now you’ve got the new hat texture and the new what do you call it um members texture let’s build our hats So i’m going to just show you guys you can build pretty much anything you want here i’m going to show you what you can do with the textures right now let’s say you want to have a simple hat that is like just your typical i don’t even know like a ball cap okay We’re gonna try to build a ball cap okay so i’m gonna bring this back here and i’m gonna try to make a square out of this hat here so let’s go for that and we’re gonna drag this over to be centered on our cube so we’ve got three on each side there That’s perfect let’s bring this up one more let’s grab ourselves one more cube and let’s bring this over to match up with that bring it all the way over to make a shape of a ball cap um you might be wondering what i’m doing there i’m hitting space Space bar cycles through these two resize and move you can just come up here and hit move and you can move it or you can hit resize and you can do that if you hold shift you can do smaller motions or smaller degrees of movements and if you hold control it’s even smaller Those are just some quick keybinds that you guys can use for when you’re working on this i don’t know if i really like that so we’re going to try to round this off actually so we’re going to pull that back by one and we’re going to right click on this and duplicate Pull it forward and then i’m just going to resize this one more time just like that so this thing is looking not too shabby let’s work with our new hat texture so we’re going to come over here and drag this new hat texture in it is solid White and it’s applied to that face right so let us do a what color hatch we want to do let’s do a blue and green hat we’re going to have blue on the top here green on the front so let’s um use this square up here we’re going to resize that to that Little small square there and we’re going to come over to paint and let’s paint this square blue but we’re going to just paint that blue and once that’s blue you’ll see on your hat there and you can actually say apply to all faces now the entire hat is blue Let’s say you want to add some details to your hat right you don’t want to just be one solid color blue that’s fine you can go over here choose a different color this is something that i really like to do i turn the opacity down And then i just come to my hats and you can draw right on your hat even right and you can just add some texturing the more your opacity is down the less it will actually apply that darker shade of blue and you’ll see the entire hat now has This kind of texture to it i just really rush that so it’s not great by any means but you can see a bit of texture now we’ll do our green but we’re going to click on this drag our new hat texture over let’s pick a new spot to work with on This texture file and what we’re going to do i’m going to show you guys another tool is the paint bucket so if i choose the paint bucket choose the green that i want to use i can just click on that face and it fills that entire square in With that color of green i can now switch back to the paintbrush go for the darker color have my opacity set for 20 and once again just add some detail it’s really that simple and i can come back and hit apply to all faces and we can actually copy that and paste That right here paste and apply all faces now we’ve got a slightly weird colored hat actually kind of looks like a platypus but we’re going to ignore that so now you want to actually adjust this so it fits on your character’s head so you come over to display tab here Make sure that you click on the head tab and adjust this so it looks well on your player’s head i’m going to increase the size yeah that’s perfect right there actually now what we’re going to do is actually adjust how it looks in all your hands so this is way too big right We’re gonna bring that a bit smaller i don’t know how long the ambulance was going there i’m really good at zoning that out um and we’re going to bring this up and we’re actually going to try to rotate it just a slight little bit now if you like How it looks on that hand you can hit edit you can hit display copy come to the other hand and hit display paste and it applies the same settings to that hand how it looks in your first person this is also big for when you’re holding on to it on this On your server on your single player world whatever you just want to have this kind of look like look like you’re holding on to it right so you can actually see it we’re going to display copy that and paste it there as well now how it looks on the ground When you throw it on the ground you’re like oh that looks horrible right so you just have to adjust this just to add the little touches just to make it look good now one thing i really like to do on the server you guys do not have to do this at all You could do whatever you want but i have it so that they could put item frames on the walls and the hat looks like it’s actually sitting on the ground in front of the item frame so i just make it really large and level like that and boom Now they have a hat sitting on the ground one thing you could do is put the hat like that so it looks like your hat is hanging on the wall right there’s so many things you can do whatever your creativity says you can do it and then of course how it Looks in your gui so i just turn this around and i position it right there that should be plenty i might lower it a tiny bit and we’re just gonna resize it just the slightest there we go we have done our first block bench hat so now you can just hit save and That saves to the curved pumpkin let’s hop into our minecraft world and let’s apply this texture all right so this is my kind of test world there’s really not much here i often test resource packs here and what we’re gonna do is open up our resource pack folder and i’m gonna apply Our hat pack now when i grabbed a carved pumpkin it’s gonna look like this so this might happen to you i’m actually glad this happened to us because now we actually get to try to troubleshoot on video so you guys might be able to find ways to fix your problems I think this might be because my texture file is unused the uh here let me show you i’m thinking this new file is unused and we’re saying to use it as a particle so we’re actually going to delete that for now and we’re going to use that for our Particle and that should hopefully fix our problem so we’re going to save again come back here and we’re going to reload the texture plaque with f3 and t that was not the problem let’s go to our folder we’re going to head back to minecraft models item and carve pumpkin all right let’s Open this up let’s see what it looks like all right so i think i see the problem i’m pretty sure that minecraft doesn’t like there to be spaces in the file locations so i’m actually just going to go here and hit backspace on hat textures and do an Underscore and the same thing here underscore we’ll hit save again we’ll close this file and then we’re actually go back to our folder and put an underscore here as well just like that now we’re going to try that again f3 and t that was our problem do not put spaces or capitals Inside your folders or your texture files models do not like it so anyways we put this on our face and now we have a ball cap on right it looks amazing but let me go into first person oh i can’t walk around like this so we’re Going to adjust that we’re going to edit the texture file to actually remove that completely so inside the resource pack folder we’re going to enter the assets folder minecraft and textures inside this folder here we’re going to create a new folder called miscellaneous or misc inside that folder is This is where we’re going to put our pumpkin blur texture file this one is 256 by 256 pixels and we also have this pumpkinblur.png file again this will be in the hat pack resource pack down in the description below so you do not have to make these files yourself you can just Use that for your own templates but this pumpkin blur is essentially just an empty picture file it’s a png with no information in it whatsoever it’s just empty so that’s why when we refresh our resource pack here it’s completely clear we still have our pumpkin on our head carved pumpkin But it’s beautiful right we have our own hats on the serve on our server on our single player world wherever you want to have a hat that’s how you do the basic creations of hats in minecraft now if you guys want to get more advanced and add multiple hats Stay tuned for the next video where i introduce custom model data to have multiple hats on one carved pumpkin thanks guys for watching you guys enjoyed the video don’t forget to drop a like and subscribe if you haven’t already leave a comment down below letting me Know what you guys think of the channel what you guys thought of this video other things like that but guys most importantly please don’t forget to have a lovely day bye guys you Video Information
This video, titled ‘How To Make CUSTOM HATS in Minecraft! Pt.1’, was uploaded by Lubcubs on 2021-06-04 22:00:11. It has garnered views and [vid_likes] likes. The duration of the video is or seconds.
In this video, I show you how to make a custom hat to replace your carved pumpkin model with in minecraft! Hat Resource Pack: …


![Charged Creeper [SMP] {Cross-Play} {McMMO} {Dungeons} {Mob Arenas} {Custom Loot} {Shops} {Chest & Inventory Sort} {Crates}](https://newsminecraft.com/wp-content/uploads/2024/05/Charged-Creeper-SMP-Cross-Play-McMMO-Dungeons-Mob-Arenas-Custom-Loot.gif)