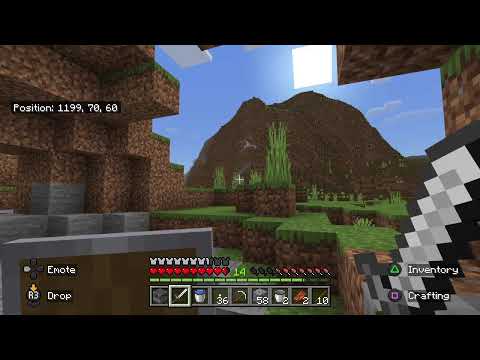
What’s going on guys welcome back to a brand new video and in this tutorial we’re gonna show you guys how to record and stream Minecraft and I know this video maybe looks like it came out of the blue but minecraft recently became really popular again like PewDiePie I Start playing it tons of other youtubers start playing it I thought like if you guys would like to record videos in Minecraft or stream it why not just go ahead and show you guys how it’s done in OBS and this video is brought to you by A good friend of mine Michael from our discord links in the description if you wanna check out his channel he did a great show up and I always support new talent if you have good equipment and you are understandable and you can record in 1080p I’m obviously just Giving you a chance if you want to upload on my channel or a tutorial I’m always supporting new talent like I’ve mentioned make sure to smash like button down below subscribe if you’re new and let’s go ahead and start off some Michael take it away All right so let’s get into this tutorial so what you want to do is create a new scene basically in OBS I’m using the twenty 3.2.1 64-bit on Windows first of all you go down where you have the scenes and you have one scene created you want to click Plus sign and then you want to click minecraft and type it in here so enter name is doesn’t care how you spell it it’s just easier to organize everything basically in scenes you can create how many one this is good for streams you can have like a welcome Titan right here If you go into minecraft you can click on this plus sign in sources that you can use display capture or you can use game capture display capture is this it’s basically captures everything you have inside of your monitor so if you bring up minecraft you will have it Around here where you drag it this is pretty good if you want to like record your screen like this but when it comes to Minecraft or other games in general you want to use game capture so if we place this in game capture we can type this as minecraft with small letters Because we already have one that is large letters now we can click on capture specific window it’s always easier to shoes you want to find ravu axc or minecraft and the version you’re using these settings right here there are nothing that you should care about you should only click okay launch up Minecraft once so you want to click on plus sign name here click on game capture minecraft doesn’t even matter how you type it just as it isn’t the same as it seems then you click ok so you want to have it there’s a ball capture specific window And find minecraft 1.14 here it opens now I have it in small minecraft as you can see what you can do is basically I’m gonna fullscreen this on my other monitor if I’m not full screen that you have minecraft inside of this so we’re going to be using high pixel for this One ok so right now it’s all working right now it says 18 FPS it’s because I’m in full-screen but for people that has a pretty bad computer once you click it’s go out of full screen and then you will have a lot more FPS but what you do Is basically go on here and you drag this I use this for over two years the quality is okay I would say it’s better in the video than in just like the preview screen right here this is just one way of doing it if you’re able to I Would recommend on using full screen it’s always better to use a full screen than what it is to use mini windows so what you can click if you want to stream and have a video capture device like a webcam there is this video captured right here in the plus sign we’re gonna Call it webcam right in my background right here as you can see my face right here I’m gonna pull over there we go click okay you have a webcam if it’s lagging you go into properties configure video you can go to camera control right here and then and then it’s like a Special light right there let you click it’s like configuration and then there we have a webcam if you have like a background like me and you want to use it you can click on filters and effect filters right here you basically right click the source click filter then down Here you will have a special crop and pad and then you just click that you can click on this to make it go inwards so it doesn’t seem like you have anything else in the background so like I would normally go for like a hundred like that And then right a hundred there you go that’s about it that’s like a background of it you don’t really need to do anything else right now my background is only this little screen I have to enable and disable everything you click right here so you have a webcam a source of Audio but we’re not going to be using that to add audio if you don’t have a mixer or anything you click the plus sign audio input capture and then call it microphone if you want to sort it out I’m gonna choose my line audio box USB because I have an XLR microphone because Sometimes the audio will look like this now this is not the best audio ever so we’re going to be fixing that basically click on the cogwheel into advanced audio properties and then you click Donna mix two mono and this basically makes it so both of them so you can hear It in both left and right arrow otherwise you would only be able to hear it in the right ear but yeah you control this audio with a slider you can put it at infinite – DISA Bell or you can put it at sea road as well which means Basically the audio comes a little bit clearer this is really good when you choose this you can go with basically game sound so if you have like two headsets plugged in which I don’t so what you always want to do when you have a webcam as well just keep it above the Game otherwise it will look like this spoon and then you can’t see it so you always want to keep the webcam overlay towards your minecraft then you have like there’s a game sound and microphone these are just basically any where they’re not going to be viewed on the Screen which means it’s no real problem you are now ready to record you have a game sound you have a microphone I’m gonna show you the best filters these filters you can just add it’s a compressor banner gain invert polarity limit or noise get noise percept and suppression basically all These plugins can be enabled you don’t have to mess around with it to get a better and clearer mic these are personally the settings that I use sometimes it’s a little bit weirder to use it because it matters of a microphone I’m using Explorer so I have Control over a soundboard and set of all sound cards you guys most likely have a headset blue snowball blue Yeti and suchlike but it’s not often a lot of people use an excel or when they’re you’re starting out so you can go into settings these are some pretty basic Settings if you want to have it looking like this because most likely it would look like it will most likely look like this from the start or something close to it what you do is click dark and default and then it’s basically dark around the edges you can change the Language to any language you want I usually have it in my own language but yeah this is not thing really you have to care about go to stream if you want to stream it you go to youtube gaming then on the link you can basically go on Your youtube channel find the link it’s like live streaming and then there’s a if you scroll to the bottom live stream now there’s a stream key which you revealed copy and paste it inside of here it’s pretty easy to find it if you need help with it just come down below And we’ll help you as much as possible if you’re going to out per output mode can be advanced which is better per se but you don’t really have to use it what I would recommend for a bitrate is if you go into your if we say now I’m gonna Use Firefox to open this up so what you want to do is search up speed test in your browser alright so speed test on that I think this link will be in the description you can see that this is about my download speed and soon the upload speed will Come up on the screen and when the upload screen is coming on the screen you can basically multiply it by a hundred though I would recommend you’re using yeah you can see 50 basically if I had five it will come up to 500 now it’s 5,000 now it’s seven seven thousand four hundred Basically like that you just want to keep on monitoring it in your head it’s pretty decent you want to have at least 13 it’s 1,300 bit rate I’m going to keep it around 9000 oh 9,000 it’s what I normally go for these are the best settings for me Everybody has different matters of your internet connection if your stream starts lagging you basically want to turn this down a bit down here you see recording that was just for streaming this recording what you want to do is find a new place or have it sorted like store A new folder so what you want to do I have a special D Drive so I want to go in here and I want to go create a new folder and call it minecraft videos you see I have it in Swedish settings but it’s basically the same thing you want To select the map now it’s in Minecraft videos it will generate it don’t really have to have anything any sense right here in this settings you have base canvas resolution which is what you want to do for worst computers you want to have 1280 by 720 but you should always Have a 1920 by 1080 selected and go into out output scale resolution so basically this is the canvas but this is the scale resolution which means you can choose either way I can choose a 3 6 640 by 360 but what I normally go for is 1080p 1920 By 1080 down here you can see I have a by Pollock sharpened scaling 16 samples hotkeys this is basically pretty easy for starting streaming I’m going to put delete and then delete so every time I press and the video will start we have delete here for starting to stream and We have start start recording and stop streaming here stop recording as n button if I press this again I start stop recording on my other view you could show in high minecraft if we place like yeah I want to show minecraft I can put this as one hide minecraft it’s also One this is nothing that we need into that that section there’s not much that you need to do its busiest direct you can have process priority so you can basically have the highest and you can have normal you have the low normal an idle this is how good your computer is But it’s really nothing that you need to worry about all of this is pretty nice everything works this is the best settings that I use for video recording I normally go for 1080p 60fps but it’s all working if you record a file you can see with it that it’s working I’m inside Minecraft right now you can see me moving it around wait Jesus you can see me moving around right now minecraft is being buggy since it’s on hypixel I can go and actually enable my webcam as well this should be on your screen right now hello there you can see That I’m moving arrived I’m talking at the same time that the audio is playing and it’s working perfectly yeah that’s what that is what I have to show for this video let’s go to the outro so guys that’s it for this video I think it’s much Michael for recording this video His channel is linked in the description and I will see you guys obviously in tomorrow’s video Video Information
This video, titled ‘How To Stream And Record Minecraft On PC (OBS)’, was uploaded by JustAlexHalford on 2019-07-16 16:00:09. It has garnered views and [vid_likes] likes. The duration of the video is or seconds.
Unlock savings now & save 15% discount on BorisFX!


![-+- ⭐ TMF Country SMP⭐ [1.20.4] -+-](https://newsminecraft.com/wp-content/uploads/2024/05/TMF-Country-SMP-1204.png)