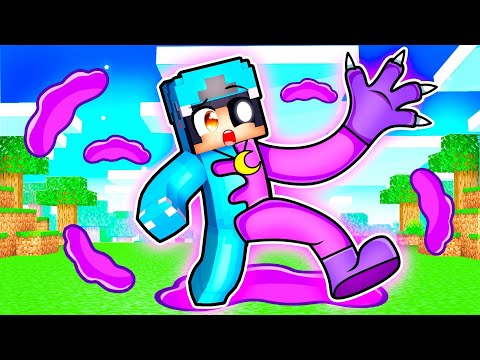
Hey i don’t know about you but i think this might be the scariest noise in video game history all right folks my name is adam and i like to make tiny nerdy things and today i made a creeper lamp so the plan here is to have a somewhat realistic interpretation of a creeper Seconds after he hits the go button bury deep within his kamikaze belly i will however need something to hold up the body and the explosion without it being obvious that that’s what they’re doing with this in mind the plan is to have his feet firmly planted on the ground Albeit in varying degrees of disrepair we’ll call it making the feed is a pretty straightforward process i’ll start with a lump of clay and poke enough holes for however many toes i want and then roll some little balls into toe shapes and stick them in then i Can smoosh some rolls onto the legs to give a little bit of texture before getting started on the bone that will be sticking out the top the bone will serve two main purposes one it’ll give me a good spot to mount some wire later to help support the Explosion and two it’ll look gnarly and that’s good enough to make it worth doing and once i’ve added some explosive texture i can set it aside and get started on the next leg now this one will be a little bit less battle damage from the front so i’m going to keep the Skin texture intact all the way up the knee however i’ll expose the backside by cutting away a fair chunk of clay and then using my melon baller to scoop out a bunch of the body i find a really easy way to make gnarly looking battle damage is to simply poke A whole bunch of holes into it i don’t know why but once you get some paint and a couple little bones in there it looks pretty awful and then i can add this leg to my first one and make a couple more now the first Two do need to be a bit taller so they can hold up the explosion but given that i’ve got a bit more artistic license with the other ones i made them extra crunchy then it’s into the oven with them for a pre-bake and i can start adding the little details now mostly These will come in the form of tendons connecting the bones to the legs as well as little bits of muscle and flesh over the top of my visceral pointillism now at this point there’s really no going back from how gross it’s going to be so You may as well go all in to that end i thought it might be fun to add little creeper chunks shooting off the body as well so i’ve made some unidentifiable body lumps to attach later now the head’s going to be flying out at the top of the explosion which means it Needs to remain aerodynamic unfortunately because i’m trying my best to keep it true to the anatomy of a minecraft cube world i’ll have to eschew aerodynamics in favor of keeping it lightweight so a skull of aluminium foil will have to do i also want to make sure that it is Immediately recognizable that this is a creeper the goal here is to take those famous 64 square pixels and bring them to life in a way that doesn’t stray too far from the original design mostly i want people to see the thumbnail and instinctively click on a minecraft video am i pandering to the Algorithm you betcha now my original design in as much as i ever have a design for these things mostly i just start shaping things and hope it doesn’t turn out naf was keeping his mouth and eye holes black however once the shape of the face started coming together i decided i Could still add little eyeballs in as long as i painted them black in the end same thing for the mouth he seemed a little too gummy without teeth so i rolled some tiny balls of clay into pointy points of clay and then using a little bacon bond i jammed them all up Inside his gums until i was left with a mouth fit for the big book of british smiles Then the only thing left to do is go full fled the impaler and mount my head on a big old spike now i am going to use the strongest gauge wire i have so i know it’ll hold the head at whatever angle i want without fear of it slowly Sinking to the ground of course if we’re going to lean into the gnarly r rated rating then we’re going to need to make this head a bit grosser by adding a spinal column to do this i’ll wrap the wire in some clay then mark out each of My vertebrae then i can add the spinous processes coming out the back before adding both of the transverse processes along the side then i’ll use my ball stylus to blend each of these pieces together and give it a nice bony texture finally i can wrap my spinal column and A bit more clay to help blend the head into the neck and add some wormy d leaves to bulk it up a bit more and make it look like the rest of the body parts i’ve already made but that is essentially it as far as the Sculpting goes which means i’m on to the painting so i’ll start by priming everything in a nice white gesso now gesso has been my go-to primer these days because i bought a liter of this stuff and i don’t know what to do with it otherwise fortunately a nice white Base means i can paint with thinned out colors which i find make for a nice and easy shading here i’ll add a base coat of green and then i’ll let it seep into all the cracks and grooves not worrying about whether it’s piling up anywhere then i will strategically add some Highlights of a dirty green kinda wherever i want before giving the entire surface a once over with a darker green this will help blend all the undercoats in but it’s also translucent enough that it will let the shading in the cracks and wrinkles show through Now i had humdin hot about giving him a pixely paint job but i couldn’t figure out a way to make him not look stupid so in the end i just ended up highlighting some of the edges and ridges with a lighter shade before hitting it with a Slightly lighter shade i think it works well as far as giving it a cartoony look while still retaining a tiny bit of realism or as much realism as a four-legged amorphous explosive tube that’s evolved become a living proximity bomb can retain any degree of realism i Will let you be the judge of it otherwise the green skin finished we can get started by adding the bloody red bits before painting the mouth and eyes black now call me crazy but he’s kind of adorable with his big beady black eyes anyways teeth get painted a bone white And then i can go over the toenails and bones with the exact same bone white before adding some quick shading with a sepia wash Originally i wasn’t going to bother with the base but i wanted my feet to be completely free from the rest of the explosion body thing so instead i’m going to build a really basic dirt and grass block so i have cut out a perfect square of foam that i’ll cover in my Fake dirt and then a dry brush with progressively lighter browns will give me the nice dirty appearance that i’m after then i can set my feet in place to determine where exactly each of the feet should be since i want to keep the dirt beneath them free of static grass in Order to make it easier to glue them in place later then when i’m happy with where the feet are i can mix up a little batch of thinned out mod podge which is just matte mod podge and a square of water and then paint that over the entire exposed base Then i’m ready to apply a nice healthy coating of static grass i’ve laid down a bit of paper in order to catch any errant grass clippings and i’m using a static grass applicator here because it makes my grass stand on end and it fills me with a child like glee every time but You can absolutely just sprinkle the grass by hand and it will look perfectly fine or hell just paint the base green and for what we’re after it’ll probably look just as good finally i’m going to gently brush the grass away from the center to account for the shock wave From the explosion this makes literally and i mean quite literally no difference in the final piece but i did it anyways then a couple big old globs of glue will hold my feet in place and i’m ready to get cracking on the explosion to make set explosion i’m going to be Repurposing some christmas lights these are tiny leds that are powered by usb which means they won’t get hot enough to cause any damage to the cotton we covered them in and i don’t have to worry about faffing with wiring which means i don’t have to electrocute myself Today the center of the explosion is going to be made of packing paper which i will then coat in a layer of aluminium foil the paper will bulk up my bomb so it’s significantly larger and the foil should help to reflect the lights out of the Explosion then all that’s left to do is wrap the lights around the ball i intentionally chose the shortest christmas lights we had lying around but they’re still 50 meters worth of cable to wrap around this ball so it took a while finally i’ll take some modeling mesh and Wrap it around the ball this will both hold the lights in place and keep them from unwinding as well as give something for the glue to adhere to instead of directly on top of the leds in the wire then i can very carefully jam the wire From the head through the body of the explosion and then drive that through a hole i drilled in the large leg chunk i’ll also use the wire i mounted through the other leg to help stabilize the entire thing to make the plumes of fire shooting off From the main explosion i’ll jam a few lengths of wire into the body then wrap a small amount of lighting around these parts now once i’d finished all of that i realized that the cable was hanging out awkwardly and i needed to fix it unfortunately because it’s already Soldered onto the usb end i had to completely dismantle everything and feed the cable through a tiny hole i drilled in the ground before pulling the entire thing back together i’m sure somewhere in there there’s a lesson to be learned about planning but i’ll be damned if i Can figure it out failed lessons notwithstanding i’m ready to add smoke and fire which will be made of cotton balls these can be unraveled so they’re not quite sabally and then a dab of hot glue will hold them in place on the mesh wire and it’s just a case of rinse and repeat Until every inch of the surface is covered in cotton Now before i get on to the painting i want to make sure i cover the body parts so that i don’t inadvertently cover them in paint a little aluminium foil will keep everything protected and i can get started with the airbrushing this is one of those scenarios where an airbrush Truly makes all the difference trying to paint cotton balls any other way is a recipe for frustration and tears that being said if you haven’t got an airbrush handy i have had success in the past with dyeing cotton balls and then letting them dry or buying pre-colored balls and being very strategic with Their placement now as far as the painting is concerned i’ll start with a heavy coat of yellow making sure to get the majority of the cotton covered before working my way through oranges reds and finely dusting all the distal bits in black then once i’ve removed the foil i’ll Give the grass underneath the explosion a bit of soot shading as well finally i can reposition the head until i’m happy with the projected angle of bodily ejection and then start attaching those various little chunks and bits will be flying outwards i’ve drilled tiny holes That can be used to glue each of them onto the metal wires that are sticking out but with that we are onto the glamour shots That’s There you have it folks this was my first foray into the world of minecraft and i think we can all agree that this one was a banger sorry but i’m not sorry to give a shout out to my newest patrons alex hayward jenny wood nancy whittington coats andy Shea monica zins gracie moon and robin the rat making tiny nerdy things takes a huge amount of time and it simply wouldn’t be possible without the support of my patrons if you’d like to help support the channel and keep me fed then have a gander at my patreon the link is In the description below of course you can always help out by subscribing liking this video commenting and sharing it with your friends otherwise we’ll uh see you next week cheers You Video Information
This video, titled ‘I made a realistic Minecraft Creeper EXPLODING!’, was uploaded by North of the Border on 2021-08-13 15:00:31. It has garnered 881896 views and 32504 likes. The duration of the video is 00:12:00 or 720 seconds.
What better way to light up a room than with a creeper explosion? Well, I made a minecraft creeper into a lamp, and now you can too!
Want to help the channel? https://www.patreon.com/northoftheborder Want to buy me a ko-fi? https://ko-fi.com/northoftheborder Follow me on instagram! https://www.instagram.com/northofthebordercraftworks/
And of course, ya’ll know I love me my likes and comments, and if you haven’t subscribed yet, now is a great time to do it! _____________________________________________________________________________________________________
Materials — Full disclosure: I’m an Amazon affiliate, so any of the links you follow here will help support the channel. It doesn’t cost you anything, but I get a little kickback for each purchase made through these links (I like to think of it as taking money right out of Jeff Bezos’s pocket)!
Usually Used Materials:
UV Resin (UK) https://amzn.to/3izI0wg (USA) https://amzn.to/3wreX1b (CAN) https://amzn.to/3yIxEiG Mod Podge (Gloss) (UK) https://amzn.to/3ta4BBY (USA) https://amzn.to/3hTBPRY (CAN) https://amzn.to/3khr2Uz Mod Podge (Matte) (UK) https://amzn.to/323CGrE (USA) https://amzn.to/3hTBSx8 (CAN) https://amzn.to/3AS3XO6 Tacky Glue (UK) https://amzn.to/3tkK9OQ (USA) https://amzn.to/3hT1FoZ (CAN) https://amzn.to/3hS6TBC CA Glue (Super Glue) (UK) https://amzn.to/3217k51 (USA) https://amzn.to/3ANpAin (CAN) https://amzn.to/3AR4lMs Armature Wire (UK) https://amzn.to/3s1rHtm (USA) https://amzn.to/3yG1zIc (CAN) https://amzn.to/3jYxcZs Clay (UK) https://amzn.to/2R5rWXL (USA) https://amzn.to/3xw4bIl (CAN) https://amzn.to/3hXe7Eo Paints (UK) https://amzn.to/3eLsona (USA) https://amzn.to/3r1eemq (CAN) https://amzn.to/3hUgWWP XPS Foam (UK) https://amzn.to/3wVh2n7 (USA) https://amzn.to/2Vu85DF (CAN) https://amzn.to/3e6dDL3
My Tools:
Sculpting Tools (UK) https://amzn.to/3xw4uD9 (USA) https://amzn.to/36tQjCO (CAN) https://amzn.to/3AMowvd Silicon Tools (UK) https://amzn.to/36vJz7n (USA) https://amzn.to/3yD3mh4 (CAN) https://amzn.to/2UBf3Gy Stabbing Tools (UK) https://amzn.to/36vJLn7 (USA) https://amzn.to/3r1fJky (CAN) https://amzn.to/3r0wdcE Pasta Maker (UK) https://amzn.to/3wABzwd (USA) https://amzn.to/3ANETHH (CAN) https://amzn.to/3hvhGT0 Airbrush (UK) https://amzn.to/3r8wqe0 (USA) https://amzn.to/3r2w34k (CAN) https://amzn.to/3wCxlEI Airbrush Booth (UK) https://amzn.to/3l95Xfi (USA) https://amzn.to/3BZfn32 (CAN) https://amzn.to/3fcCXQ0 Compressor (UK) https://amzn.to/3wqIiZK (USA) https://amzn.to/3AJKtet (CAN) https://amzn.to/3r17jth
My Filming Equipment:
Camera (UK) https://amzn.to/3k3LLuL (USA) https://amzn.to/3hvhALd (CAN) https://amzn.to/3hvi2ZQ Lens (UK) https://amzn.to/3wxJ9YL (USA) https://amzn.to/3xAGezU (CAN) https://amzn.to/3yK1kvC Microphone (UK) https://amzn.to/3htJqYg (USA) https://amzn.to/3e5bGhJ (CAN) https://amzn.to/36pvf02 Mount (UK) https://amzn.to/3yOnrBn (USA) https://amzn.to/3e6tXLQ (CAN) https://amzn.to/3xyrqSj
_____________________________________________________________________________________________________
Chapters 00:00 – Ode to my mud hut 00:19 – On the right foot 02:26 – Alumidynamics 03:43 – This is Spinal Tap 04:27 – Why did I buy so much? 06:01 – Dirt and Grass Blocks 07:24 – Better than Xmas 08:55 – Fluffy White Balls 09:37 – Fluffy Yellow/Orange/Red Balls 10:27 – Glamour Shots _____________________________________________________________________________________________________
Some of the music in this video is courtesy of GameChops. Specifically, it contains multiple tracks from Chillcraft (Minecraft & Chill)
Chillcraft is an album of chill out and lo-fi Minecraft remixes by Helynt ▸ http://smarturl.it/chillcraft
Grab Chillcraft on vinyl ▸ https://music.gamechops.com/album/chi…
Chillcraft combines the hybrid electronic style of Helynt’s series “Super Lofi World” with a more laid back and relaxed vibe. Perfect for world-building! Super Lofi World ▸ https://www.youtube.com/watch?v=5hqf5… Super Lofi World 2 ▸ https://www.youtube.com/watch?v=j5T2T…
Pigstep, the album’s lead single, was composed by indie darling Lena Raine for the Minecraft Nether Update. The rest of Chillcraft are tracks composed and produced by Daniel Rosenfeld, better known as C418.
Chillcraft was produced by Helynt, mastered by Dj Cutman, with artwork by Sean Therlow. The 3 artists collaborated on the animation for this video.
Stream & Download Chillcraft ▸ http://smarturl.it/chillcraft Limited-time vinyl ▸ https://music.gamechops.com/album/chi…
Chillcraft on GameChops.com ▸ http://www.gamechops.com/chillcraft
#minecraft #creeper #polymerclay