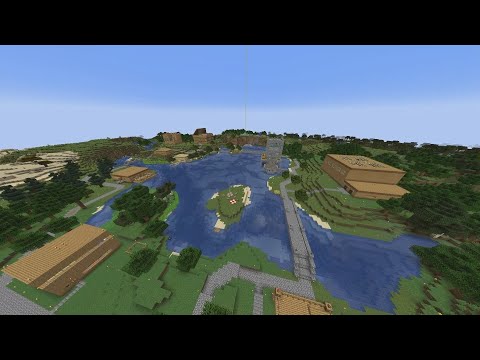
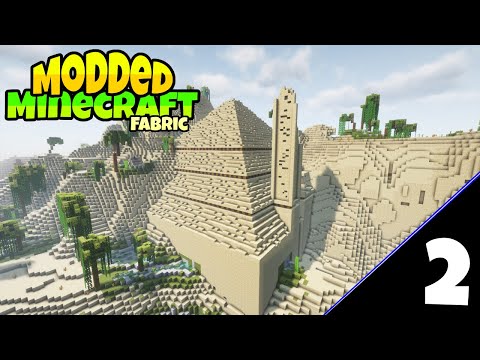
Welcome to the second lesson in this tutorial Series where we’ll be creating a Minecraft clone in JavaScript I’ll be showing you how to use instant meshes to render thousands of objects on the screen at once with the end goal being this procedural world that you can shape And sculpt right from the browser so without further Ado let’s get coding so if you can locate the the world file here let’s open that up and let’s first change the size that we’re passing in so this is going to be change to an object so let’s do default width is Going to be 32 blocks and the height will be 16 blocks and then we need to add a third dimension in here so we’re just iterating over the x and z axis but we need to iterate over the Y AIS as well so I’m going to add another for Loop in Here and we want to look at the height here and x and z those will also need to change to size. width so now that we have this y parameter here we’re going to pass it in when we’re setting the position of our blocks we’ll just save that and now if We go back to the browser we can see that we have this 3D kind of world here we’ve added that wide Dimension to the world now as you might have noticed already there’s a little bit of stuttering when we’re rotating this around so I’m going to go and make the World a little bit bigger here let’s do 64 by 32 and we’ll save that now if I try and rotate this you can see that everything is just coming to a grinding Halt and this is because we’re using a very naive way of rendering these blocks basically creating one mesh for each Block in here and 64x 32 I can’t do that in my head but that’s a lot of blocks and each of those draw calls is just being performed really inefficiently so we need a way of batching all those draw calls together so we can reuse the same geometry and materials across all of Those cubes and that’s a technique called instancing so I’m not going to get too much into like the nitty-gritty details of how instancing works at the GPU level um but I did pull up the documentation for the 3js instance mesh class so just reading the description Here you can see that we use the instance mesh if we have a large number of objects with the same geometry and material but different world Transformations that could be different positions different scales different rotations so this reduces the number of draw calls and then improves the rendering performance of our application Minecraft is a perfect application for this because we’re just drawing a bunch of blocks it’s all the same geometry the materials vary a little bit and that’ll add some challenges in later but for now we can use this and speed up performance drastically so just pulling up one of The 3js demos right now this is the instan thinging performance demo it can give you a really quick idea of what instancing can do in terms of increasing performance so we have our frame rate counter up here we’re getting 120 frames per second so if I just switch over to The naive method and Let’s do let’s say let’s do 10,000 of these objects so I’m hitting 35 frames per second right now which is not great you can see there’s a little bit of stuttering if I go to instance it just moves right up to0 frames per second It’s super fast and you can see there’s also reduction in GPU draw calls and GPU memory as well so with instancing it’s just one draw call because these are all the same object with the same material using 173 kilobytes of memory if we go to naive looks like it’s still using the Same memory but it’s 10,000 draw a calls so before we get into adding instancing to our project we need a way of measuring the Improvement and we do that by having that frames per second counter in the upper left so we’re going to quickly add that in so the frame rate Counter actually comes prepackaged with 3js so all we need to do is import stats from three examples JSM Libs stats. module. JS now adding the stats to our application is super simple all we need to do is to create a new constant here called stats and will be New stats and then we need to add that to our document so do document.body append stats. this should be stats not status and then all we need to do is we need to update the frame rate statistics each frame so let’s go down to the animate function and we’ll do stats. update now If we go back to our game here you can see that we’re getting a whopping three frames per second so definitely some room for improvement there because this is basically unplayable at this point so now that we know where we’re starting from we can go ahead and add Instancing to our application you can get an idea of the performance improvements that we’ll get so going back into our code now we’re going to go into our world file and we’re going to update this generate method here so let’s start by removing the old mesh Here and then we’re going to create a new mesh this will be new three. instan mesh so here this is very similar to a mesh we pass in the geometry we pass in the material but there’s one more argument here and this is the maximum number of instances of the mesh that We’ll have this one caveat with instance mesh you need to know ahead of time the maximum number of instances you cannot allocate more without creating a new instance mesh the maximum number of blocks that we’ll need so we’ll call that Max count that will be this do size. width times this Do size. width times this do size. height so it’s just the the width squared times the height gives us the total number of blocks so we can then pass that into our instantiation of our instance mesh here and then we’re actually going to start by setting count equal to zero so Count is the current number of instances that we have so there’s two different variables we got to keep track of here the maximum count and we have to make sure that we never run over that limit and then also the current count so you can render less than the maximum count But you just cannot render more than that now let’s go ahead and go about adding our instances here so I’m just going to delete this old code so what we need to do is we need to define a matrix and this will be a 4×4 Matrix which will store the position of each Block and then we’ll do matrix. set position and we’ll pass in the X the Y and the Z position now I’m also going to be adding a 0.5 offset to each coordinate here and the reason for this is the default box geometry in 3js the center of the box is at the origin And just to keep things kind of cleaner I want the the lower left corner of our world to course respond to the lower left corner of that first box now we need to set the Matrix for each instance so we’ll do mesh set Matrix at and we’ll do mesh. count plus plus and Then we’ll set the Matrix so how this is going to work is we start with zero instances so then we set the Matrix for um the instance at index zero to the Matrix and then this is going to increment that mesh count so the next time we do this it’s going to Be index of one set the Matrix and so forth and by the end of this count is going to contain the the total number of instances and then finally we need to add the instance mesh to our world so let’s us do this. add mesh so there’s not really a whole lot Of extra work we need to do to make instancing work it’s just keeping track of the total number of instances and then a little bit of extra work defining this Matrix setting the the position the transformation for that Matrix and then updating the transformation matrix for each Instance so if we go back to our game now you can see that things are butter smooth we’re getting 120 frames per second so we went from 3 frames per second to 120 which is uh what my monitor is maxed out at so everything is working very nicely and we’re ready to Start making our world a bit more interesting now before we get into the world generation I want to go ahead and add a UI to our Minecraft application and this will help us a lot with debugging because we can tweak values while we’re working on things and debugging Things so the the UI that comes prepackaged with 3GS is called l goey so I’m on the website for that right now and this is the complete documentation it’s very well written very comprehensive so I’m not going to get into everything here but pretty much everything you can think of you can do You can do checkboxes you can do buttons text Fields number field sliders dropdowns so highly recommend in looking up the documentation for little gooey and seeing all the things that are possible with that so I’d like to keep all of our UI codes separate so I’m Going to create a new file under scripts called ui. JS so here we’re going to import the little guey library to import guy from three addons Libs little gooey. module. min.js and let’s create a function in here called create UI and we’ll pass in our world object so you need to start by Creating the guy object so this will be the the base object that we we add all of our controls to so let’s go ahead and add a control for world. size and we’re going to add a property for the width so how this works is we give it The object that we want to manipulate and the property on that object that we want to change so in our world we have a property called size and width and height our property on this size object so I’m telling it modify this object and the property on that object And then we can also set some minimums and maximums and step values so I want a minimum of eight a Max of 128 I want to step one at a time and then we will call this width so do a similar exercise for the height here and then finally we want to Be able to regenerate our world so I’ll just add a button here so I’m giving it the world object and passing in the name of the method that I want the button to trigger so finally we need to call this in our main method so let’s go into Main and Then right before animate we’ll do create UI and then we’ll pass in the world now if we go over and look at our code you can see that it’s added the UI here so I can change the width so you can see that it’s limiting it between Those Min and Max values you specified same with the height so if I set this to say 128 by 64 actually let’s do something smaller 128 by 10 and click generate that will regenerate the world so it looks like it’s still keeping the the old instances so we need To go and tweak our world code so when we’re generating we need to clear all of the existing child objects so now when we go back here I change this to 128 change this to 10 so now we have this nice UI that allows us to dynamically change our World parameters on the Fly we don’t have to go back into the code change them have it rebuild go back so this saves a lot of development effort now one Improvement we could make rather than having this button we have to click every time we can automatically trigger Generate every time the width or the height changes so let’s go back into the UI we’ll delete that and we’ll do guey on change and this we’ll just pass in a function here and all we’ll do is world. generate so now if we go back into our Code I change the width you can see that I don’t even have to click a button anymore it’s automatically updating our world as we move these sliders now with our UI out of the way we can now focus on creating the data model for our 3D World so I’m going to go ahead and in our world class def find a new property at the top called Data so I’ve added a type declaration here using JS do I’m going to be using this quite frequently in the project to help the intellisense with the editor and also kind of Document what each of these properties are now you could argue you could use typescript for this instead and that’s perfectly valid but I’m sticking with vanilla JavaScript for this project so this data array is going to contain what each block is at each X Y And Z location so we can say at an X of two y of 3 Z of 20 that it’s a grass block there and that’s going to be represented by this ID property here and the in instance ID is a reference to the actual mesh instance at that location Now the reason that we need to keep track of this is when we go to remove that block we need to remove that instance from our scene so now that we have our 3D data array defined we’re going to go ahead and split our generate function into two separate functions so The first is going to be where we actually generate the data model for our world so it’s basically just defining what is the block type at each X Y and Z location and then the second function is going to be generate meshes so once we have that whole world data array defined We’re going to go through and for each XYZ location that has a block we’ll create a new instance for that so we’ll just call this generate meshes because that’s what this code already does We’ll add two new functions called generate and another one below called generate Terrain So to start with we’re going to set each block in our world to the same block ID of one so I’m going to go ahead and write that code and then I will talk through it all right so I’ve went ahead and implemented this function now I’m Not typing everything out on the screen in some instances because I think it’s just kind of boring to watch me type um but I’ll try and talk through all the code line by line so I don’t skip over anything and if you want a copy from the Video feel free to pause otherwise you can also go into the GitHub or repository which I’ve linked in the um description down below for each lesson in the series I’ve created a single commit so you can go into the commit history for the repository you can find the commit associated with lesson two Here and you can see a snapshot of the code so as you’re following through with each lesson you can kind of look at the end product for each of those lessons so anyway that aside let’s talk through this code so first we’re clearing our data array so we can call this multiple Times and it’s always going to reset the world then we have a triple four Loop here so let’s talk through this from inside out so this is the object for our block here so you can see we’re setting the ID to one and the instance ID to Null because we have not yet created our instance meshes yet so we’re building our world row by row then we’re concatenating all those rows together to build a slice and then building all those slices together to completely define our 3D World now before we go ahead and adapt our generate meshes Function to the code we wrote up here I want to go ahead and write some helper methods that we’ll be using a lot so we need to be able to get a block at a certain set of XYZ coordinates need to be able to set the block ID set the block instance ID and we want to make sure that when we’re passing XYZ coordinates into these functions that those functions are actually in bounds so we don’t get any errors when we’re accessing something out of bounds so I went ahead and defined all of those functions below our generate meshes function so we’ll talk through Each of those four functions one by one so for git block we’re passing in the XY and Z coordinates we’re checking to see if those coordinates are inbounds so let’s quickly scroll down to the bottom here and you can see our inbound function so the inbounds function also Takes in XYZ coordinates and all it’s doing is returning true if these coordinates are within the bounds of our data array if they’re out of bounds then it returns false that just prevents us from trying to set the value of an XYZ coordinate that does not Exist so if that is in bounds then we’ll return the block data at that particular set of coordinates and just as a reminder that block data is the block ID which is the type of block so grass dirt Stone Etc and then the instance ID what is the Mesh instance at that particular set of coordinates so if it’s not in bounds we’ll just return null and then we’ll handle that in the calling code now the other two functions I wrote are set block ID and set block instance ID um these are very simple just passing in XYZ coordinates and then either the ID or the instance ID and of course just checking to see if the coordinates are in bounds before we go about trying to access the uh the data array at those coordinates so that’s it those are four helper functions get Block Set block ID Set block instance ID and inbounds so now that we have our helper methods implemented we can go and finish up the implement ation for our generate meshes function to match what we’ve done here with generate terrain so we’ll start by getting the block ID for this particular set of X Y and Z Coordinates so we’ll do a new Conant here block ID and we’ll do get Block pass in the X Y and Z then we want the ID so we’ll Define a new constant for our instance ID and this will be mesh. count now we don’t want to just increment this right Away because block ID might be zero there might not be a block here so we don’t want to just assume that we’re going to be using this instance ID quite yet so we’ll do a check here if block ID is not equal to zero then we will create an instance at This location so we’re going to keep these two lines here we’re still going to set the position on our Matrix and and then set the Matrix for that particular instance this will now be instance ID and then now that we’ve created that instance we need to update our block With that instance ID so do this do set block instance ID XYZ and pass in the instance ID here and then finally we need to increment the count on our mesh so we can get the next available instance so we’ll do that right here now everything Should be exactly the same as what we had it before but now we have successfully separated out our world data from the 3D representation of the world so we can do whatever we want with this world data we can manipulate it in any way that we want and we can save it To disk and not have to worry about carrying all that mesh data with it so let’s just go verify that everything is working in the browser and it is so this is exactly what we had before but now we have a much more flexible system so let’s make this a bit more fun Now let’s actually get into some procedural generation so we’ll start with something simple and we’ll work our way up to something a bit more advanced and actually useful so I’m going to define a new property on our world called threshold and it’s going to give that a value of 0.5 We’re eventually going to delete this so I’m not going to put any comment on that but let’s go down to generate terrain and we’ll say math. random so this will generate a random number between zero and one if that is greater than the threshold then let’s set the block ID to One otherwise we’ll set the block ID to zero so this basically what this does is randomly pick if there’s a block at a location or not and we set threshold to 05 so there’s a 50/50 chance there so if we go and look at our world Now you can see that a lot of the blocks are missing and it gives kind of this Borg know if you guys are into Star Trek or not but the this Borg effect which is pretty cool so let’s add a parameter to our UI so we can tweak that threshold value in real Time so in UI let’s add a line here so on world we want to manipulate threshold and that will just be between zero and one call that noise so now if we go back to our game here I can toggle this threshold value so if I set this to zero math. random is Always greater than zero so you can see that everything’s filled in and if I increase this to one you can see that slowly all the blocks go away it’s going to make a very sparse World here now this is cool but it’s not useful because the noise isn’t structured it’s just Completely random what we want is smooth noise we want the noise values to change slowly over time so we can create effects like Hills and Valleys and things like that and that’s where Simplex noise comes into play so I went ahead and Googled Simplex noise just so You can get an idea of what it looks like before we start implementing it um so we can see some examples here so in this image on the right we can see it looks like noise but it’s very smooth out very blurry so this is going to give Us kind of those Rolling Hills that we’re looking for and you can tune the the scale of the noise to control sort of the how big or how small those noise features are so since 3js is open source we can actually go in the 3js GitHub and Look at the code they have and they already have an implement mation of Simplex noise which is super nice we don’t have to go and Implement that ourselves or import some npm package and that’s one thing I really love about 3js is usually if you need something someone has already added it Either in the examples or the addons um the difficulty is just finding if a thing exists or not um because a lot of this stuff is not documented all right so that’s enough background let’s get into actually implementing Simplex noise in this project so let’s delete this threshold property That we added here and then we need to go ahead and import the Simplex noise module so I’m just going to copy paste that in here so that’s located under three examples JSM math Simplex noise and let’s go ahead and first Define some parameters for our terrain generation so I’m just going to call this params and this is really going to be all of the defining attributes for our terrain so if we were to use all these same parameters again we would get the same world out so it’s going to contain the seed value and all of the different Parameters used for our noise models so under pams I’m going to create a separate property for terrain this is going to contain the scale the magnitude and the offset so I’ve set these to some default values but this will be the the scale or the size of our smooth Simplex Noise the magnitude will control kind of the size of the hills and offset is just an offset we apply to the random number that’s generated that will kind of lift everything up or down all at once and we’ll be expanding a lot more parameters on this as we go on and Implement other things like water and resources but this is what we’re going to start with so scrolling down now to our generation code we’re going to repurpose generate terrain to an initialization function so rather than doing a random ID here we’ll just initialize every block to zero with no instance ID so This will be initializing the world terrain data and we’ll call it initialize Terrain then below here we’ll add a new function called generate terrain all right so let’s get to generating our terrain first we need a Simplex noise generator so we’ll do simplex and this will be new Simplex Noise now you can see our Simplex noise has one argument in the Constructor here and this is a random number generator so if you don’t pass anything in it defaults to math. random and we’re actually going to be creating our own random number generator later because math. random doesn’t allow Us to put in a seed value so we want to be able to generate the same world every time if we put in our particular seed so that way when we go back and load a world that we had saved we get the same world that we were in before so next we Need to iterate over the X and the Za axis of our terrain so we basically need to figure out the height at each x and z location so we’ll start by getting a random number from our Simplex noise generator so we’ll do const value equal to simplex and there’s a bunch of options Here we’re just doing 2D noise so we’ll do noise and then we pass in x and z now we want to adjust these coordinates based on the parameters that we had defined above so that’ll be the scale the magnitude and the offset so scrolling back down here we’ll put these each on separate Lines so what we do here is we scale our x and z coordinates by the scale that we Define in params so we can kind of imagine what effect scale is going to have here if scale is set to one then the noise is just going to change quite quickly Whereas if we set scale to 100 the noise is going to change 100 times slower as we increase that x coordinate so the larger the scale the less the noise will change over a particular distance and we also need to take into account the magnitude and the offset Parameters so we’ll do scaled noise here and first We’ll add in that offset and then we’ll do our magnitude and then multiply that by our noise value so from that scaled noise we can compute the height so we’ll do let height equals this do size. height time scaled Noise and then we need to clamp that height so it doesn’t exceed the the minimum and the maximum of our world height so do height is equal to math. max0 math Min height and this do size. height so this little expression here we’ll clamp our height between zero and The maximum height so we’ll do another for Loop here we’ll iterate over y so if Y is less than or equal to height and then we will set the block ID at the set of XYZ coordinates and we’ll set the block ID ID to one so to make a few quick Adjustments here we actually want to scale this between this do size. height minus one because we’re starting at zero here and then we want our height to be in integer value so we will floor this right here right so there we have our kind of simple terrain generation code that uses Simplex noise to set the height in a particular x and z coordinates so let’s go into our UI code now and let’s just delete threshold here that doesn’t exist anymore and let’s see if our world is actually working and we can see that it is we have some Trin being Generated so let’s go and add some controls to our UI for the scale magnitude and offset so in order to organize our UI controls a bit more we can actually create folders that are collapsable so we can put all of our terrain parameters into a single s Le folder which I’m Going to do that now so create a new terrain folder that will be goey and folder and then we’ll just pass in terrain as the label for that folder now I’m going to go ahead and add the three UI controls to control our noise parameters so similar to how we added Controls to the guy we can add controls right to the folder then we’re controlling the scale the magnitude and the offset so now if we go back here as I tweak these values you can see this is changing over time so with a very high scale everything’s very smoothed out with a Small scale we get very Jagged terrain and you may notice that our world is changing completely every time we change the scale and this is that issue with math. random I talked about before we’re not using the same seed value every time so it’s completely generating a random World so quickly just tweak magnitude here make sure that works so when that’s set really low we get these kind of these flat Hills we make it really high and we get these big Cliffs and then we can change the offset to kind of move everything up and Down all right so our terrain generation is working perfectly so I think we should go back and Implement that random number generator that allows us to pass in a seed and I think after we Implement that you’ll see what effect that has here when we start um changing these Properties so just very quickly looking back at the source code for Simplex noise if we look at the comments here you can see that R by default is set to math and the comment here is pretty helpful you can pass in a random number generator object if you like it is Assumed to have a random method so that’s what we’re going to do we’re going to create a new random number generator class that’s going to have a random method on it and we’re going to set that up so when we pass into seed value random will always return the same sequence of Random numbers so back in our code under scripts let’s create a new file called rng. JS so this code is very obscure I just actually copied it from stack Overflow I’m not going to get into how this works I actually don’t know how this works I just know that it works so We’re going to roll with that but you can see that I’m passing in a seed value here so every time I’m creating this new new RNG class I pass in that seed and then every time I call random I’m always going to get the same sequence of random Numbers so every time I’m generating a world with that seed I’m going to get the same result so let’s go back into world and let’s import our new random number generator so to import RNG and then let’s go down to where we’re defining our Simplex noise function so create a new RNG Here so let’s scroll up here and let’s add a new parameter for our seed so we’ll just default to a seat of zero and then we’ll pass that seed into RNG and then finally we’ll pass in RNG to the Simplex noise Constructor and of course we also need to update our UI as Well so we’ll add a new property at the top here and this will be seed and we’ll just cap this between 1 and 10,000 all right let’s go back to our game here and you can see now that as I change seed it’s just changing um the seed for that random number Generator and we get a different world each time but now as I change scale you can see that it’s keeping the same world it’s just changing the features of that world it’s not completely regenerating a whole new random World um so it’s kind of fun to watch as We you know stretch and Shrink this we can see the hills kind of coming together and expanding we can lower the magnitude increase it bump the offset up and down so now we have a nice tunable world all right so let’s wrap up this video by adding some additional block types right Now we just have this grass block and it’s not very interesting so I’m on a Minecraft Wiki right now and you can see that there’s actually a whole ton of blocks that we could add here so I think for our purposes today we’re just going to focus On adding in grass and dirt just getting those two different block types and we can expand from there so let’s go ahead and create one more file here under scripts we’ll call this blocks. JS and this is going to be a file where we Define all of our block types and the Metadata that is associated with those blocks so let’s create a new constant called blocks then we’re going to name our blocks here so we’re going to have an empty block we’re going to have a grass block and then we’ll also have a dirt block the ID for empty is going to be Zero ID for grass will be one and ID for dirt will be two so let’s also has some names for these so name we just call that empty this will just help with debugging later on this will be grass and this will be dirt and then we need to set the colors For each of these blocks so empty of course has no color so we won’t Define a color there but for grass we’ll do do 55920 which is a reasonable color of green and then for dirt we’ll do brown this will be 8 Z 70 and 20 so this is a very simple just object containing our block definitions we’ll definitely be expanding on this later as we add in more block types so going back to our world file let’s import blocks and then let’s start adding some additional block types here in our mesh Generation first things first I want to in our initialized terrain function we’re using this literal zero here I’d rather use the ID for empty so this is just a bit easier to read so you know that we’re initializing our blocks to empty here now what I would like to do is for All of the blocks on the surface so the very top blocks I want those to be grass and then everything below that is going to be dirt so let’s go back to our generate terrain function where we’re setting the block ID and we’re going to change this code here so we’re actually Going to iterate over the entire height here so this do size. height so if Y is less than height and we’ll set the block ID to dirt otherwise if Y is equal to height then we’ll set that block ID to grass and then otherwise we’ll set the block ID to Empty so everything below the height is dirt everything at height is grass everything else above that is going to be empty so now that we’ve updated our block IDs we need to update our mesh generation so how do we set the color here first thing we need to do is to go Find our material at the top we’re already setting this to Green Let’s just clear that out so if we were to look at our world now we would see that everything is white as expected so going down back to our generate meshes function there is actually a property on the 3j Instance mesh where we can set the color so the the default Shader allows you to change the color per instance without creating a completely new instance mesh which is pretty nice so below where we’re setting our Matrix we’ll do mesh and we’ll do set color at pass in the Instance ID and we’ll do new three color and then we need a color to pass in here so we’ll get the block type and this will just be getting all the values of blocks and we’ll find the block where the ID is equal to our block ID so how that works is we’re just getting an array of all these objects here and we’re finding the one where the ID of the Block matches the block ID at this particular set of XYZ coordinates perhaps not the most efficient way of representing this Because we need to do a find each time but um this code runs pretty fast so we could always change it later to be more efficient so now that we have our block type in the Constructor for three. color we can do block type. color and that allows us to pass in that Color so now if we go back to our game now we can see that all of the blocks on the top are this uh shade of Darker green that we have and then everything below that is dirt it’s a brown color and everything above that is empty So there’s no block there and that’s also what we wanted so now we can kind of tweak all of this change our world size and it’s actually starting to look like a real Minecraft game now so the last issue with our code here that we’re going to Address is we are rendering all of the blocks even if they’re hidden so as I zoom in here it’s it’s really hard to see with this but you can see that there’s all these little blocks inside the hill we’re rendering all of those instances even though the player can’t See them so we need to change that cuz that’s going to kill our performance later on so at the very bottom of our file we’re going to create a new function called is block obscured so we’ll pass in a set of XYZ coordinates and then we need to Basically query all the blocks above below to the left to the right front and back so if a block has blocks on all sides of it then we know that block is hidden and we don’t need to render it so I went ahead and implemented this function here so let’s walk through What’s going on so you can see I’m getting the blocks above and below so y + 1 y- one to the left and the right x +1 x -1 and the blocks in the front and the back so be z+ one Z minus one so I’m getting the ID of each of Those blocks and if there’s no block there then I’m just setting that block to empty if any of these blocks is empty then we know that the Block in the center is exposed on that side and the player can potentially see that block so we need to render it so in That case is block obscured we return false now if none of the blocks are empty then the block is completely obscured so you return true so let’s go back up to our generate meshes function here and let’s change this line so if block ID is not equal to blocks. empty. ID and the block is not obscured and we’ll go ahead and add an instance so let’s go back to our code everything looks correct now let me expand up the world a bit expand the scale now if I kind of Zoom inside here you can see that it’s completely Hollow Whereas before this was all filled with blocks now we’re only rendering the blocks on the very surface of our world all right so that’s all I plan on covering in this video I know it was kind of a lot but I think we have a pretty cool result here we have this World it can pick from one of 10,000 worlds we can change the scale of the terrain the magnitude of the Hills the offset and everything is dynamically controllable from the UI which is really nice so in the next video we’re going to look at procedurally generating resources so we’re going to create Little mineral deposits coal deposits iron things like that so going to create these little 3D blobs that live inside of the terrain so that actually gives us a reason to go and mine into the terrain to get those resources so I hope you’re finding this tutorial series informative And useful and fun if there’s anything that you find confusing or you’d like me to explain a little bit more please leave it in the comments below and be sure to hit that subscribe button so you can be notified when the next lesson in this series comes out so until then take Care everyone thanks for watching Video Information
This video, titled ‘Build a Minecraft Clone with Three.js // Part 2: Procedural World Generation’, was uploaded by Coffee Code Create on 2023-10-23 10:00:30. It has garnered 610 views and 27 likes. The duration of the video is 00:46:13 or 2773 seconds.
Do you want to learn how to create a Minecraft clone from scratch with JavaScript? In this 10 part video series, I’m going to show step-by-step how you can create a Minecraft clone with procedurally generated worlds, collision detection, terraforming and much more.
In this video, you’ll learn how to use instancing so we can place thousands of blocks into our scene while maintaining super fast performance. Then we’ll be using Simplex noise to procedurally generate our Minecraft world!
0:00 Intro 2:14 Instancing Overview 4:02 Adding Frame Rate Stats 5:31 Implementing Instancing 9:38 Adding a GUI 14:06 World Data Model 22:06 Generating Terrain using Noise 33:27 Seeding RNG 36:31 Multiple Block Types 42:31 Excluding Obscured Blocks 45:08 Outro
🕹️ Demo: https://dgreenheck.github.io/minecraft-threejs-clone/ ⭐️ GitHub: https://github.com/dgreenheck/minecraft-threejs-clone ▶️ Playlist: https://www.youtube.com/playlist?list=PLtzt35QOXmkKALLv9RzT8oGwN5qwmRjTo