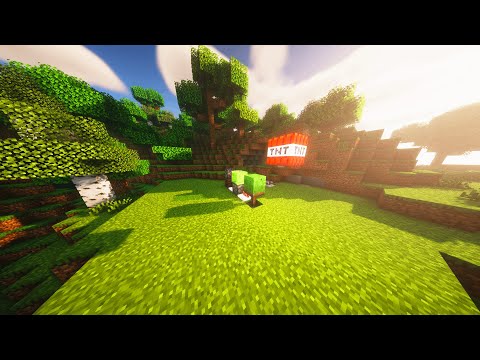
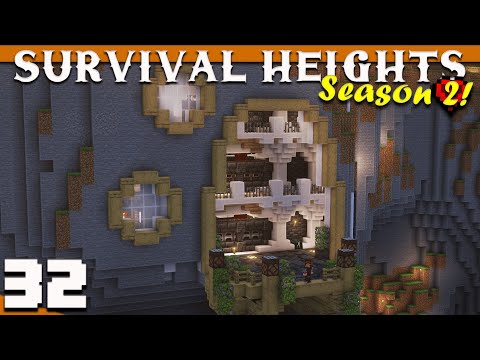
Hello everybody my name is marlo and today i’m gonna show you how to build this starter survival house in minecraft now this build may seem familiar to some of you and that’s because it’s actually my starter house from the survival series i had a little while ago on my Channel i built this in episode one which was nearly two years ago now and ever since that video i’ve had people asking me for a tutorial on this one so albeit a little bit late here it finally is i do just quickly want to say that The design i’m going to be showing you in this video is ever so slightly different to the original one i’ve just made some very minor improvements to make the build look a little bit better here is the full materials list of all of the items that we’re going to be Using in this build the top row are all of the oak variants that we’re going to be using and then the row underneath here as well as the spruce sign are all of these spruce variants that we’re going to be using we then have some more main building blocks and then the rest Of these items here that i’m just scrolling over are all of the miscellaneous items if you don’t have all of them it’s not that big of a deal don’t worry something i do just want to mention quickly these 12 corn flowers just represent any type of flowers to go Inside these flower pots and on top of the course dirt and then lastly here on this bottom rail we just have all of the helpful survival items there is one small addition you need to make to that resource list and it’s either going to be the items on the left of the screen Or the items on the right of the screen it’s going to depend on what you want to put in the second level of the house here in my survival series i turned my second level into a bee farm of sorts it was fresh when 1.15 was just released so Bees were the whole new thing i understand they’re not as exciting anymore so it may not be what you’re looking for if it is then you want to choose the items on the right hand side of the screen as that’s what we’re going to need to make the bee and the honey Farm but on the left hand side of the screen it’s going to be all of the items to make a pretty simple storage room which may be more suited to most survival players once you’ve picked out a location to build this in the first thing you want to do is place down your Spruce doorway in between two stripped oak logs just like that this of course is going to mark the front of the house how you actually get inside and once we’ve got this done we’re going to leave a gap of two blocks and place another oak log either side of those and then We’re going to go around to the two sides here leave a gap of one then leave a gap of one two three four and five this time and then another gap of one we can do that super quickly over here too so one then five and then another one and then As for around the back we’re going to leave a gap of one either side and we should be left with three in the middle and once you’ve got all of these plotted out you can then bring them up by one two three four and five more for a total of six With all of the pillars in position the next thing to do is to go around from the top of all of these logs placing in some horizontal beams just going all the way around placing them in from one to the other until you eventually reach the Other side and you should have once i get around something that looks like this now what we can do is come to the two sides of the build so the longer sides here that have the five wide gap in the middle and we’re gonna place an upside down spruce stair on either one Of the top corners and then have a line of spruce slabs going all the way across we can then add a spruce trap door on top of this block and we just want to alternate between having a trapdoor and not all the way across so we get Something like this which we can also super quickly do around this side as well now you can come around to either the front or the back of the build and we’re gonna start by placing down two upside down spruce stairs once again on the corners of the blocks just like that Then we’re gonna have two regular stairs just coming off the side and then what we can do just pick one of these for now we’re gonna have a full plank then a stair and then an upside down stair and we want to repeat that two more times Just like this so full plank stare and then upside down stair and then on this last block we’re gonna have another just stair on top to give us this shape right here we can very quickly do that on this side too and we’re left with one gap in the Middle where we can have an upside down stair just like that so this is the shape of the roof outline but now we can quickly just come down to this level right here where we’re gonna have a spruce trap door in front of this upside down stair just like that and then we’re Gonna alternate between slabs and trap doors until we get over to this side here and then above it on top of the trapdoors we’re gonna have some spruce slabs and on top of these slabs we’re gonna have some spruce trap doors so we get something that looks like this which All of this that we’ve just done can now be copied around to the other side here Continuing on with the rest of the roof we’re just going to come around to one of the sides here doesn’t matter which one at the moment because it’s both going to be identical and we’re going to place down two logs on these two spots right here so three blocks away from That spruce plank and then there should be three blocks in the middle we’re going to bring these up so that they’re four blocks high just like this and then we’re gonna have two upside down spruce stairs on top of them and two spruce stairs out the back we can have two Slabs on top with two full planks next to them and then an upside down spruce stair in the middle we can also go ahead and stick a chain underneath this upside down stair with a lantern just underneath it we can then grab some trap doors for this next step and we’re going To add in next to this top log an upside down stair here as well as over on the other side and then two stairs at the bottom on these two spots and then we want to fill the rest in with spruce trap doors so there’s two at the top and the bottom And then we’re gonna have two on either side just like that flip these up and you get a nice little archway leading into the top half of the house super quickly i’m just going to add in a line of oak planks going all the way across The top at the middle of the house just like this now we’re going to fill in the rest of the roof here so just beside this thing we built we’re gonna add in three oak planks either side and then three stairs on top of those and then We’re gonna do the same thing above it starting on this plank so have three of those three the other side and then just the stairs on top and as you can see all we’re really doing is where we have a spruce block we’re having a blocks next To it as for the next level though we’re going to add in a line of planks going all the way across this time not just three on either side and then we’re gonna have a line of stairs on top of that just like so and then we just want to have another line Of stairs connecting to that middle column then we can come back down here and we just want to connect this part of the roof to the main part of the roof so we’re gonna start off by having two stairs here on either side just to curl those round and then we’re gonna have Two slabs here two slabs here and then we’re gonna have six planks there in the middle and all of this can now be copied round to the other side here as well with the roof all done all we need to do now is add in something that looks like This to the front and the back of the house so as you can see i’ve already done it around the back but let me show you how to build it around the front so we’re going to start with a line of white terracotta along this bottom rail then have one here either side Then three just next to it and then three more across the top we can then have two here on either side and then one in the very middle leaving us with two open gaps now we just need to hop inside the house and we’re gonna have our oak trap door placed down and Flipped open and then we’re gonna on this section i have two stairs either side one upside down one regular and then two spruce trap doors on those spots giving us something that looks like this so now you want to come around to the front of The build and what we’re going to do is step inside real quick and add in a stair here just above the doorway with two spruce fences on top of it now what we can do either side of the doorway is add in two spruce fences and then we’re Gonna have one two and three slabs just like that to make this nice archway awning in front of the doorway now we can grab four coarse dirt and we’re gonna add them in just like that and we’re gonna turn them into flower beds so cover the front up with Spruce trap doors and just place some flowers on top looking very nice and colorful now we can step inside and we’re gonna make some windows in these gaps here but obviously we can’t use glass because we’re working with a two wide section and it just wouldn’t look Very good so instead we’re gonna make some shapes with some spruce stairs and how they’re orientated so we’re gonna start with two full blocks behind the course dirt and then we’re gonna have two stairs here facing into each other just like that and you may have to get some temporary Blocks for this next step but we’re gonna have two upside down stairs just above it like so giving us this big square window and then above that we’re gonna do a similar thing just this time with two immediate upside down stairs so that when we look back from the inside It looks like this a little bit like the letter i if you want to look at it that way and from the outside it looks like this all we have left to do is add in one two three and four upside down spruce stairs now we can come around to The back of the house here and we’re gonna start by adding in four spruce stairs two regular and two upside down just like this and we’re gonna add in one two and three spruce fences in between them the next step is to get three coarse thirds and line it like so With three spruce trap doors in front then we can just grab a flower and stick it in the middle like that leave the two on the outside because we’re gonna be having some more spruce fences just like that now we want to step inside the build here and behind these side spruce Fences we’re going to add in six white terracotta just like that and then we’re going to add in three spruce planks along the bottom here just next to the coarse dirt and then some more next to all of these fences then we can step outside and have an upside down Spruce stair at the top one at the bottom and then two glass panes right there and lastly we’re gonna have a chain and a lantern moving on round to one of the two sides here it doesn’t matter which one they’re both gonna be the same the first thing we’re gonna do Is add in once again two stairs on the bottom and two upside down ones on the top on these one wide sections now on the side where we have the white terracotta we’re gonna have three spruce fences and on the side where we have these spruce blocks we’re gonna have Three oak buttons just like that now on this middle section here we’re gonna add in one block back so on this block starting five along the bottom spruce planks four up the top just like this and then three more in the middle so basically we want this five by five square leaving us With a three by three area in the middle to make a big old window using some glass panes and then just below those glass panes we’re gonna have three coarse dirt with some pretty flowers or ferns on top of them and we’re gonna cover the front up with some spruce trap Doors we then want to have two spruce stairs in the two corners just like that with three spruce trap doors in the center underneath these two upside down stairs we’re gonna have three spruce fences and then we’re gonna add in some barrels on these spots but i don’t really like the Top texture of the barrel when it’s purely decorative so we’re gonna dig down a block here and add in an upside down barrel just like that instead of the top texture this one you get the underside texture which i personally think looks really nice when incorporating it into a build and now as You may have already started you can go ahead and copy everything we’ve just done there round to the other side too With that side all done the exterior of the build is completed we’re now ready to head inside and start work on the interior first things first we’re going to go ahead and grab some full spruce planks and we’re going to chuck them on top of these upside down stairs here What we can then do is turn around over to these corners right here and the first thing we’re going to do is just place two torches or some other lighting block underneath there so that we’re not gonna get any mob spawning because what we’re actually gonna do is place down Four strip spruce logs in front of them closing off those sections here so you don’t want a zombie spawning in there and groaning all the time it’ll be really really annoying trust me so once those are added in we’re gonna add two full spruce planks on top of them just like that With two upside down spruce stairs off the side of them just like so we can also add in two more upside down stairs on these two spots then we want to switch over to our spruce slabs and we’re gonna have five of them going all the way across from one upside down Stair to the other then we’re gonna add four more here on either side just like this and then four more over here just like that leaving us with this four by three gap that we’re going to fill completely in with some oak slabs this time and that is our Ceiling all completed as you may be able to tell the next step is to remove all of the blocks here on the floor and we’re gonna fill it all out with some strip dark oak logs but before we do that we need to break a couple more Blocks so when you walk into the house here facing this side we’re gonna go ahead and break one and two of these blocks right here this one can become an upside down spruce stair and this one can become a double chest this will make sense later on it’s basically going to Be a hidden away storage place so now we can grab our strip dark oak logs and we’re gonna have one here in the middle facing towards us with two on the sides just like that now the way we’re placing all of these down is in a checkboard Pattern a crisscross if you will so basically the idea is you always want to place the log down on the side of the log never on the front so you’re just placing them down on the side and then you kind of alternate as you go along And when it’s all done you should end up with something that looks like this with the exception of furnishings that is the downstairs all done so we’re ready to head upstairs now so we’re just gonna add in five ladders here either side of the doorway and then on top of it once We get up here we’re gonna add in one and two spruce trap doors we’re gonna have a stair in the middle with two stairs either side curved round to the side just like that and then facing this we’re gonna have two more stairs here then three slabs in front giving us this Little thing here allowing us to go up and down whilst also being able to close it off we also before we start anything else with the ceiling here we just want to fill in these blocks here with some spruce planks with the ceiling you can kind of see we have four identical Corners so i’ll just show you how to do one of them we want to add in two upside down stairs just like that with two above it and then two on the side here giving us a bit of a smoother shape it virtually looks the same it’s just smoothened out So then we can go ahead and do that three more times there we go that’s already looking a whole lot better all that we have left to do is to add in a line of upside down oak stairs on these two spots right here and that is the ceiling all done now we Can head back downstairs where the first thing we’re gonna do is place down a chain and a lantern in the center of those two ladders and now we can make our hidden chest actually hidden plus make it look a little bit nicer so the first thing you can do is actually just Get rid of these two dirt blocks and replace them for some spruce planks just looks a little bit better that way not that you’re really going to be able to see it because we’re actually going to add in an upside down stair above it so you’re just going to be able to access The chest on that little corner block right there and you should be able to open it because these two are not solid blocks but we just want to put a lantern once again on top of this stair and we’re going to add in a sign just like This a spruce sign with an item frame and then if you just click on the side of the item frame here stick an oak slab in there and it looks a little bit like a set of drawers or a single drawer i should say over here on this side we’re Gonna have our bed right in the middle with a crafting table and a flower pot on top of that to the side of it and then to the left hand side we’re basically going to make a bit of a pile of barrels i guess would be the best way To describe this just for some storage so we’re going to have two regular barrels here just beside the bed and then we want a sideways barrel facing into our hidden storage then we’re gonna have a barrel facing towards us once again and an upright barrel here then a barrel Facing this way so it kind of is a bit all over the place and all facing the same direction i think it just looks a little bit better and then lastly you just want to go ahead and place in some spruce trap doors on top of them over Here just in front of the right hand side window so the opposite to our hidden storage we’re gonna have a blast furnace in the middle with two regular furnaces either side of it we’re gonna have a detector rail here on top of this furnace which uh might be facing this Way i think it looks a little bit better if you can have it facing sideways just a personal preference but we’re gonna go ahead and stick two stone pressure plates on top of the regular furnaces just like that then we can turn around and come over to This corner right here just to the left of this thing and we’re gonna have an anvil in that corner with a stone cutter in front of it and then this seems a little bit dangerous just to have inside of a nice little cozy home i know it’s Not you can step over this as much as you want but i think it just looks a bit cooler if you fence off with some iron bars so have four here and then one just in front you’re still gonna be able to access all of this but it just looks a Little bit protected we’re gonna make a bit of a shelving unit just beside the barrel stack here so we’re gonna start by placing in two spruce trap doors on those spots right there so on top of this block and then we’re gonna have a trapdoor here on the top of that lowest Barrel and then we’re gonna have another one here on the bottom of the top barrel so we should get something that looks like this where from the underside of this top trap door we’re gonna have a bell and we’re gonna have an item frame on the Floor i am gonna put some raw beef inside of this item frame and you may be asking why and that’s fair enough it seems a little bit weird well in my survival series i tamed myself a wolf and i soared him stored as maybe the incorrect word i Placed him i sat him down whatever you want to call it in that corner there so i got my good friend uh what do we call him sting i think it was in my survival series tamed him and gave nice little comfy carpet to sit on put him in the Corner there and the idea with this is when it’s time to eat i can ring the bell and he would run on over and snack on his food that’s what that’s meant to be on top of a plate of some kind obviously he doesn’t do that it’s not Really in the wolf mechanics but it’s just a fun little idea if you don’t want to add that in that’s fair enough you can switch these out for anything you would like to it is entirely up to you the final thing to add in down here is Simply an armor stand on this spot with something on display maybe your first set of iron armor you required if you’re able to take it off in time before it actually breaks so here we are inside of my actual survival world and i’m only in Here to show you one thing and it’s this something i’m not going to be showing you how to do i’m not going to do a tutorial for this room it’s far too big and i’m also not going to show you how to build this redstone machine to shoot you back up And fall down into it so why am i not showing you how to make this redstone machine well the simple answer is i am not good enough at redstone to tutorialize it as you can see this is a messy messy redstone i don’t really know exactly how this works it Kind of all got pieced together a bit all over the place and i just got a bit lucky so i’m not going to show you how to scramble this jumbled mess together and hope it all pans out instead i’m going to point you in the Right direction so you can do one of two things a you can type this into the youtube hotbar and you should get something very similar or you can head down to the description below and i’ll find a tutorial that will show you how to build a very similar mechanism and Once you got it all added in you can decide what you want to add in to the underground part of your survival base if you haven’t already now it’s time to decide if you would rather have the bee farm or the storage room up here on the Second level to begin with i’m gonna show you how to build the bee farm the same thing as what i had in my world so the first thing we’re gonna do is grab some campfires and along these back five blocks the opposite to the ladders coming up here we’re gonna have some Campfires and then we’re also gonna have two more here either side now this is just so we can smoke out the beehives that are gonna go on top of it that way the bees aren’t gonna get angry when we harvest the honey we also need to add in Two eggplants in the corner here just to fill in those spots and we do need to cover up these campfires so on the two side ones here on the far rest out one we’re gonna have a regular spruce stair and then the other one here is gonna be Curved round to the side just like that so that when we put the other three trap doors down you’re not going to be able to see the campfires so just make sure you have this and not this for example to the side of the campfires here we’re Just going to have three coarse dirts and we’re going to make a flower bed out to this so we want to cover the front with some trapdoors and then you just want to place some flowers on top to give the bees a place to collect pollen From and on the side of the course dirt here we’re just going to place in a barrel either side and then a double chest next to it and this is where you can store all of your stuff related to the bees so if we just label the chests Here over this side can be where you have your honey bottles and maybe your empty bottles can go in the barrels i believe that’s what i did and on the flip side here this is where you can store your honeycomb you can maybe put shears inside of this barrel so there we Go that is how you build the bee farm up here in the loft now if you want the storage room stay tuned i’m gonna take all this down and i’ll show you how to do that afterwards So with the storage room design we’re obviously not gonna have the campfires lighting the room so we do need to add in some more lanterns so we’re going to look up to the ceiling here and go and buy one and two blocks and add in two Chains with a lantern and we’re gonna do that on both of the sides just like this then we can grab our chest and two barrels and we’re gonna place a barrel just in the middle of this circle archway thing on either side with a chest to the side of both of those then We’re gonna go ahead and place down two double chests stacked on top of each other making sure you place them on the side of the chest just so they connect like that and we’re gonna do it in all four of the corners just underneath the two upside down stairs and all that’s Left to do as far as placing chests is concerned is we’re gonna have four more double chests just like that and in the middle a crafting table with an ender chest on top so that’s all the storage i’m keeping it pretty simple this isn’t meant to be like your end game storage Room you’re probably gonna need something bigger than this eventually but for the meantime it should be enough and if you need more you can expand it in very simple ways just like that and you can go up here and so on and so forth there’s plenty of room to add in Some more chests however i do think it’s quite helpful to label your chest so how we’re gonna do that on the corner ones here we’re just gonna put them on the side like so so there are eight item frames and then i’m gonna group all of these together and just put an item Frame in front of the barrel maybe this is where you could store your bulk cobblestone for example and all of your wood could go over here just to give you some ideas and then lastly we’re just gonna stick four more item frames like that so there we go that is the storage Room all done meaning the house is entirely complete so thank you everybody so much for watching this tutorial i really hope it’s helped you out and i am very sorry it’s taken me a really long time to get round to making this video i hope it was worth the wait but thank You once again and i’ll see you next time bye for now Video Information
This video, titled ‘Minecraft – Starter Survival House Tutorial (How to Build)’, was uploaded by ItsMarloe on 2021-11-24 16:00:24. It has garnered 27222 views and 1090 likes. The duration of the video is 00:25:39 or 1539 seconds.
How to build a simple survival starter house in Minecraft! This house is from my survival let’s play series and after a lot of requests I have finally made a tutorial for it!
Piston Door Tutorial – https://youtu.be/RmaqKAT0h6E
🟣Twitch – https://www.twitch.tv/marloe_
🔴Second Channel – https://www.youtube.com/itsmarloe2
🟡Discord – https://discord.gg/TpJAe2K
🔵Twitter – https://twitter.com/itsmarloe
🟠Instagram – https://www.instagram.com/itsmarloe/
🎵Music – https://c418.bandcamp.com/
🌟Shaders – https://bitslablab.com/
The resource pack used in this video is my own custom one! It is only available for my YouTube members and Twitch subscribers. Click the join button to find out more! If the join button is not anywhere to be found click this link: http://www.youtube.com/c/ItsMarloe/membership
Timestamps: 00:00 – Intro + Materials List 02:06 – Exterior 12:51 – Interior