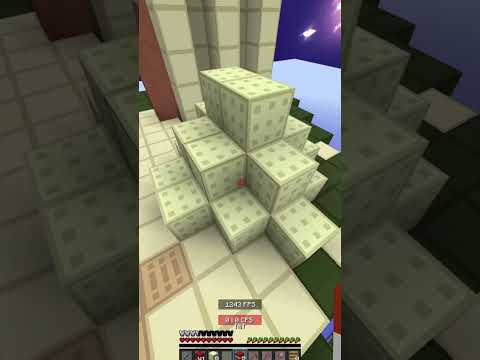
I’ve cleared out a chunk for a 9x brewing system. Some ingredients and materials are kept, and my usual inventory is put down to get more space. There is a lower floor too, to 9 levels down. These are the main materials I need. For ease of understanding, the floor is filled with a checkerboard. The wart blocks here marks the location of the ingredient panel. The dark oak planks mark the locations of the brewing stands, and the cobblestone is where we will have a dropper elevator. Let’s start by building a base rail system. The crimson wart blocks marks where we’ll collect the ingredients. We place a comparator there to power the power rail to be placed later. There are in total 6 of them, for base, splash, main, corruption, enhancement and lingering ingredients. Above each of them we have a dispenser to place the minecarts. We then place our promised power rails. Skipping a block, we place another power rail. Once it hit the wall it will turn, and we place power rails there too. Here we place more of them for speed. For this end we have to place three power rails to form a line, before we can place one adjacent to it without connecting. Once placed we can break the extra power rails. Now we connect them with normal rails. For this adjacent rail we go back a little to add a bit of delay between their minecarts. This way hoppers will have enough time to collect materials from both. Placing rails one after another, you’ll always get the correct joints. I know that these will connect correctly, so I can place the normal rail last. If not, just delay placing the final power rails. This is the base rail system done. The power rail will receive power from levers. The ones besides the dispensers are powered by comparators, so don’t touch them. Instead, we build a minecart starting system. Hm… how I can miss the hoppers… First place a dropper one block away from the first comparator. Now we build a hopper line from the other end. Keep the blocks besides comparators free. Once the end is reached we turn back towards the dropper. I mark this location with a yellow froglight for its importance. It is responsible for finishing of the startup process, by pass through the information to a comparator. It is also responsible for kicking off the startup, By being powered and triggering the dropper beside it. To complete it, we place one junk item inside. Once triggered the item will move through the hopper line one cycle. Let’s test it with a minecart at the end. By powering the redstone dust with a redstone torch, The startup system runs, and eventually starts the minecart we placed. This confirms that our minecart startup system is built correctly. At the end this comparator lights up to indicate completion. Now we should place full blocks above all these hoppers. This way we won’t have items accidentally fall into it, And the game don’t have to check for items above the hoppers. We can move to the next component. This time we will build a 22 seconds signal extender on the floor. Once an ingredient is seen above the brewing stand, the circuit will keep the brewing stands holding the potions in progress, Until 22 seconds after the last item falls in. Start with a target block 2 blocks away from the hoppers. This redstone torch thus won’t affect the hopper. Next we have a repeater powering a green froglight besides the target block. On another side of the target block we have a repeater. The source of it is a 3 seconds extender powered by the green froglight. On the other side, we place a solid block. A redstone dust powers the target block, and on the other side we have a long sequence of comparator. In total we place 13 of them, Turning the direction with two solid blocks. Each of them provide 1.5 seconds delay, so in total it is 19.5 seconds. The 3 seconds extender earlier provides the long pulse for this to work correctly. Let’s test. The first stage goes off in 3 seconds, and the remainder stays on for a much longer period. But we see them fading so it will go off eventually. Instead of waiting for it, let’s start building the brewing core. First place 9 blocks on top of the target block. On the top of them we place redstone dust. They are all powered by the redstone torch in the current idle state. Besides them we place 9 target blocks. Besides the target blocks we place redstone torches. Because the target blocks are powered, the torches are off. On top of them we place solid blocks, currently unpowered. These are what controls the actual brewing states. We place a row of hoppers to just besides the minecart system. They are the output hoppers for the brewing stands. Next we place repeaters from the solid blocks we placed just a while back. So in this idle state the output hoppers are unlocked to collect potions. At the back we place redstone torches. They are besides hoppers for water bottles. In the current state they will be locked to stop brewing. Now we place the 9 brewing stands. The hoppers for water bottle input are also placed. We also place hoppers for ingredient input. We place a hopper line to deliver water bottles from a single spot. One more row of hoppers are placed for ingredient delivery. Finally, we place two more hoppers in the water bottle line. This leads to the position we want to place our water bottle filler. It is a little dark, so I add a torch. We place a solid block at the far end to block the hopper. This hopper is part of the water bottle filler. On the top ingredient hoppers we place a line of normal rails. Minecarts runs on top to deliver the ingredients. We want to extend it one more block off the last minecart. On the other side of each brewing stand, one hopper sends blaze powder to it. They are two levels below the ingredient minecart, providing a comfortable distance. Let’s have a temporary scaffolding for getting to the top. Oops, that’s too high. Cut down one level and I can jump. To deliver blaze powder we have another minecart line. The line turns at the end, so we need a few more blocks there. Other than that it is just one line of solid blocks for returning rails. I don’t want the minecart to return on the same rail, As they will be delivering blaze powder again to some of the brewing stands. We need to provide power here for minecart to run fast enough, but the power source is not yet ready for placement. We create a joint so that on entry it turns to the far end, before delivering blaze powder. The joint needs some care for building. Break the joint and rebuild, if it is in the wrong direction you’ll need to power the joint. Luckily it is not needed in my case. There is actually a slight problem that when turning, the minecart may deliver additional items. I’m going to ignore the issue. Let’s move to the next component. We will complete the whole rail system. Okay, that should be it. Place a redstone dust line besides the minecart dispensers to place the minecarts. Next place hoppers above the dispensers for refill after one cycle. Level off the hoppers with solid blocks for a rail line. At the end we have a powered block for returning the minecart. This is for running minecarts to deliver the minecarts. Isn’t that a little strange? This is the starting point of that system. Now start placing the rails, the end is three power rails for maximum speed. In the middle there’s no place for rails to be powered, but luckily none is needed. We do all the acceleration at the initial turn. Here they can be powered by levers from above. I use glass here so that I can easily see what it is for. The starting point is raised with a target block. This allows the block to be powered without affecting the redstone line below. Above the starting power rail we need a hopper. At the other end we need a solid block to start the minecart off. On the side we have a solid block too. That is for us to place sand and cactus to collect returning minecarts. For them to come here of course we need a rail. We place our sand and cactus, and one solid block above it to keep ourselves safe from its damage. Now we place full blocks to encase incoming minecarts. I was looking for a way to place the solid block without a temporary… but didn’t succeed so I did it in the simple way. For this side it is easier. Finally, we have one more block at the top, and we can remove temporary blocks used. We can place a minecart with chest here, And place 6 minecart with chests inside for delivering to the dispensers. We now place a permanent ladder to reach the top. This way we can easily service the brewing stand if we do something wrong. We extend the ingredient rail line to hit the cactus. We keep the minecart high for as long as we can, and move it down only two blocks before the cactus. This gives us more space below so that we can walk around later. It is actually quite dark here, I should have placed some torches. We come back up to complete our blaze powder rail line. This rail should be power rail. Then we go up and have a normal rail. And we go up once more and place a power rail. I use red froglight here to remind me that this needs to be powered later. Behind the power rail is a solid block for starting the minecart, Above it is a hopper for filling it. And on it we place a minecart with chest for the actual blaze powder. The ingredient line is not yet complete, we do it now. We extend the rail three blocks to avoid the blaze powder line. After that we start getting down. This gets all the way down to the floor. To ensure we have power to go up we need power rails. This completes the line, except for the power. We have a super convenient place for power, though. This powers both lines, as we can check. This completes most of our rails. Let’s test them. Minecarts are dispensed by powering this line. Hm, we don’t have minecarts inside the dispensers yet. Let’s get them there. Now we do it again, minecarts will be dispensed. All 6 of them are there. We start them one by one by powering this redstone dust, The minecart runs above the brewing stands. After that they runs into the cactus and are collected. Once all of them are there, we can power the power rail besides the cactus, and resets everything. So the rail system is fine, we move to the next component. BTW, do you notice that I use this chest opening times to break the video in parts? The build is far too complex to record in one take. Now it is the bottle filler. We first cover the open hoppers here. Break the top level floor so that we can start the build. We need a 2×4 space. We also need to clear the block right above the hopper and all blocks around. I’ll replace the blocks around with glass to remind myself not to break them. This is because I’ll place water source above the hopper. From the hopper we place a comparator. The signal goes to a redstone dust, but I don’t want the block below to power. Replacing with glass ensure the hoppers around can work. The redstone dust is for the target block besides it. It is the base of the clock, so that a full system stop the water bottle filler. We continue building the clock with a redstone torch, a solid block, a repeater, and another solid block. That clock is besides a dispenser, to keep filling water bottles. The dispenser have a solid block attached, which a comparator reads through. We complete the clock with two redstone dust first, And we see it clicking immediately. The comparator is placed, leading to a solid block where we attach a redstone torch. This torch powers when the dispenser is empty, stopping the clock. At the last block besides the dispenser, we place a hopper. We complete the bottle filler with water, chest and top glass. We can now test the bottle filler. We will also take materials for testing the brewing stands. All we need is to place bottles into the chest. It is advisable not to stand here because we will take the water bottles. We go down and check the last hopper. Only this hopper receives water bottles, because the feeder hoppers are locked. Let’s complete the brewing system. We place a block besides the last brewing stand. Then we place a comparator on it to detect ingredient entry. We use a green froglight to pair with the one downstairs, For the 22s extender switching the state of the brewing stands. We place a row of blocks below, and get down just after the locations for the dropper elevator. Have a redstone line connecting all the way to the repeater. Above, first redstone dust receives power from the comparator above. Then comes a repeater to amplify the signal, before joining the redstone dust line. That’s it, let’s test. We place blaze powder manually this time. A sugar is placed on the top hopper. It takes the middle hopper 4 ticks to bring it down, enough to power the 3s extender. So the brewing stand starts brewing a useless potion. At this time the output hopper is locked so it won’t take the incomplete potion away. So we confirmed that the brewing works. We don’t want to fall inside the hole, so let’s cover it with carpet. We place the chest for the blaze powder too. Then the bottles and blaze powder can be placed preparing for the full system. It is a good idea to put the first batch of empty bottles directly into the dispenser. This way the empty bottles will take all the space in the dispenser. So when a water bottle is filled, it is forced to be thrown out. The downside is that we will pick up some water bottles. We can use them to fill the bottom hoppers. We can fill up the blaze powder too. They will be transferred to be blaze powder minecart for later feeding. Let’s build one more component before taking a break. This time we will build our dropper elevator. We first break the hopper at the end, which is towards the wrong direction. A large chest is placed besides the redstone line going down. Hoppers are placed towards the chest. We place a block two levels above the start of the elevator mark. This is extended to the whole elevator area, with the latter two being upper slabs. The upper slab is a preparation for the future bedrock version, where we can couch and get through a 1.5 block space. Now we jump couch to place our dropper column facing up. We do it all the way until we are level with the upper floor. Clear off 3 blocks in front of it, we need them for the elevator. Next place solid blocks up. Temporarily remove the redstone dust here so that we can place a hopper below the chest. After that we can replace the redstone dust. One observer looks at the chest to detect items transfer. Buffered by a solid block, this powers a redstone torch. Before we continue the build, we need to fix one problem. The redstone torch would power this solid block and lock the hopper. So we replace it by glass before continuing. On the two slabs we place two redstone dust. We have a redstone dust right besides the redstone torch connecting to it. A couple of ticks after each observer tick it powers the solid block, Causing the dropper besides it to move the item up one level. The redstone dust is then observed by an observer, which sends a signal to invert a normally on redstone torch. This pattern is repeated twice more. The observers are observed by another observer, And the torch signal also causes the next level to be powered. In both cases they cause the dropper at the back to raise the item. Before going to the top to place the last level, we note that finally we can power the power rail. Let’s go up and complete the last level of the elevator. Now the dropper elevator is completed. We will collect the items here by a shulker box. This way we can take all the potions away easily. Let’s go back down and test the elevator. We place 16 comparators into the last output hopper, And check that they all goes to the shulker box. We add a row of blocks here for easy access to the brewing stands from below. Now we check that there is no blaze powder yet. We test the blaze minecart by powering it. Now the brewing stand has some fuel to use. The last one has extra powder because of our earlier test. The first two may actually take two powder unluckily. We can now take away all the items of this chest, leaving only spare items inside. Let’s take a break, those materials will be used in the upcoming parts. For now we take a look at how far we have got. It is a full minecart system a a full brewing system. We will build an ingredient dispense system in our next part. Video Information
This video, titled ‘Minecraft bedrock 9x brewing station build part 1’, was uploaded by Isaac learning to Minecraft on 2023-02-17 16:59:43. It has garnered 134 views and 5 likes. The duration of the video is 00:29:37 or 1777 seconds.
Show how I build a relatively compact brewing system that makes 9 brews of the same potion at a time, in my own survival world. Feature ingredient selection, fuel distribution and out-of-stock ingredient protection. Every block placed is within a chunk within 15 levels of height.
The videos can be used as a tutorial: every block placement is shown, and the location can be tracked easily.
The whole build has three parts. This is part 1. Part 3 will be uploaded a little later.
Link for part 2: https://youtu.be/jzLWak-9L1M Link for part 3: https://youtu.be/viZpAvnRIs0