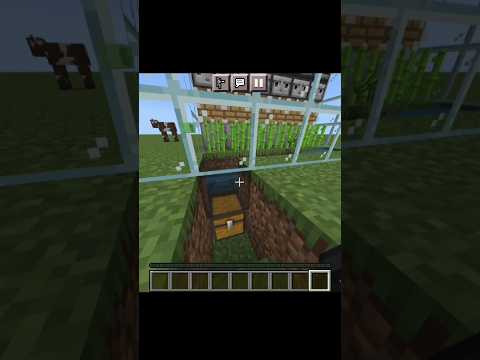
Hello everyone silent here and welcome back to another bedrock edition tutorial today i’ll be showing you how to build a fully automatic and afk moss farm in your bedrock edition worlds this moss farm might look a little bit complicated and hard to build however i assure you it’s actually a pretty straightforward Little build process this thing produces over 61 000 items per hour and it’s also an amazing bone meal farm as well if you toss everything that you get from the farm into a composter you’ll get over 3 800 bone meal per hour and that’s not even counting all the bone meal that It’s taking off the top to power itself so this thing is fully self-sufficient fully afk and it can help you power a variety of other bone meal based farms so overall this one different farm will give you six different items it’ll give you the masa blocks moss carpets seeds Flowering azalea normal azalea and of course a bone meal as well if you choose to get bone meal from this design on top of that it doesn’t really use that much bone meal per hour either it uses about two stacks and twenty every five minutes of running the farm and from five Minutes of running the farm you get an entire single chest and an entire inventory completely full of moss blocks it really does crank out the items so let’s take a closer look at this moss farm shall we i assure you it is actually really simple so everything From this left gold block over is just a double stone generator it looks complicated by i assure you it is actually really easy to build everything between this gold block and that one right there is simply the redstone to harvest the moss and also bonemeal the Moss as well all of that is really simple and then all the redstone from this block over to the right is another double stone generator so overall these stone generators make the build look really intimidating possibly but they’re really not that bad they’re they’re big and soft and cuddly i assure you of Course we have some item collection out the backside as well for the hopper minecarts we have five hopper mine car unloaders at four times speed each and these things keep up with the farm it’s actually a lot of items you’re going to need quite a bit of storage or bone meal Composting capacity anyway let’s go ahead and turn on the farm real quick and you guys can see this entire thing in action so we flick the lever and then that starts a bone mealing the moss down below it spreads to the stone blocks up here these pistons are harvesting the Azalea and the carpets at basically the exact time that they grow so you don’t even really see them pop up but however you can see that we do have azalea and carpet items in there and we’re also getting seeds as well so that’s how you know we’re actually harvesting those Properly the double stone generator on the left and right are constantly feeding into this area breaking the moss and just kind of filling in this entire area with stone every time that the moss is completely removed we bone meal it again for the highest bone meal efficiency we could speed up the bone Meal rate to give us more items per hour but that would be less about meal efficient and you would actually get less of bone meal per hour so i’ve decided to actually slow down the farm in order to make it more efficient which might sound counterintuitive so now that You’ve seen the farm in closer detail let’s talk about the nitty-gritty rates of this because of course we’re producing six different items so in general if you’re just going for all the moss items you’ll get a total of 61 512 items per hour which is mostly consisted of the 48 Moss that you get from this farm per hour as well if you want some more detailed rates on the exact item count per hour you can see that on screen right now the total bone meal output of this farm is actually 5 60 however you need to recycle some of That bone meal back into the farm so that it continues running so the net positive bone meal output is actually around three thousand eight hundred and eighty so overall it’s a pretty awesome farm it’s the fastest moss farm that i’m aware of on bedrock edition and it’s really not that complicated or laggy Either because of the way that this farm works it’s a little bit difficult to actually see what’s happening in this area right here so a cool trick i would like to show you is the use of structure blocks these allow you to peer into areas that otherwise would be pretty Difficult to see and this allows us to actually observe the exact happenings of what’s going on with the bone mailing of the moss and the harvesting of the moss as well as you can see every single time this area gets bone milled it gets filled in with stone extremely quickly And pretty much 100 of the time every single masa block is destroyed replaced with stone and then bone meal when it comes to the mechanics of this moss farm there isn’t really much that you need to know besides the masa layout moss can only spread in a 7×7 diamond and it will Never cover the corners of this diamond so as you see no matter how much we bone meal this thing the four corners of this will always be stone so that is essentially the moss coverage area now our moss farm gets incredibly high coverage it’s bone mealing everything in This area and converting it all into moss except for the very middle block which due to the mechanics that we’re using the middle block of the farm will never be converted to moss however that’s not really a downside and in fact this actually does help efficiency Compared to many other ways of doing it and i don’t think there’s a moss farm possible that gets 100 coverage now one really cool trick that you can use to actually spread moss upwards which we are utilizing in this farm is that you can have moss below the area and as long As it is connected to the top of the area the moss will spread to the very top layer so as you can see in this area we have a layer of rails which counts as a connector block then we have some stone and then at this layer we have Some slabs so if we put a master block right here and bone meal this guy it is actually going to spread up to the very top of the farm so we don’t need to have a cedar block right in the middle we don’t need to have a cedar block up Above it or you know somewhere up above the farm we can actually hide it away below the item collection even and as long as we have the slab in place then we are good to go basically it’s a really neat little trick and thank you so much to zolson 012 for sharing that With me it helps increase the efficiency and coverage of the farm by about five to seven percent and overall it’s just really awesome so overall this is a pretty cool little mechanic however this could possibly break in the future if it does break the farm will only need some Very minor tweaks and changes in order to move the masa block upwards if this ever happens you can check the description down below the pen comment and the i cards for a fix video and i’ll get that fix out basically as soon as i know that this farm is broken due to This mechanic change but overall i feel like this is probably gonna stick around for a very long time if you enjoy these kinds of bedrock edition tutorials then maybe consider subscribing to the channel i have a lot more great tutorials on the way that i think you Will enjoy and overall i have about 200 bedrock edition tutorials as well so if you like bedrock tech and farms then maybe consider subscribing to the channel not only that you’ll help us reach 500 000 subscribers as well which is totally insane and other than that let’s hop into the tutorial and thank You so much for the support and let’s hop into the tutorial shall we for your convenience so there is a full materials listed down in the description of the video that will tell you absolutely everything that you need to build at this farm the farm itself is going to be 19 blocks wide and 10 blocks deep it is 10 blocks above the ground and one block below the ground as well you’re also going to need this little extension on the front side over here for your storage item collection and mine car unloaders now this farm is not Directional however if you choose to build it facing either east or facing west you’re gonna have a much easier time at placing in all of the rails however you can build this facing north or facing south it’s really up to you but east and west is gonna be easiest so Go ahead and mark this out in your worlds and make sure that you have your orientation correct this little area right here is where all of your storage is going to be where your bone mailing is going to be happening and where all of your minecart unloaders are going to Be now before the tutorial the on and off switch at the farm is actually going to be over here on this side however it’s very easy to just run a redstone line and then have your on and off switch be on this side as well first Thing we’re going to do is place in our mazda block so line yourself up with your five block extension right here and go ahead and place in your moss block right in the center of this area there should be five blocks to the back side Of it as you can see there and four blocks to the front of it we’re now going to go ahead and place in ourselves a piece of redstone dust right there a saw a block beside that repeater on two ticks placing a block behind that and then a comparator right there placing Ourselves a temporary block right there and then just a ring of hoppers going around in a circle like so this is going to make a little bit of a clock that activates your bone meal dispenser we’re now going to place in a dispenser right here and we’ll be filling this up with Bone meal later on place a hopper behind it like so and now you need to get in yourself a temporary block right there and place in four hoppers going into it like so we’re gonna be placing a button directly above this hopper so that the moss can grow upwards and this hopper Line is gonna collect the carpets and azalea etc that grow on top of this moss and send it into your storage so that there is no loss place send yourself a temporary block there with a piston right there swoop around to this side and place in a redstone torch and then Another redstone torch like so and now we’re going to continue building upwards so we want to surround this moss block with some solid blocks on all sides that way no items get lost on the edges and now we’re simply going to fill in a platform of slabs in this area basically A big 7×7 square centered on that master block but with the corners cut off once you’ve filled in all of your slabs this is what it should look like and make sure you fill in these slabs if you don’t then basically no moss is going to grow on your farm these slabs are Crucial to the farm working now the redstone components also count as connector blocks so we don’t need to worry about the torch or the piston or that button now on this side over here we’re going to break this slab and replace it with two pieces of redstone Dust a block and another redstone so now it’s time to install the floor for our rails so we’re going to go ahead and put saw blocks in all of these locations right here and then a layer of upper slabs in place this time we need to be a 7×7 square with the corners as there’s going to be rail blocks above absolutely all of this and that is essentially what your platform should look like before we put in the rails i made a very small mistake on the back side here this hopper clock actually does need to be Moved out a block so go ahead and remove all this real quickly place in a temporary block and then your circle of hoppers needs to go right here we’re gonna place in our two pieces of redstone our block and then our redstone dust and then just go ahead and put that Slab back in the corner like so and now it’s time for rails so we’re gonna place in ourselves a solid block right here for lever powering it on that side and a lever powering it on this side as well go ahead and put yourself a slab there And a slab there with three redstone blocks in the middle and for the rail layout it’s really simple placing yourself a powered rail there rails going all the way around the corner and then back and then a powered rail like that as well powered rail right here With rails going all in this direction powered rail there powered rail there rails back to here powered rail powered rail rails a powered rail and then you start from this corner as well powered rail rail’s going all the way around the corner like so and then one additional Powered rail like so now keep in mind if you’re not building east or west this process is going to be a little bit more tedious and you’ll need to build little extension bridges just to make sure these rails all face the correct directions so keep that in mind you Might need to fiddle with these rails a little bit anyway and now we’re going to go back to the back side of the bill to place in yourself with three solid blocks right here levers on the underside of all of these blocks to power those rails and now it’s time to Install all of the pistons for your masa farm so go to one of the corners and place in yourself a pillar of three blocks above that rail and then place in yourself a regular piston facing downwards we need to put a piston above absolutely every single piece of rail in This area so that we have a 7×7 platform of pistons of course we don’t need any pistons in the corners so just go ahead and fill that in and that is what your piston ceiling should look like keep in mind that you don’t need pistons above Any of these rails right here since that is outside the massic row range so in total this should be a 7×7 layout of the pistons minus the corners and of course you need to put redstone above all of those so let’s start by building the right side stone generator keep in mind That you’ll need to mirror this build on the other side as well so as you’re building this you might want to also build the other side or do it however you want to anyway we’re going to go ahead and place in ourselves seven obsidian along this edge of the stone Platform within that block and within that block right there and that should be lined up with your piston ceiling as well we’re then going to go ahead and place in a seven obsidian in this area right here with seven pistons facing upwards placing slabs along this zone With a saw block on that end and a solid block on that end we need two additional upper slabs right here with redstone dust repeater on three and redstone off in that area we’re gonna place in a layer of glass blocks to fill in this floor we’re gonna be building with a lot Of lava and water and breaking a wrong block it could flood everything with lava so make sure you’re building on the glass that way you can see where that lava and water is anyway we’re gonna place in seven pistons facing forwards right here two glass blocks to the left And two glass boxes to the right fill in some temporary stun blocks in front of them and then put yourself some solid blocks behind them like so redstone above all of that an upper slab on this corner and then a solid block right there you then want two pieces redstone Like so and now we need to get a water bucket and place one water bucket within each one of these pistons it might not appear that they are waterlogged but if you look from the side you’ll see that those pistons are indeed waterlogged and now we’re gonna place in a border of Glass above all of those pistons that makes the water way more obvious place in another glass block there and then a line of it on the front right here as well you can place in one lava source in the middle and that will generate all of the stone for that lower stone generator And now go ahead and put in a layer of saw blocks above all that lava one temporary block right there of an observer facing outwards towards the back of the farm place in a block right there and now we want our seven pistons facing forwards this is gonna be pushing In all of these down to eliminate your moss and to be turned into moss and now we’re simply going to place in a saw block right there and redstone dust off in this area we’re going to flip around to this side and fill in our two block Layer of glass right here as well and now we can fill in our top layer of pistons for the upper stone generator so seven pistons right there two glass to the left two glasses to the right flip around to the back side and you want saw blocks along that entire area like so We’re now gonna go ahead and place in our temporary stone right in front of all of those pistons and then you can fill in all that with a water bucket on each one of those and now to finish up the upper layer we’re going to put a Layer of glass above all of those pistons and then put a layer of glass on the front side as well place in your one lava bucket in the middle of that area and now we need to place in our seven pistons facing downwards this is at the Same layer as the glass once those are in place to put a layer of obsidian above all of that and a redstone dust above all of that as well now we’re gonna go ahead and place in ourselves a block right there and right there as well place the redstone dust above this Entire back line all the way up to here and then place in a repeater right there on three ticks make sure there’s also a piece of redstone dust above that solid block and now for the finishing touches you want to place in a row of obsidian Right next to all of these pistons right here with one additional one on either end of course because it needs to be lined up with all of those pistons and now for the main redstone clock we’re going to go down to this block right here and place in ourselves a sticky Piston right there an observer on its face facing away from the farm like so and now we’re going to put a redstone dust above that a saw block to its side repeater on top of that on four ticks saw block right there redstone torch place yourself in a block right there And then get in yourself a lever on that if everything is working correctly you should see a line of stone get generated right here in this area we’re now going to place in another sticky piston right here with another observer facing out away from the farm and we need to Replace this one glass block right here with a solid block so if you want to you can now go ahead and unflick that lever and test out your stone generator it might take a second to get going but once it gets going it kicks out the Stone so don’t leave it running for too long and now we essentially need to build what we just built here on the other side as well like i mentioned earlier it is mirrored so basically every block that you place on that side it needs to be placed on the opposite Side as well so once you have two of these stone generators i would recommend testing both of them to make sure they do work correctly and that’ll also fill ins down into the entire middle area as well so now go ahead and place in a bunch of glass underneath every one of Your obsidian on the left and on the right side as well that will contain your items and make sure that everything is collected by your hopper mine carts below we now need to place in a line of glass on the front side of this build for the final redstone line we need to Go to the left redstone torch or place in a solid block there and a solid block right there place in an upper line of slabs going across until you get to this piston then you want a solid block and an upper slab off of that torch placing yourself a repeater right there redstone Going all the way across this entire thing we’re going to place in an upper slab right here with a repeater on three ticks going into a solid block we now want a piece of redstone dust right here repeater on four ticks solid block and then a redstone dust this right here is Where the lever of the build is going to be going if you flick that on that should activate all of your cobblestone generators and everything should be good to go we can now go ahead and remove our two temporary levers that we have on the left and the right sides and now flip Around to the front side of the build and we need to install our hopper minecart unloader so place in an upper slab right here and then and solid block right there we want a detector rail and then one more temporary rail right there to make that a diagonal rail placing Yourself another upper slab a comparator going into a solid block with a redstone torch above it saw block right there redstone torch a solid block and then an upper slab coming off of that we’re gonna have a redstone dust right there going into a solid block then grab Yourself a sticky piston place it right there facing downwards and then we want and close the fence gate on the front of it like so so that is of course just one slice of this build go ahead and build that four more times for these areas Right here so that is all five slices installed now we can go ahead and fill in these center blocks right here and we also need to go ahead and install two repeaters one right there and one right there that way these things are completely independent of one another We’re now going to go ahead and place in a line of solid blocks above all five of those pistons and a line of solid blocks right above this bit of redstone as well place redstone above all of those now we’re going to install a little circuit that will turn off your minecart Unloaders whenever you turn the farm off this is a little bit of a junky circuit but it does work so we need an observer facing that piece of redstone dust a solid block behind it redstone torch right there and then slabs in all five of these areas put a comparator going Into that block a comparator going in the opposite direction three pieces of redstone dust and then a saw block right here so these two pieces redstone don’t canoodle so whenever your farm is a pulsing and turning on and off the pistons that’s going to activate the observer power your comparator clock Which will unpower this redstone torch sending all of your mine carts on their way whenever you turn off the farm this clock will eventually decay allowing you to collect all the last little items and then all of your mine carts will go into the parked position for item collection We’re gonna go down a two blocks from these slabs right here and then placing ourselves a double chest facing sideways we’re gonna want at least five of these and that is going to get filled up pretty quickly with all of your mass blocks etc so go a block behind these And you want a hopper facing into the backs of every single one of these double chests a hopper facing into the tops of those double chests and then another hopper facing into the sides of these ones right here this is going to fill up your chest at two times speed And now we need to put the hopper mine carts on top of these so place in yourself some powered rails and make sure these go into like this orientation make sure they’re not facing sideways once you have them in this orientation place in yourselves some glass panes on These blocks and now we need to walk around the back side remove these slabs for a moment possibly this hopper as well and place a hopper minecart on each one of these rails the ones on the powered rails can just be nudged into place above the ones on the edges you’ll Need to walk into these and kind of push them into those glass panes a little bit more once they’re all lined up you can go ahead and put this hopper back into place and put in your slabs as well that is your item collection done these hopper minecarts will now grab all the Items from the hopper mine carts above them we also need to go ahead and place a hopper minecart on each one of these detector rails as well so that is item collection completely done as for a bone meal input you can pretty easily grab yourself a little bit of a hopper line And then put a chest right here fill up that thing with as much bone meal as you want to the final touch for the farm is the fact that we need to put in ourselves one item into this little hopper right here and now we kind of Turn on the lever and we should see that we get ourselves a bunch of moss ground and we’re also getting the azaleas and the moss carpets and all of that good stuff now one thing i will mention is that occasionally maybe like one in ten When you turn on the farm it won’t be perfectly synchronized therefore your moss will not grow so if you notice that you turn on your farm and no moss is growing and just turn off the farm and turn it back on that is due to this little hopper counter down here getting De-synchronized sometimes not entirely sure how to fix it so if you notice that your farm’s not bone mealing the moss just turn it off turn it back on and we also need to add a little bit of a glass of wall from this block right here going All the way off to the opposite side of the farm that way no items will fly out and land on the floor we also need to add two glass blocks on that side and an additional two right here and just after like two or three minutes of running the Farm every single one of these double chests already has like nearly two rows of items in it absolutely absurd converting this moss farm into a bone meal farm is actually a pretty simple task however and increases the noise factor by about 10 composters on machine Gun mode so what you need to do is replace your double chests out the front with a composter each replace the hoppers on the back side pointing downwards into even more composters that should be 10 in total you want a hopper line underneath both of those lines of Composters going into one another and then you leave those hoppers into a double chest as you can see that’s producing a lot of bone meal what’s very important is that you actually intercepted this hopper line with another one going underneath it to deliver bone meal back into your farm You need to prioritize giving the farm a bone meal before you put bone meal into your storage because if you do it the other way around your farm is going to stop producing eventually because it’ll run out of bone meal anyway as you can see we have four droppers going upwards And then our dispenser at the top layer here you’ll take a redstone line off of this block with a redstone torch and just kind of run that into these four droppers you’ll want to prime these middle droppers with a couple pieces of bone meal each that way you ensure they Never run out and you don’t accidentally decrease the efficiency of your farm but yeah as you can see this entire dropper and all three of these hoppers are full of bone meal that is good that is how it should be and once all these are full of Bone meal the rest of the bone meal will be delivered directly into your chest and all of this is pure profits if you have any questions comments or concerns regarding today’s bedrock edition tutorial then of course let me know in the comment section down below i’m Always trying to help you guys out as best as i possibly can but otherwise i hope that you enjoyed today’s video if you did leave a like on the video possibly subscribe those are the two best ways to help support the channel and thank you so very much for watching I hope you have enjoyed i’ll see you guys down the comment section and in the next one and then there was silence Video Information
This video, titled ‘Minecraft Bedrock: Automatic MOSS FARM! 61,000+ Items/Hour! Bonemeal Farm Tutorial. MCPE XBOX PC PS4’, was uploaded by silentwisperer on 2021-09-28 22:00:33. It has garnered views and [vid_likes] likes. The duration of the video is or seconds.
Welcome to a new Minecraft Bedrock Edition tutorial! Today I show you how to build a fully automatic and AFK moss farm!