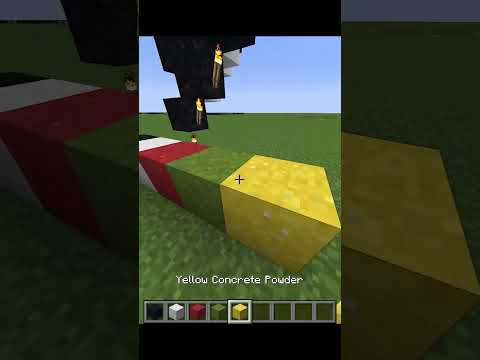
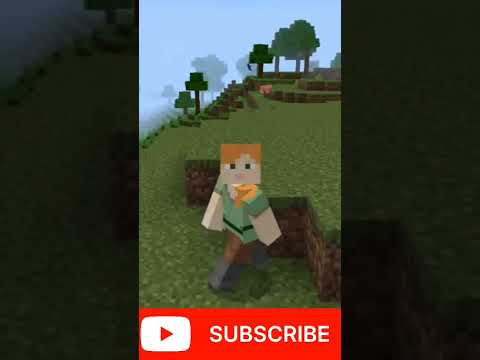
I am george and this makes some custom minecraft mobs of skins i have all my zombies here done up as scary clowns as you can see of course daytime and they’re all catching on fire but what the heck okay let me show you how this is done i painted the zombie skin here On planet minecraft it’s very easy to do you can actually paint any of the mobs right here if you want to have this particular zombie skin i’ll put this link in the description you can then just go over here and then download that mob right Here and i’ll show you how to make the resource pack for this as soon as i show you where i made this zombie skin so go up to where it says minecraft over here to the pmc skin 3d this is where you make your standard skins in here Click on the advanced edition there’s the zombie skin now normally when you come here it’s going to show a steve skin let me just show you that steve skin here i’ll just do that as all the basics and there you get that basic skin like this or you could have it with The steve skin already showing on it and it worked from the steve skin but to use a mob or to work with a mob just go up here to file same thing nu skin this time though over here we have the drop down list and then choose the mob You want to work with even have the lay right there so they have all the new mobs and i came all the way down here to the bottom where we have the zombies and i did this one for java so it’s the java zombie click on create and there You go there’s your basic zombie and then it’s just like painting any other skin here inside of planet minecraft you just choose your colors choose the different tool you want to use this is the drama the pencil tool this one’s kind of a random pixel painting tool paint bucket and so forth And then just go in and paint in what you want to have on your image or on your mob whatever you feel like doing on that mob just paint it in this part is pretty straight for you just you know paint what you want you can change your Colors in here to any other color that you want to use like that put in different colors and it’s just painting onto it now if you use the scroll wheel on your mouse you can zoom in and out like that there’s also a zoom control over here Right hand side if you grab outside you can pull your image around this way and look at different sizes and parts of the image you can toggle the grid on and off so you can actually see where that grid is there you go now when you’re working with the zombie And some of the other mobs they only have limited things to paint for instance on the zombie there’s just one arm and one leg and it works on both sides so if i did a line right here notice how that paints on both arms because it’s actually just one arm used In the model same thing for the legs it’s just one leg on the model in here any pain on one side it’s going to be copying that to the other side now this is the outside on this leg now you can go over here it says visible parts and You can show or hide different parts you can hide the right leg right here and when you paint this side over here you see how it’s been mirrored over here now it’s not always perfect because i need to put in just a little bit right there so it Isn’t a perfect match each time but it’s pretty good so if i paint it like this notice how it’s duplicating that on that other side now to get the inside part if you care about that just over here uncheck right leg and there’s the inside part i could Paint in this now normally these inside sections really don’t show up in the game so it’s not that big of a deal but you can paint the inside just by hiding the leg that’s in the way right there same thing do the left leg or i can hide the left arm Or i can hide the right arm okay so once you’ve then painted it up your monster your mob any way you want to all you have to do then is just to again see this after your computer and file save to file and i have a working Folder right here i just called it pack you just save it right in here and then choose save and there you go downloads and saves that right into that folder that you just selected okay let’s go over now and see how you can build a resource pack to load your mob into and Get the mob into the game also and i’ll use this partial one here for this video get this out of the way and go over to the desktop and here we go right inside of my pack folder right there and there’s the file that i just downloaded Now it’s the wrong name so need to find the name and we need to find where it belongs where the folder is i’m just going to delete this this is the whole folder structure but i’m going to show you how you make this in case you want to work with a different mob And not just the zombie so i’ll delete that i also have a pac mc meta file right here we’ll be talking about this in just a little bit we also need to have a pack png and i’ll talk about that again in just a little bit But first let’s get our folders set up now for this you want to open up your minecraft launcher right here courses installations and over here with latest release click on the folder icon right there and that opens up the minecraft folder and here come down to where it says Versions right there open this up and in here find your current version right now i’m in 119.2 there we go a lot of those other stuff are pre-releases and beta versions i should delete some of that one these days but find your version open this up and here You’re going to be seeing two files a jar file and a json file now if you only see just a json file or just one file then you have to play the game once at least as far as the title screen because that’s when the jar file is downloaded The first time you play that version so if you only see one file just open the game up to the title screen close it down again and you’ll have that file if you don’t see the dot jar and json then you need to enable file name extensions Make sure where that is right now i’m in windows 11 so that’s up here under the view and come down to show and right here find them extensions just make sure that is checked if you’re on windows 10 just go up to the view tab and put a Check next to phantom extensions it does the same thing that gives you that jar file let’s now get this into my working folder i’m going to right drag it over here and copy there we go we can now get that out of the way when I need to make this into a zip file and it’s really easy to do just click into the name type over the jar and make it say zip click outside choose yes it’s now zip file all it was was just a zip file that had the jar name instead Let’s now open this up i’m going to right click on this and open in a new window this is the easy way to do this there we go and a couple things first off if you want to use the built-in pack png file this is my custom one if You want the vanilla one just on this page right here scroll way down and right down in here and it’s right there pack png this is the one that looks like the dirt block that’s all it’s just pretty boring for mine this is a custom One it’s just at 128 by 128 png file and then what i have inside there it’s whatever you want okay and here’s going to assets into minecraft come down where it says textures right there open that one up in here we’re inside of entity all your mobs are inside of entity some Are in here if there are more than one look to them like there are several bees for instance there are several cats several frogs right here if you scroll down down here things only have just one look those are right down here what we care about are the zombies and that’s right here Open the zombie up and there are four of these drowned drown outer layer and the husk and the regular zombie which is right here that’s the name that you want we’ll be changing this name over to zombie so let’s go click on the name over here and Let’s just retype this and make it say zombie that now matches the original file name that’s good and also we have that inside of these folders up here so we need to recreate these folders here inside of our working folder so make a new folder the first one is assets You can see that that’s right there new folder the next one is minecraft notice that there are no capital letters in here let me make this so it’s the right size as well there we go inside of minecraft new folder this one is textures there it is the view correct Inside of this one new folder this one is entity let’s change our view so it’s right there we go inside of entity new folder and this one is zombie then i’m going to change the view here so it’s the right size there we go inside of here is where i Want to put that other file so let’s back up to our pack folder and that’s this one i’m just going to right click and copy and we’ll go inside of our folders there we go right click and paste there it is in the right location and let’s again fix our view on that There we go okay that’s all set so we have our folders we have our new skin we have our pack png now we need the pack mcmitted this used to be included in the jar file it’s no longer included in the jar file so we need to get that some Place and i just made it easy i put this up on my website can just download it from the website let me show you that page here you go i’ll put this link in the description now if you want to code your own there’s the actual code right here and Tell you how to do that in these short paragraphs if you want to do it the easy way just click on the pack that you need for your particular format you see there’s all the different versions in here and we’re using pack format nine just click on it download the zip and then Extract it from the zip file so that’s all taken care of and that’s what we get right here now i open this thing up inside of notepad plus plus it’s a great and free code editor it’s my favorite open that up right here now we need to do is just to Rename it zombie if you’re working in 119 to which i’m at right now that’s format nine and then just give it a name again i’m calling mine zombie so that’s done that’s all i have to do with the pack mcmeta and we’re now all set to make this into a resource pack You want our folders over here hold the control key down get that pec mc meta and the pack png just those three pieces right click compress to zip file i am in windows 11 so that’s how you do it in windows 11 give it a name i’ll call it zombie If you’re in windows 10 just go up to the share tab and click on zip same thing and just give it a name okay we need to get this into the game so i’ll bring the launcher back up again let’s get this thing out of the way we’re done with that Here’s our launcher go over here to that folder again now this time i want to come into the resource packs folder right here open this up here’s my clown zombie skin right there i’ll take the zombie and just drag it and drop it right into this folder there you go it’s all set Close that down we’re done with that we can now play the game click on play let the game load up and then we’ll activate that new zombie pack here i am in the game hit the escape key choose options resource packs there’s my clown zombie i’ll take him out and it’ll scroll down There’s my new zombie file the one that we just made click that bring that in there we go choose done let that load that pack in choose done again back to game i have my zombie spawn egg right here let’s go ahead and spawn some zombies and see what this looks like There we go there’s our new zombie look that we just did over there in planet minecraft hope you like this video hit that like button click on share click on subscribe make sure you check out my channel for a whole bunch more of these minecraft custom videos and i’ll see you next time Video Information
This video, titled ‘Minecraft Custom Mobs Skins with the Planet Minecraft Skin Editor’, was uploaded by HTG George on 2022-08-16 14:30:05. It has garnered 11219 views and 176 likes. The duration of the video is 00:11:57 or 717 seconds.
🔴 If you enjoy this video show your support by clicking on the Thanks Button Minecraft Custom Mobs Skins with the Planet Minecraft Skin Editor. Here is how to Make Minecraft Custom Mobs Skins. You can change the look of any mob using the Planet Minecraft Skin Editor to make your Minecraft custom mobs. Planet Minecraft is the easiest way to give your mobs a custom look in Minecraft. Using the Planet Minecraft PMCSkin3D tool you simply paint onto a 3D model of the mob using the advanced editing tools available. You can then use your new mob texture in a Minecraft custom mobs texture pack which I also demonstrate in this video. So if you really want to learn how to make custom mobs in Minecraft then this is the video for you. Using the Planet Minecraft skin editor is easy and fun, and is the best way to re-paint the texture of Minecraft Mobs.
⬛🔴 Support Me on Patreon! https://www.patreon.com/htg_george
Download the pack.mcmeta here: https://www.georgepeirson.com/minecraft-pack-mcmeta Get the Minecraft Custom Mobs Clown Zombie here: https://www.planetminecraft.com/mob-skin/zombie-clown-5681411/ Notepad++: https://notepad-plus-plus.org/downloads/
00:00 Minecraft Custom Mobs Skins 00:14 Planet Minecraft 00:39 the PMCSkin3D skin editor 01:17 Opening a Zombie Skin 01:34 Painting a Zombie Skin 03:39 Save to computer 04:13 Build the Custom Resource Pack 10:44 Install in Minecraft and Test 11:46 Like Share Subscribe
My Minecraft channel is all about having fun with Minecraft. Changing the look with custom textures and resource packs, digging into complex topics like making potions, collecting all records, fighting the dragon and more.
Minecraft: https://www.youtube.com/playlist?list=PLfp-NJt_DpgHCfNa9Uykd2TnkRRsT5lXD Custom Minecraft: https://youtube.com/playlist?list=PLfp-NJt_DpgG2odTDbwjtXkdjdBgpSxng If you liked this Minecraft tutorial subscribe to my channel https://www.youtube.com/c/howtogurus?sub_confiramtion=1
#minecraftresourcepack #minecraftcustomsounds #minecrafthoney #minecraftcustom #minecrafttexturepack #skindex #minecraftmusic #minecraftmods #minecraftjava #minecraftjavaedition #howtogurus #georgepeirson


![🔥HUNT DRAGON NOW! 🐉[MINECRAFT ADD-ON] #ADSA](https://img.youtube.com/vi/pmoP3_R4czw/0.jpg)