
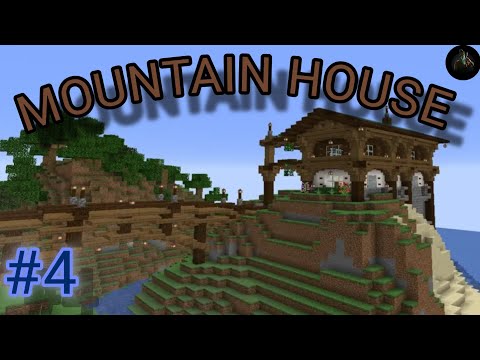
Hi everyone! and welcome back to another build tutorial i’m Spudetti and in this video i’m going to be showing you how to build a mountain house in minecraft as always i’ve tried to make this house Practical but also nice to look at using materials that are easy to get hold of in survival if you’d like to make this exact build i’ll leave the seed and the location in the description box below It’s the same seed that i’ve used for all of my other builds if you’ve already created the world i really hope that you enjoy this video don’t forget to leave a like and consider subscribing if you’re new here i also really appreciate receiving any feedback that you have about The builds or my videos or any requests that you have to start i’m going to mark out the location of the window on the side of the mountain using spruce slabs i’ll be following the natural shape of the land here so that it fits in better the top part of the window follows The same shape as the bottom but goes up by one block each time apart from in the middle the easiest way for you to do this is by following the graphic that was shown just before this clip To get the shape right it doesn’t have to be in the exact same spot on the mountain as we’ll be terraforming around this anyway i’m now going to clear out some space inside so that we have Room to build don’t worry if you break through the sides of the mountain we’ll fix this later if any parts of the window are floating place stone underneath so that it fits into the mountain nicely the same goes for any areas that are sticking out with nothing surrounding them Do your best to build around these with stone and add grass on top the best way to do this is by trying to make it look as random as possible so that it blends in with the rest of the mountain Don’t worry if you don’t get it perfect straight away we’ll be coming back to this a couple of times throughout the video to make sure that everything is covered a trick to making it look better is by having the ground slope upwards around the top of the Window and hang downwards slightly around the bottom this way it looks like it is supported by the mountain and has a more natural feel to it compared to if it was all straight we will now clear out the inside so that we can start constructing the interior of the build You will need to dig out nine blocks away from the edges of the window on both sides and all of the area in between this will probably be the most time-consuming part of the whole build but once it’s done you can reuse the blocks for terraforming around the outside of the window If you haven’t already check out my instagram for extra small builds and tutorials that i put out while i’m working on a video if you’d like to see more content from me you can also find all of the finished shots of my builds on there the link is down in the description Box below if you’d like to have a look we’re now going to move on to building the entrance and exit of the house so that it’ll be easier for you to get in and out while you’re building Dig out two blocks one block away from the outline of the window and leave a one block gap in between after this dig down around 15 blocks or until you reach the ground at the base of the mountain you can dig forwards a few at the bottom to check where you are If you’re happy with how far you’ve dug go back up to the top and dig down again in the other hole it might be best to use scaffolding here if you’re building this in survival dig forwards again to connect to the area that you just dug out to we can now start building The entry and exit of the mountain house clear out a bit more space so that you have two blocks showing next to the holes that you have just dug on both sides and then remove the blocks in the Ceiling so that the room is three blocks high we can now start decorating the room in between and next to the holes that you dug place columns of strip spruce logs as shown next to the columns at The sides place oak planks and then another column of oak planks one block diagonally out from these to finish off the walls add a final two columns of strip spruce logs one block diagonally out from the oak planks that you have just placed if there’s anything in the way of where you’re Trying to build just remove it we’ll also be doing a bit of terraforming around here too on top of the spruce columns place spruce planks with spruce slabs pointing outwards on both sides then add some spruce stairs facing inwards and create two blocks using spruce slabs in Front of these to create an arch add some spruce planks behind these to fill in the gap and then cover the areas that are showing with stone and dirt so that it blends in more Follow the shape of the land again here to make it look natural fill in the rest of the ceiling with spruce planks including the bits in between the columns make sure not to cover up the holes Though add some lanterns or torches for light and then fill in the floor with stone bricks when you get to the front bring the stone bricks out so that they meet together in a square as shown after This terraform the outside of the entry with dirt to cover up any stone bricks that are showing and to also make the ground flatter and easier for you to walk on while trying to keep it looking natural You don’t need grass blocks for this if you just use dirt the grass will spread over them over time add some spruce fences and fence gates to the entry so no mobs can wander inside we will now Work on the water elevators place spruce signs on the column that is in between of the holes that you dug so that the water doesn’t flow out into the room you can also use them to label the holes Like i have done place a dirt block at the bottom of each hole so that we can place kelp on there then go back up to the top and add water into the hole again it would be a good idea to use scaffolding if you’re in survival travel down the water to the Bottom and then place kelp going all the way up and remove them to create source blocks do this again on the other side keep an eye on your air though if you’re doing this in survival Finally add a magma block on one side and soul sand on the other to create the water elevators soul sand goes up and magma comes down you’ll know if they’re working if you see bubbles in the water next to the outline of the window place spruce planks in the floor This is where the glass will go fill in the window with light gray stained glass follow the shape of the window here so that it comes up in the middle and goes down at the sides Make sure to fill in any gaps in the ceiling as you’re going along so that none are left behind you can miss out the one block of glass at either side of the window as this won’t be seen add some Spruce planks on top of the light gray stained glass that reach up to the ceiling we want that to be two blocks above the tallest parts of the glass in the middle so you may have to raise the ceiling A bit to do this if you’re enjoying the video so far i’d be really grateful if you could leave a like and consider subscribing if you haven’t already if you have then hit the notification Bell so that you never miss a new video carry on adding spruce planks above the glass to make sure that you’ve got the height correct we’ll come back to this later on in the video to finish it off We’ll now move on to designing the walls floors and ceiling of the house in line with the spruce planks at the end of the window place a strip spruce column going up by five blocks fill in The space one block back from this with oak planks going five blocks across and up add another spruce column at the other side and then place spruce stairs going across the top row of oak planks After this add dark oak stairs going above these all the way across fill in the area above the wall with stone or dirt as this won’t be seen then create a sloping ceiling using dark oak planks and Slabs until you reach the top if you follow the graphic and dug nine blocks away from the window then you won’t have to remove this extra layer of wall like i am here the first section of wall here Will have a gap of three blocks in between each of the strip’s spruce columns as the ceiling is sloped add a row of spruce planks at the top and spruce stairs below these so that they fit better Then fill in the rest of the wall with oak planks and add some more spruce stairs at the bottom the next section of wall will have a gap of six blocks in between the columns fill this in with Oak planks and add spruce stairs at the top don’t worry if you’ve gone through to the other side of the mountain we’ll fix this later the final section will have a gap of three blocks in between And we’ll have spruce stairs at the top and bottom now repeat all of these steps on the other side of the room starting with the wall with the five block gap and going up by five blocks again if You’ve broken through the mountain here just fill it in with stone or dirt and we’ll fix it later do the sloped roof again here using dark oak planks and slabs the exact same as we did on The other side of the room this is just to add more detail to the build and to follow the shape of the window as it slopes upwards so we have a smoother gradient from the wall to the ceiling We will now do the rest of the wall this is exactly the same as you did on the other side of the room so you can just copy what you’ve already built if you’ve ever built anything from my Tutorials in your minecraft world or i’ve inspired you to build something tweet me your pictures the link for my twitter can be found in the description box below i’d really love to see what you’ve all built carry on building the last bit of wall and then we can go outside and cover Up the parts that stick through at the back place stone to cover up any part of the build that is showing through the wall make it look as if it is hanging down slightly so that it blends in One block back from the strip spruce column at the ends of the wall place oak planks you can add some more stone to the floor here to make it easier to build the back window Remove any stone or dirt that is next to the oak planks as this will block the view from the window do the same on the other side and then mark out where the window will be using spruce planks This is also shown on the graphic at the start of the video if you’d like to refer back to that after you’ve done this go back outside and tidy up the area underneath the blocks that you’ve just Placed so that it looks natural make the window look supported by placing the stone to make it look like it is hanging downwards as shown you can also remove any harsh lines so that it looks more natural go back inside and add some spruce stairs around the bottom of the window space Then count three blocks up and place an upside down spruce stair on the spruce column with a spruce slab on top add a spruce plank next to this and another made out of spruce slabs half A block up one block diagonally from this repeat all of these steps going back down to the other side to make a small archway with two blocks in the center add some more oak planks behind the spruce blocks that you’ve just placed and then add the light gray stained glass to the window The glass will be placed on top of the spruce planks that we put down to mark out the window and will go up by five blocks like i said at the start the seed for this world will be in the description If you want to build this yourself add some spruce planks on top of the glass that you’ve just placed and then add some stone around the window so that it all fits in nicely with the mountain Make sure that no areas of the build can be seen through the walls apart from the window go back inside and add the last layer of glass and we can carry on with the rest of the interior add some upside down spruce stairs going around the walls at the top of the window To finish it off at the top of the main window at the front add dark oak planks in between the spruce planks that we placed above the glass earlier going all the way across to the other side Then add some dark oak slabs in between the planks that you’ve just placed to bring it all together if there’s any gaps fill them in with spruce or dark oak to finish it off after you’ve done that replace the whole of the ceiling with spruce planks If there’s anything else that you’d like me to do a tutorial for then let me know in the comments i’ve been making a list of all of your great suggestions and i’ll do them in future videos To finish the sealing off add a border of dark oak slabs in line with the ones that you placed on the sloped roof earlier we’ll now move on to the floor design which i’ve kept fairly simple In front of the main window add a border of spruce stairs the same as we did for the back window add spruce planks where the water elevators are and you can add signs to label these again to start building the rest of the floor dig out a border around the whole room In the gaps in the walls where there’s no spruce stairs dig here too be careful when you dig near the water as it will all flow out once you have done this add oak planks to the border going Around the whole of the room then clear out the rest of the floor and replace it with birch planks i’ve chosen to use birch for the floor here as there is a view of a birch forest out of The back window so it fits in well we can now move on to the main interior decorations i’ve tried to include all the things you’d need for your house without it being too full or resource intensive On the far right wall add some spruce slabs between the columns and place some furnaces on top add an anvil and a stone cutter next to these and then add some more spruce slabs with spruce trap doors going across the top i’ve then added a lantern and a flower pot for decoration and Lighting on the wall next to this add spruce slabs between the columns again add a crafting table smithing table and a brewing stand on top add some spruce slabs above these and then decorate using a lantern and a flower pot again you can also add a small painting underneath using temporary Blocks to get the right one if you’d prefer to use torches instead of lanterns then that’s fine too for the middle section place four rows of three double chests on top of each other you can make these go higher but you’d have to add ladders to be able to reach them Above the top row add spruce slabs and stairs as shown to create a shelf as you can see you can still open all of the chests as they don’t have full blocks above them on the shelf that we made add a couple of barrels for decoration you can then replace The corner stairs with planks and hang some lanterns or you can just place torches on the columns if you’d prefer for the final section add spruce slabs between the columns again on top of the slabs place an ender chest with some armor stands on either side You can also add an item frame this is where you could place your best armor and tools place some more spruce slabs above and decorate them using a lantern a flower pot and a painting i’ve used temporary blocks again to get the painting that i want I’ve then added little tables using upside down spruce stairs and added lanterns on top for a bit of extra lighting and detail we are now going to build a raised platform for the bed to go on three Blocks away from the spruce columns in the wall add another two columns going up by four blocks on the top half of the third block add spruce slabs going between all of the columns and sticking out at the sides at the right hand side add another column in the middle this Time three blocks high with the third block being stripped spruce wood then fill in the rest of the platform with spruce slabs and we can move on to decorating it add spruce fences with spruce fence gates in between the columns to create a barrier around the platform so you don’t fall off Add a ladder on the middle column at the side so that you can get up and down replace a couple of the stairs with planks again so you can hang some lanterns up for the bed place Some spruce planks with stairs either side and slabs on top then add some slabs in front of the stairs and place a couple of beds in the middle you can then decorate by adding a painting using Temporary blocks to get the right one again and by adding some bushes by using a flower pot a dead bush and a leaf block finally add a spruce slab on top of the columns to finish it off Underneath the platform replace the birch planks with oak in this section to add a bit of contrast we’ll be adding an enchanting area here in the corner add some oak planks as this won’t be seen and then add bookshelves on the back and left hand side with two extra to Get the level 30 enchantments add an enchanting table a grindstone and a chest to finish it off you can then add a couple of lanterns on either side for some extra light finally as there is not much room left at the side we’ll just add a small desk for decoration Place spruce stairs as shown with a spruce slab in the middle to create a desk then add a spruce slab with a trapdoor to make a chair above the desk place upside down spruce stairs with trap doors on either side to make a shelf Decorate the shelf with a lantern and a flower pot or just add a torch you can also add a lantern to the wall section next to this finish the desk off by adding a small painting for detail Then add oak trapdoors on the bookshelves behind this to cover them up and make it look tidier the final bit of interior decoration that we’ll be adding is a rug to fill in the empty floor space and so that we can hide some lighting underneath as well Remove any torches you’ve placed and dig out a random pattern in the floor and fill it in with wool i’ve made it quite big so that we can hide a lot of lighting underneath The wool can be any colour you like as i know that brown dye can be hard to get hold of in survival surround the wool that you just placed with carpets of the same colour after you know where the carpets will be placed you can add torches Underneath for extra lighting so no mobs will be spawning in your house you can do this all the way around the rug and even in the middle if you add some extra carpets you can do a quick check around the house before you finish to make sure that the Light level is above level a everywhere by pressing f3 if you’re playing on java and that is the interior of the house finished we’re now going to complete the build by finishing off the terraforming on the outside of the mountain around the window Make sure that no blocks are showing through and that everything looks natural by using stone and dirt blocks to cover it all up thank you so much for watching i really hope that you’ve enjoyed this video don’t forget to leave a like and consider subscribing if you’re new here I also really appreciate receiving any feedback that’s left in the comments section below Video Information
This video, titled ‘Minecraft: How to Build a Mountain House [Tutorial] 2020’, was uploaded by Spudetti on 2020-10-12 13:00:26. It has garnered 131092 views and 4630 likes. The duration of the video is 00:17:12 or 1032 seconds.
Learn how to build this beautiful mountain house with incredible views in your own Minecraft survival world! 😄
I’ve tried to include everything you need in one place so you don’t have to keep leaving your house to get things done. I hope you enjoy this video, please leave any feedback you have in the comments section below. Thank you 😊
SEED: -5405061352920635065 (Java) LOCATION: X: 164, Y: 66, Z: 567
➜ Minecraft: How to Build a Mountain House in @Minecraft ➜ Thumbs up & Subscribe for more! ► https://bit.ly/SubscribeSpudetti
Join my Official Discord: https://discord.gg/vs3zGVcQfx
➜ Follow! ● Instagram: https://www.instagram.com/spudetti/ ● Facebook: https://www.facebook.com/spudetti/ ● Twitter: https://twitter.com/5pudetti
➜ Let us know what you think in the comments section below!
➜ Download music: https://www.epidemicsound.com/referral/3x3vt6/
➜ Texture pack: x32 Faithful v1.16.2 ➜ Shader pack: BSL Shaders
#Minecraft #MountainHouse #Tutorial
Timestamps: 0:00 Intro 0:39 Window design 1:53 Interior dig 2:33 Entry & exit 4:45 Water elevators 5:29 Main window 6:25 Wall design 8:35 Back window 10:26 Ceiling design 11:21 Floor design 11:51 Interior decorations 13:40 Bed design 15:12 Finishing touches 16:40 Terraforming 16:53 Outro
————————– Don’t reupload or modify my videos in any way on YouTube, TikTok or any other video sharing services without my permission.
If you use my builds in a YouTube video then please credit me for the design.
Copyright 2021 © by Spudetti.


![🟢 EPIC SLIME BATTLE! "Not Giving In" - Minecraft MV [Exit From Darkness E26]](https://img.youtube.com/vi/dJ8vyNIsP_4/0.jpg)


![Minecraft: How to Build a Mountain House [Tutorial] 2020](https://newsminecraft.com/wp-content/uploads/news/minecraft-news-trending-17.jpg)