
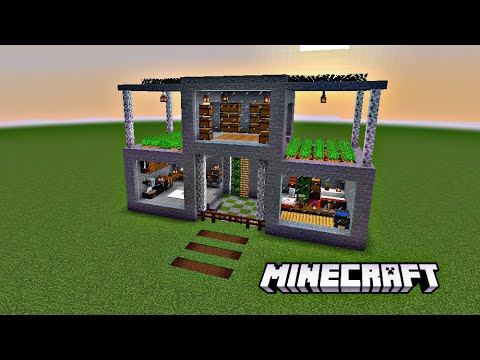
Hi everyone and welcome to another how to build tutorial. In this video I’ll be showing you how to build this underground survival house in Minecraft. This house includes an enchanting area, various crafting and smelting stations, plenty of room for storage, a bedroom and even a mine entrance. I really hope you like the build and enjoy the tutorial and if you haven’t already, be sure to subscribe to see more content like this. So, to start, the first thing we need to do is to mark out a large circle in the floor using spruce planks. This circle will be 5 blocks long on the sides, and will have two blocks, then one block, followed by another two blocks in each corner, just like this. I’ll show all of the measurements for this circle shortly to help you out. Here’s the measurements for the main circle. Now, for the next circle, come over to the right hand side. In the middle of the 5 block long section come forward by a block then add 3 dark oak planks in the floor, like this. So the middle of these 3 planks is in line with the middle of the 5 block long side. After that, to the side add two more dark oak planks. You’ll have to remove a spruce plank here to do this. Then, add another two planks facing in the other direction, like this. And that’s the side and corner part of this circle. We will repeat this all the way around. So do this again for the next side, like this. And keep going until the whole circle is complete, again I’ll show measurements for this shortly. Here’s what the smaller dark oak circle should look like. Now, come over to the left hand side and do the exact same thing again. So start by finding the middle of the 5 block wide section then mark out the first 3 block wide section using dark oak planks and carry on your circle from there. Here’s what the 3 circles should now look like. The two dark oak circles are exactly the same. Once you’ve got the circles marked out, add slabs of the same block type on top of them. So spruce on top of spruce and dark oak on top of dark oak. Now it’s time to dig out the house. So, start by removing the ground that’s inside the circles, in line with the planks that we placed. This is the first layer we will remove. Now remove 5 more layers below this. For these next 5 make sure to remove The ground directly below the planks, so you can see them from underneath. Here’s what the front and back of the larger circle should look like when it’s all dug out. Here you can see that the area where the two circles meet can be seen from below As we removed the ground underneath the planks. Here’s what the front and back of the smaller circles should look like. And finally, here’s the measurements for the outer side of the smaller circle. When you’ve got all of that done it’s time to add a staircase. To do this, at the front of the main circle add 5 oak logs below the spruce planks on each side of the gap, like this. After that, add spruce stairs in front of these logs with the outer stairs turned to the side, like this. Now, fill in the 3 block gap behind these and remove more of the land behind this too, making sure to come up a block each time. Then add spruce stairs on top, like this. We want 3 sets of stairs in total here. When you’ve done that, come to the top of the stairs, dig through to the surface and dig out a 3 block high by 2 block wide section in line with the top stair. After that, come to the side and mark out another staircase that comes up by 3 blocks. This will be 2 blocks wide. Then do the exact same on the other side too, like this. In the middle section, replace the blocks with spruce planks. Now you have a way to get in and out of the underground house. After that, remove the ground next to the oak logs On each side and add a dark oak plank at the bottom, like this. On the next block, remove all of these and replace with spruce logs with an extra at the top. Do this on both sides. You should have this so far. Next to these logs, leave a block then add another log. And do the same on the other side of the stairs too. Then add more logs across the front. There will be a 2 block gap on each side with a 3 block gap in the middle, like this. And once that’s done add dark oak slabs on top of all of the spruce logs. After that, add dark oak planks between the logs on each side, but don’t add any in the middle for now. And in front of the stairs add spruce planks. Here’s what it should look like. Now add dark oak fences in between the spruce logs With dark oak fence gates at the top of the stairs. When you’ve done that, fill in all of the circles with glass, placed in line with the planks that make up the outlines. Now that you’ve got something to stand on and won’t fall down the hole, Come to the front of the large circle and remove a spruce slab on each side, like this. After that, add a spruce log on each side and add a dark oak stair on top with an upside down stair on the back of it, like this. Do this on both sides. Then add dark oak slabs across the top and hang a lantern from the middle one to finish it off. Now no mobs will be able to walk into the underground house. To finish off the staircase come back inside and add more spruce logs below The ones we added at the front with an extra dark oak plank next to this. Do this on both sides. Now, in the middle section, remove the dirt and add 3 upside down dark oak stairs across the top. After that we’re going to dig out a mine entrance. To do this I’m just coming down by a few blocks and adding some spruce stairs leading down. To tidy up the walls, I’m adding some extra spruce logs to look like supports and filling in the walls with a mix of stone and stone bricks. For the ceiling, I’m using some dark oak trapdoors so we don’t bang our head when we go down and I’m also adding some dark oak fence gates at the entrance too. Now, at the entrance to the house, remove the 3 middle spruce planks And replace with an upside down stair on each side with a slab in the middle. Then, after that, add an upside down dark oak stair on each side in front of the spruce plank. On top of these stairs add a slab, followed by a block And a final slab in the middle to create an arch. To decorate, add a lantern and a flower pot with whatever you want in it at the bottom. Then, add some spruce trapdoors around the top oak log to finish it off. Now, inside the build, add slabs underneath the planks that make up the outlines of the circle, just like we did above. So spruce beneath spruce and dark oak beneath dark oak. When you’ve done that it’s time to start work on the walls. So, starting by the entrance, we want to bring the whole wall back by a block. So remove the ground next to the oak column so it comes across by three. Then you want to have 3 columns going across diagonally like this after that. To fill this in, add dark oak planks across the top and bottom with spruce planks in the middle. Then, in the corner add a column of oak logs. And after this add two dark oak planks at the top and bottom With spruce in between. These should be pointing towards the middle, not the side. For lighting, add a spruce plank at the top on either side of the oak log and hang lanterns from them. Now repeat this exact design for the three remaining corners in the main room. They are all exactly the same and should all line up. If you get stuck at any point you can copy what you’ve already built or look back in the video. When you’ve done the walls in the main room it’s time to add some arches at the sides. So, to do this, come over to the gap at the side and remove the spruce slabs that we added below the planks at the top. Then add 3 spruce logs on each side, like this. On top of the log add a dark oak stair with an upside down stair on the back of it, just like this. Do this on both sides. Then add a slab followed by a block on both sides with a final slab in the middle to complete the arch. For some extra detail you can add some dark oak trapdoors around the top spruce log. And that’s the arch design finished. Now come over to the opposite side and do the exact same thing again. There’s a graphic on screen to help you if you get stuck. Now, for the floor, we’re going to start by adding a border of dark oak planks around the outside of the room. These planks will go in front of the dark oak planks in the corners, between the spruce logs at the sides and in the gap at the back. So it should look like this. When you’ve done that, come to the front where the stairs are and dig out a 3 block wide section in the middle, going across to the back but stopping one block before the border, like this. Now do the same going across the other way, again in the middle of the room and leaving a block before the border on each side to create this cross shape. When that’s done, remove one block from each corner just like this. The cross shape in the floor should look like this from above. Now, to fill it in, add dark oak stairs on the inside, following the shape of the cross, just like this. We want all of the stairs to join up smoothly, we don’t want there to be any gaps. Then, in the very centre add a shroomlight with a dark oak trapdoor on top for lighting and fill the rest of the cross in with dark oak slabs to finish it off. For the rest of the floor in this room, fill it in with spruce planks. And here’s what the floor should look like in the main room once it’s all done. Now, for the side rooms, start by removing a layer from the floor following the shape of the room, like this. Inside the room, add an extra spruce log at the bottom of the arch on both sides. Then add dark oak stairs in front of this with the outer stairs facing to the side, like we did in the main room. Add an extra dark oak plank at the bottom next to the spruce log, then remove the blocks in The walls next to this and replace with dark oak at the top and bottom with spruce in the middle. For the next part, remove the first column from the two block wide section and the 4 blocks going across directly behind this. Then fill this in with the dark oak and spruce planks again, So you have a 4 block wide section here. This won’t match up perfectly with the outline above, so fill in the gap with a dark oak slab at the top. When you’ve done that, replace the next column of blocks with dark oak and spruce planks again. So on this wall section you should have a one block wide column on each side with a 4 block wide gap in between. Now for the side wall opposite the arch, add a column of spruce logs first, like this. Then, for the next part, add dark oak with spruce in the middle on the first block and a column of spruce logs on the second, like this. And then repeat on the other side too, so they match up. For the 3 block gap in the middle, Add dark oak planks at the top and bottom with spruce planks in between. To light it up, add an extra dark oak slab on each side of the spruce log at the top and hang lanterns from them. The final wall section is exactly the same as the one opposite. So start with the spruce log, then the planks and hang the lanterns up at the top again. Then make the 4 block wide section here and fill in the gap at the top with a slab. You can copy what you’ve already built on the other side if you get stuck. Finish it off with the planks on the next column and the extra dark oak plank at the side. For some more lighting, in the corner by the arch, add an extra slab and hang a lantern from it on both sides like this. Now, for the floor, start by adding the border of dark oak planks again. These planks just follow the shape of the room as you can see here. Then, for the rest of the floor just fill this in with spruce planks. And repeat all of this again on the other side too. So start by removing a layer from the floor. Then add the extra log at the bottom and the dark oak stairs leading into the room. Now repeat the wall design that we did at the front and back in the other room in here too. So the 4 block wide section with one column of planks on either side of it. For the final wall section, opposite the arch, remove the first two columns and replace with one column of planks like this. Do this on both sides. Now, next to this, come back by a block and add another column of planks on each side. Join the two sides together across the top with dark oak planks with an extra in each corner. Then remove all of the remaining blocks in the middle as well as the ones behind and Fill it in with dark oak planks, leaving the bottom row as it is. Now, at the top of this section, add an upside down spruce stair on each side with a spruce slab in the middle. Then, at the bottom, add a row of dark oak planks in the gap with More in front of this to fill in the next gap. So it should look like this so far. Then add an extra plank in the middle and add dark oak stairs following the shape of the planks that we have just placed, like this. After you’ve done that, make sure to add the extra slabs and lanterns to light up the room. For the floor, add the border of dark oak planks again with spruce planks in the middle to finish this room off. Now, at the back of the main room we still have a gap to fill. So, start by removing all of the blocks that we have here. Then add a row of dark oak planks across the top with one row of spruce planks underneath, like this. And on the next layer just add one spruce plank on each side. Now fill in the remaining space with bookshelves. Then on each side add an extra two bookshelves with one in front like this. To tidy this up a bit, replace the spruce planks in the middle with dark oak planks and add an enchanting table in the centre. Then, at the top add an upside down dark oak stair on each side with Dark oak slabs in the middle to create a shelf. To decorate, use temporary blocks to find a painting you like. Then add some candles, being very careful when you light them, and a flowerpot with anything you like in it. And finally add a grindstone at the side. As you can see here, the enchanting table set up in this way gives the full level 30 enchantments. Now, in the corner to the left of this add some dark oak slabs and an upside down stair to make a table. Then add some barrels and smokers to create an area for cooking food. By the bookshelf make a plant using a composter and two leaf blocks, then add some brown carpets in the corner to finish it off. In the next corner to the right, add the same plant again. Then add a crafting table with a couple of barrels and place a brewing stand on top too. Along the wall to the side create a table and add another brewing stand and a cauldron that you can surround with dark oak trapdoors to make it blend in better. Then decorate with the brown carpets again, some item frames with potions in and a flower pot to finish. Now, at the front, add the plant again on either side of the stairs. On the left I’ve just added a couple of tables again and placed some furnaces and blast furnaces on top with some barrels to the side to make a space for smelting. You can also add a smithing table here if you’d like. And on the right I’ve just added a loom and a cartography table as well as some extra storage. Feel free to change these designs up to whatever you think will be the most useful for you. Now, in the side room without the added platform, I’ve started by adding dark oak slabs across the 4 block wide gap with stacked double chests on top. I’ve also added the plant in here too on either side of the stairs with a few extra barrels for decoration in the corner. And I’ve repeated this on the opposite side too. For the remaining wall, I’ve added dark oak slabs across the bottom and the middle, placed on the top half of the block. Then, across the bottom i’ve added a crafting table, an anvil and a stonecutter And at the top I’ve added two of each type of furnace. For some extra lighting and colour, remove the middle block in the floor and add a shroomlight. Then add some red carpet to cover this up. Now in the final room we’re going to start by adding the stacked double Chests in the four block gap on both sides again with the plants too, but this time we aren’t adding the extra barrels in the corners. Do this on both sides. Now, where the platform is add the plants on either side, like this. Then, at the back add an upside down spruce stair On each side and a plank in the middle with a slab on top. On top of the slab add an armour stand, you may have to remove the slab above to do this. Then add a bed in front with an ender chest, lantern and a couple of item frames above this. In the remaining corners you can add a couple of furnaces and a crafting table if you’d like. Then finish it off by adding a shroomlight in the middle again with some red carpets on top. If you’d like to add some more detail outside to make it blend with the environment better then You can use bonemeal on the grass to create long grass and flowers all the way around the build. You can also add some extra decorations like sweet berry bushes or azalea bushes if you’d like too and add some paths at the entrances to look like it’s been worn down. And that’s the underground survival house completed! Thank you so much for watching, I really hope that you enjoyed the video. If you did then i’d really appreciate it if you could leave a like and subscribe if you haven’t already. And please feel free to leave any feedback or build requests in the comments section below! Video Information
This video, titled ‘Minecraft: How to Build an Underground Survival House [1.17 Tutorial]’, was uploaded by Spudetti on 2021-11-13 15:00:05. It has garnered 87240 views and 2829 likes. The duration of the video is 00:24:52 or 1492 seconds.
Follow this step by step tutorial to learn how to build this Underground Survival House in Minecraft! 😄
The Underground Survival House comes complete with pretty much everything you need for survival including an enchanting area, a mine entrance, a bedroom, plenty of room for storage and several crafting and smelting stations.
This house is perfect for players who are looking to improve their skills or even for people who would prefer to build a smaller underground house compared to a large base. I hope you like it! 😊
Want to expand this house? Click here: https://youtu.be/GPxQmfzG91M
Need MORE storage? Extend your build with my underground storage room: https://youtu.be/w5uNrpp17A8
Join this channel to get access to perks: https://www.youtube.com/channel/UCCG0k1eqamuln38WBqUSU8g/join
➜ Minecraft: How to Build an Underground Survival House in @Minecraft ➜ Thumbs up & Subscribe for more! ► https://bit.ly/SubscribeSpudetti
Support me and wear my cape: https://mantle.gg/shop/spudetti
Join my Official Discord: https://discord.gg/vs3zGVcQfx
➜ Follow me! ● Instagram: https://www.instagram.com/spudetti/ ● Facebook: https://www.facebook.com/spudetti/ ● Twitter: https://twitter.com/5pudetti
➜ Let me know what you think in the comments section below!
➜ Download music: https://www.epidemicsound.com/referral/3x3vt6/
➜ Texture pack: x32 Faithful ➜ Shader pack: BSL Shaders
#Minecraft #UndergroundHouse #Tutorial
Timestamps: 0:00 Intro 0:27 Circle outlines 2:36 Main dig 3:22 Staircase 7:44 Mine entrance 9:15 Main room design 12:26 Main room floor 14:07 Side room designs 19:14 Interior 24:32 Outro ————————– Don’t reupload or modify my videos in any way on YouTube, TikTok or any other video sharing services without my permission.
If you use my builds in a YouTube video then please credit me for the design.
Copyright 2021 © by Spudetti.


![Minecraft: How to Build an Underground Survival House [1.17 Tutorial]](https://newsminecraft.com/wp-content/uploads/news/minecraft-news-latest-303.jpg)