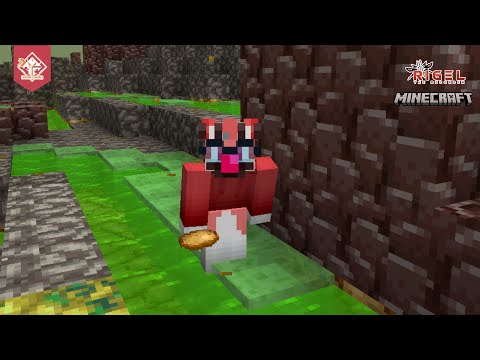
Hello so this is the Internet and welcome to the dad’s guide to Minecraft building tutorial my name is Anthony and today we’re building this very special mushroom house making the area look even more enchanted and mystical this would be perfect for a fairy or a gnome or Several these together to make a little society back here in the woods so if building this really cool mushroom house sounds like a plan let’s get started okay let’s take a look at the materials we’ll need for this build we’ll need thirty dark oak planks a total of 104 smooth quartz blocks a Total of 92 smooth quartz stairs 21 brick stairs 24 brick blocks 1 brick wall once bruised or 15 dark oak slabs a total of 28 spruce trapdoors a total of 71 jungle slabs a total of 212 red mushroom blocks 6 glass panes 2 lanterns for ladders 1 dark oak trapdoor 7 dark Oak stairs 8 dark oak fences for mycelium blocks and 4 red mushrooms unlike our other builds we’re going to start in the middle of at least a 10 by 10 area and put down a single block then from here we’re going to come back three More 1 2 3 and then come out on either side by 1 and we’ll do this on every side so we should have a structure that looks like this now let’s fill in the rest so in each one of these corners drop in a block diagonally now fill in the rest Coming back to the front of the build we’re going to put in our brick blocks one two and three in the front and then on the right hand side we’re going to put one here one here one back like this and then we’re gonna remove this dark Oak plank and put in a brick stair keeping it on the brick stairs we’re going to put one right here and then one on this side like that and then we’re going to put upside down stairs around these sides right here put a regular stair going up like that and an upside Down stairs coming around the side now let’s switch to our smooth quartz blocks we’ll put one here and one here and we’ll do that on every side now let’s go to our smooth quartz stairs and around each one of these areas where there is dark oak we’re going to put upside down Stairs now let’s come around to the front of the house where we’ll put our front door on this brick right here one off from the back we’re going to put a smooth quartz tear facing this direction and one facing this direction then on the outside of both of these we’re going To put upside down stairs like that then on the top of both of these we’re going to put smooth quartz and then on the top of the smooth quartz stairs and then upside down stairs on the interior then across the top we’re going to put stairs Like this so the front of our structure should look like this now let’s come around to this side over here we’ll have a window and we’re going back to smooth quartz and we’re going to come up a total of three on each side let’s switch Back to our stairs and we’ll put a stair here and then on both sides will do upside down stairs here like this and then regular stairs on either side like this and then our smooth orts blocks in between like that then switching back to the stairs will come Up to the top and come across like we did on the front like that now let’s go ahead and repeat this design on the back now coming over to the chimney let’s go back to our brick blocks and we’re going to come up a total of three on either Side and in the back then on the top of each one of these we’re going to put a stair like that now coming to the front of the fireplace we’ll put a stair down on either side like that skip one block and put stairs upside down across the Front like that now as we close in the sides we’ll go back to our smooth courts both our blocks and our stairs and we’re going to go ahead and put smooth courts blocks down here here one here and one here and then on the inside of both of These we’re gonna put stairs facing out like that then coming to the outside of the build we’re going to put upside down stairs on the front facing the side directions like this one over here as well and in the back we’ll do the same thing one there one there then switching To our smooth stone blocks again we’ll put one here one here one here and finally one here against the chimney we’re going to put it upside down stair on both sides like that one here and then on top of these will put our smooth stone chords so the structure should Look like this from the top now working on the outside of the build we’re going to put another smooth quartz block on each one of these like this and then stairs on the outside on either side like that now let’s go into the interior of the build and we’ll put upside down Stairs on either side the front and the back like this and next to the fireplace on both sides we’ll put upside down stairs like this and then we’ll go ahead and connect these across like that we’ll put a upside-down stair here upside down stair here and after connecting that corner we’re gonna leave This one open now let’s switch back to our blocks again we’ll come up to the top of the fireplace and put three solid blocks down here a solid block in each of these corners like this and then switching back to our stairs we need a line upside down stairs on each Of these openings here and here and let’s go to the outside of the build and we’re gonna put regular stairs down facing like these not coming to the center of each side we’re going to put a stair facing in like this having a brick block like this and a brick stair in Front of it like that switching back to our smooth quartz blocks we’re going to line the interior keeping a square of 3×3 in the middle so we should have an opening like this now let’s come around one more time and make this one higher and then go to the Outside and we’re going to do upside down stairs over top of the other stairs and on this side another brick block so at this point the bottom of our structure should look like this now switching to our roofing materials we’re going to choose our jungle slabs and off of each one of These stairs we’re going to come out to and we’ll come out to as well off of this brick then off of each side build slabs in to come up even with the slabs that we already put down so at this point the structure should look like this on the corner of each one Of these areas we’re gonna place down three more slabs two and then one so the structure should look like this now now switching to our red mushroom blocks we’re going to outline this entire structure that we’ve built for the roof now in each side we’re going to drop Down on each corner like this and then work our way around so we have one here and then one on this side and let’s do that on every side now to fill in the corners it’s better to put down a temporary block I’m using the slabs here if you place them Underneath like this then you can put the mushroom blocks down and not have the texturing issue if you just put blocks down and then remove them so this point the structure should look like this for this next roof layer we’re going to come over to and then over five And we’ll do this on every side then in between we’re going to put blocks on top of there and then one in each corner and if you make a mistake know that the blocks will default to this pattern you’ll need to remove them place down new blocks now on the inside of this Area here we’re going to switch to our quartz blocks fill it all the way around except where there is the brick right here and we’ll go ahead and add a brick here as well okay for this next layer of roof we’re gonna go ahead and put red mushroom blocks down skipping the center One in the front of the house skipping the brick for right now and then coming around the other sides like this then on three of the sides we’re gonna go ahead and put three mushroom blocks down like this for you like this three like this we’ll leave this open for right now and We’ll go ahead and put another brick down here now on the inside corners we’re gonna put red mushroom blocks down like this now this next layer of roof we’re going to come to the center block on the back like that and put one down the brick we’re going to go ahead and Put down a brick stare facing this direction and then on the other side a brick stare facing up like that that’s switching back to our red mushroom blocks we’re going to go ahead and come across like this leaving this one block open here and then fill in the rest of These openings like this next we’ll make a 3×3 square in the middle 1 2 3 1 2 3 thanks 10 one mushroom brought block out each side like this then on the top will make a simple cross like that switching back to our bricks coming off of the Upside down stair we’re going to come up 1 2 3 and then on the third one we’re going to switch grab our 1 brick wall and place that on top like that now that most the exterior is finished let’s go ahead and add the door and windows we Need to place our door right here like this then on the interior of the build let’s switch to our spruce trapdoors place one on either side and then crouch clicking place one on top of each one of these trapdoors we just laid down and then above here we’re going to go ahead And put the trapdoors down like this so you should have a structure that looks like this from the interior switching to our glass panes we’ll add 2 in for each window frame ok now let’s go ahead and put our front awning on on the corner of The front porch come up a total of 3 with dark oak fences then right now temporarily let’s go ahead and put a block it could be anything up here so we have something to put the stairs against now switching to our dark oak stairs put it upside down facing that way up side No one facing this way and you can remove the temporary blocks now switching to the dark oak slabs add one over top of each fence post like this and then coming into the middle right here we’re going to put one like that connecting the two and the one on top so Your front porch awning should look like this now let’s go ahead and come up to the roof and we’re going to put down a dark oak fence here one here and then on the top of both of these we’re going to put dark oak stairs like this and then Coming across the front we’re going to do dark oak slab on top like this switch to our glass panes put down two glass panes like this and then going back to our dark oak one right here and one right here so you should have a structure that looks like this now let’s Take a look at how I decorated both the exterior and interior of this building as you can see on the outside I added these smaller variants and mushrooms a single and one with five around it these also double as a lighting source let me go ahead and show you how to build these Before we go inside the build itself so for the single mushrooms I just use a birch fence and I put a red mushroom block on top of it like that and then for the lighting blocks I use a sandstone wall with a jack-o’-lantern on top and then I Surround each side with a red mushroom block and put one on the top now let’s go check out the interior we have our campfire and furnace over here our anvil and grindstone our brewing station with the water supply and then upstairs we have our bedroom with a bed a little Bookshelf and then stairs up to look out the window and that brings us to the end of the episode if you enjoy what you’ve seen I’d like to see more for the dad sky channel please click that subscribe button smash that notification bell so you don’t miss any upcoming episodes and If you’ve enjoyed this episode please consider leaving a like it really helps the channel grow until next time bye for now you Video Information
This video, titled ‘Minecraft Mushroom House – Building Tutorial’, was uploaded by Dad’s Guide on 2020-02-26 18:00:07. It has garnered 975157 views and 38103 likes. The duration of the video is 00:16:03 or 963 seconds.
This step-by-step guide to building a Aesthetic Mushroom House in Minecraft will show you how to enhance your fantasy builds with an easily repeatable design that will bring your dark oak forests to life. This house is the perfect addition to any Cottagecore, Medieval. And Fantasy worlds.
So if building a Mushroom Starter House sounds like a plan, then let’s get started…
NOTE: A complete building guide is available at: www.dadsgmc.com
Shaders used in this build: Sildur’s Vibrant shaders – Medium
Minecraft Java 1.14 – 1.17 Seed: 3258908606143313550 Coordinates: -5585, 69, 2850.
Check out the other builds in the Fairy House series: 1. Red Mushroom Starter Fairy House – https://youtu.be/Xl5elg2XCYg 2. Brown Mushroom Fairy House – https://youtu.be/kz0l7QfrcZw 3. Hollow Log Fairy House – https://youtu.be/25G6wI4AfrA 4. Small Mushroom House – https://youtu.be/jN7zu04TQ38 5. Mushroom House Designs – https://youtu.be/b8s7Goski7M 6. Turning an Amethyst Geode into a Mushroom House – https://youtu.be/7tr3M2xBnNU
#MushroomHouse #CottageCore #DadsGuide #Tutorial #LetsPlay #HowTo #Minecraft #Survival #BuildTutorial #Fairies #Gnomes #Mushroom #StarterHouse #DarkoakForest #RoofedForest
——————————————————-
SOCIAL MEDIA: Twitter: @dadsgmc Twitch: dadsguidemc
MUSIC: Intro: Mr. Sunny Face by Wayne Jones (Available on Youtube) Outro: Black Moons by The 126ers (Available on Youtube)
ABOUT ME: ● I go by Anthony, or Dad. ● I plan on creating videos several times a week ● I mainly do Minecraft Survival Let’s Plays, but will also do update videos and tutorials ● I live in the Pacific North West ● I have 3 kids, with the oldest starting Minecraft in 2010
COMPUTER SPECS: ● Processor: i7-9700 Processor (3.0GHz, up to 4.70GHz with Turbo Boost, 8 core, 12MB Cache) ● Memory: 16 GB DDR4 2666MHz ● Hard Drive: 512GB SSD PCIe ● Graphics: NVIDIA GeForce GTX 1660 6GB
SAFETY DISCLAIMER: I never add viewers to any personal accounts, such as Discord. Please be wary of anyone who may you add on Discord, Skype, or any other instant messaging programs! Also never comment your personal contact information on this or any other channel. Please be safe online!
TERMS OF USE: Please do not download this video and post it on other websites. Thank You. 請不要下載此視頻並將其發佈在其他網站上。謝謝。