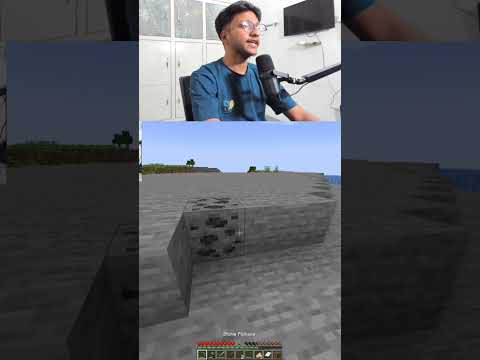
Hey guys welcome back to another default cube cg matter tutorial and today I want to go over something that’s pretty simple but has some good core fundamentals and that is making any block that is in the game minecraft it pretty much is that simple I’m gonna talk about how to do it Without using add ons and plugins and all this kind of like BS methods that don’t teach you anything I’m gonna show you the actual method and before we actually hop into blender we’re gonna need some textures of whatever block you want so if you need a stone block you Need a stone texture or whatever and there’s a website if you don’t want to you know download texture packs from wherever there’s a website that has all the default assets and if I remember I’m gonna link it in the description and you can see they have like all these Different kinds of textures so for example I mean I’ve employed the game in a while so I don’t know what most of these blocks are but let’s say the cake this is the top of the cake you know it’s it’s that one’s actually not a cube It has a different shape but this is the texture for the top of it and you can scroll all the way down and then download a zip file of everything and that is the kind of like texture pack I’m gonna be using so that opened in the Wrong screen so let’s just pick a block and then make it I am familiar with a stone block so I’m just gonna pick I guess there’s so many stones you have cracked stone you have like stone bricks you have smooth stone I guess it really doesn’t matter I’m just gonna pick the Standard one so I’m just going to copy this texture and the same principles apply for pretty much any kind of block because they’re all the same so once you have your texture which again because it’s Minecraft that is the size of the texture this tiny tiny thing if we zoom In we can almost start seeing it once you have that we’re gonna open up wander I’m using version 2.8 one once it actually opens and then the first thing we need to do is start modeling whoops we need to start modeling our cube done that there you go and now we just need To texture it so yeah obviously this is gonna be pretty easy of course if you don’t want the default cube you can add a bit of bevel or something if you want kind of like a smooth block but we’re doing the standard traditional cube then what you’re going to want to do Is go to the shading workspace this is where we’re gonna do our texturing and I’m gonna assume you don’t have too much experience with this so I’m just gonna say some of the hotkeys I’m pressing we’re gonna take this node which is the DSD F we don’t need it for now click X To delete it and then shift data add or go here and then again you either go here or just use the hotkey shift a and I’m gonna type in image texture since we want an image texture node which we are gonna plug in to the surface let me just Make that bigger and then we need to open and select our texture for me that’s on the desktop stone and you can see that it’s been applied so before we had black because we had nothing now we have our stone and you can see that there are probably a hundred issues with This main ones being that it kind of looks nothing like stone it kind of looks like a smooth gray texture and second of all it’s not really the same on all sides really and we’re gonna talk about both those things so first of all what’s happening with this smoothing out It doesn’t look like you can see the individual pixels and this is just something blender does it’s actually a feature not a bug of this is an issue of low resolution textures when you put them in blender and remember like we said like we said the minecraft textures Are like 16 by 16 pixels let’s see the information on this yes 16 by 16 pixels so it’s a very this is pretty much as low res as it gets and you can see it’s not actually applying it correctly and what it’s doing is it’s actually interpolating meaning like adding new Information between the pixels to kind of smooth it out but since there are so few pixels pretty much the whole results ends up looking and toroidal so what you’re gonna do is from linear interpolation which is what you have it set at now we’re gonna change it to Closest which you can think of as it’s just gonna inherit the color of whatever pixel is occupying that space in other words it’s not gonna do any fancy stuff it’s just gonna pull from the image and there you go and now you can see that it’s looking you know bit better you can See the pixelation kind of looks minecraft II but this doesn’t look like the stone block there should be many more pixels 16 by 16 on each face and this is because this texture even though we can’t see it I’ll open it up it’s using our UV UV coordinates so Our UV map and if we I mean we can either do it from here we can either go into edit mode and switch this from what is this image editor to UV editor to see our unwrap or we can just go to thee what am I looking for UV editing Workspace which is pretty much the same thing you can see that our unwrap of the cube how we made it two-dimensional so we put the texture on it and then we wrap it back up that is in B standard T pose as if you were to cut the cube and flatten it whereas Instead we want this whole texture the whole like 16 by 16 pixel thing on every side of the cube right it’s it’s weird but that’s how minecraft does it so what we need to do is pretty much you know pick each one of these faces and you Know scale it up so it’s taking up the whole thing of course this isn’t how we do it but if we did it you can see that now this face has a more texture than everything else so let me just go to edit mode the way we can do it whatever I’m not gonna undo it just imagine that it’s not there the way we fix this is we just select everything by clicking a so now we have all our UV faces hit f3 or spacebar depending on you know if you change to your hotkeys or whatever and Then we’re gonna type in reset and we’re gonna choose the reset that is for you V’s so this one and what it basically does is it takes each face and just stretches it out so it takes up the whole canvas right which normally is not What you want but in this case you can see now we have something that kind of looks like stone and then the only other issue if I remember correctly again haven’t played the game in a while the texture should be rotated 90 degrees so you can either you know rotate the cube Itself to fix that but if we don’t want to do that and mess with the orientation what we need to do is again go into edit mode and then with our UVs we already have them all selected so we need to click R to rotate and you can see you Know this effectively does what we want it to so I’m just gonna rotate it by type in 90 degrees and boom that that’s pretty much the essence of it and the reason I say that this is pretty much every block in Minecraft because of course there are Some exceptions like some of them have transparency like grass or whatever is in general most blocks you can just swap out the texture so let me just pick another one like a blue wool I’m just gonna copy that section in my desktop again 16 by 16 pixel and nonsense and Then back in blender all we have to do now since we have our UV map setup we have our interpolation set to closest you just click this folder or you can first delete the texture and then click open whatever you want and now I’m gonna pick the new texture which is our blue Wool already has it on closest and you can see that everything is working properly now if we go into rendered mode right now we’re in Eevee you can see that it you know it looks fine but our light our lamp isn’t actually affecting anything like we don’t see shadow or Some area more illuminated than other areas and that’s because we’re pretty much taking this texture and just putting it on the surface we’re not saying do any light calculations just show the color of the texture so if we want you know good lighting and everything I just add in you could do a Bunch of things you could do a diffuse be SDF or principle be SDF I’m gonna recommend let’s just do principled diffuse would be fine let’s just put that in there and now you can see whoops so again I just put it in between now you can see the light actually affects Things so we have some areas in shadow some areas are brighter than others and yeah that means it reacts to lighting again there are some exceptions to this technique like we need to do something a bit different if we make a lamp like the UM I forget what the name of the Blanc Is in Minecraft the yellow one that glows they find in another or whatever sorry I don’t know but um that one you need to do some emission stuff again some of them need transparency some of them aren’t you know even cubes like you know they’re more like half blocks or Whatever but yeah that is the standard method to do it so hopefully you understood everything this is kind of like an introductory tutorial but I guess not too many people know about the closest interpolation mode so maybe maybe everybody let me switch cameras maybe everybody learned something in This tutorial so hopefully you got what you wanted out this if you want to support me patreon is I’ll say the only way to do that so if you want to become a patron that would be greatly appreciated you’re doing it to benefit me you know it’s a Donation I really appreciate it but of course you also get benefits but I don’t want to misconstrue it it’s a donation so if you want to help me out that is the way to do it but otherwise the tutorials free enjoy it thanks for watching see you Video Information
This video, titled ‘Create Any Minecraft Block (Blender Tutorial)’, was uploaded by Default Cube on 2020-01-19 06:25:00. It has garnered 46457 views and 2291 likes. The duration of the video is 00:09:18 or 558 seconds.
rock, block, talk… patreon and stuff: https://www.patreon.com/cg_matter business inquiries or donations 🙂 [email protected] textures: https://mcasset.cloud/1.14/