
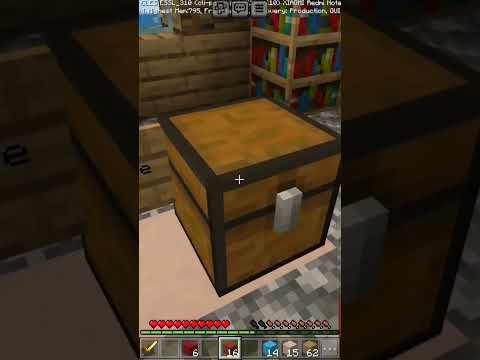
Hello everyone my name is pixel riffs and welcome back to the Minecraft Survival Guide I hope you’re all having a good day and today I want to show you guys what I’ve done with the sugarcane farm because I’m pretty happy with this so far it is not a hundred percent done But there are really some nice areas of this build coming together what oh oh that was the hitbox of that grass what it was weird black line was crossing my vision turns out I was just standing in the tall grass no worries so yeah anyway this is this is the sugarcane farm it Looks a little bit different now as you can tell I’ve been working on turning it into a fantasy style medieval build these big like over hanged section of the roofs the kind of roof dormers here are not normally the kind of thing I tend to build but I decided maybe we Would go a little bit more out there with the style of things now the thing about this is it does look a little bit if you’re looking at the build straight on it does look like the build has these giant kind of elf ears it’s even more Noticeable if we get up to that mountain top over there and you look at it down the side and you’ll also notice that I haven’t done the sidewall here but look at that it’s just got these giant giant like goblin ears coming out either side which I kind of like actually like I’m Getting more and more used to it as a build style as I go but you see people building in this sort of exaggerated medieval style quite a lot the other unfortunate thing about this is that it’s an even-numbered build because of the nature of the sugarcane farm the Fact that we built it kind of eight blocks long in the the mechanism part there so the end had to be two blocks wide and that means you can’t really bring it to a a peak the way we can with the the ones on the sides it kind of has To be a little bit of a flatter kind of wider section here which sort of sucks I don’t I don’t prefer to build stuff on even numbers typically if I can help it or at least if I do then I make some so some features of it offset like doorways And things like that you don’t always want to have a double door in there you don’t always want to have a double kind of thick peak roof but there you go that’s that’s just how it had to be because of the design of this place and I didn’t want to just extend one wall out one block kind of thing but it’s basically the same on the other side we’re going to add a couple of features to this today to make it look a little bit better we’ve got the each of the Peaked roofs I decided it’d be fun to kind of hang some fences off of there to simulate like ropes and I think we might even go we’ve go one step further with this middle one because the middle area is left open and I’m sort of leaving it open there intentionally because I want To imagine that this section up here is actually a winch and pulley system that you could use to transport goods up to the second floor because the first floor is basically entirely a sugarcane farm you can’t really bring anything in there and we’re probably going to have platforms attached to these ropes that Could kind of pull stuff up to this opening on the second floor and that’s where a lot of the trading and stuff is going to happen I might even actually now that I think of it I might actually include some sort of staircase I’ve got this design on both sides where these Stairs are kind of forming these cross beams sort of situations here and I might actually add in a kind of porch system maybe like we could have like a little porch up here with a staircase that leads up to the second floor up here and then we can floor this whole Place off and we can end up using this for something else in fact we might end up using it for the subject of today’s video because we’re not going to do too much more building on this in the video we’re going to add in the the sort of Lift and it’s not gonna be any kind of mechanism here it’s just going to be a an aesthetic thing you know we’re not gonna be able to automate it in any way because that would in court that would require Pistons and things like that and it would also look a lot different you Can’t really automate ropes out of offenses it doesn’t really work that way you can’t be it can’t be that simplistic but if we add a couple of fences like so I think we might actually try and have the lift platform sort of level with this and it’s gonna have to be quite a Wide platform because obviously the roof overhangs quite substantially so it’s gonna have to make it look like we could offload some of the stuff into there or maybe we should bring this out a little bit do you think maybe yeah maybe we’ll make like a balcony coming out from the Build there to sort of meet in the middle with this this system because what I want to do is include some of these stone slabs let’s bring it down to about here I think that’s probably going to be as good as we’re gonna get and then we’ll bring these stone slabs down Like so and I want to make this a platform about that long maybe we’ll double up on that middle one there to make it look like you know what here’s a fun trick if you want to make it look like the fences go all the way through an attached to something on the Other side make a button out of the same wood type and put that in there and that looks like it’s kind of piercing through the stone slabs there that’s a fun fun little building tip for you guys so we’re gonna make this lift platform maybe I don’t know three by five or Something like that that or maybe five by five if it’s gonna be completely square that would help it look a bit balanced I’m gonna need to grab a little bit more smooth stone for this so I might grab some from the local terrain here because I will need a few more Slabs probably shouldn’t need that many more let’s grab one more so we can make it nine smooth stone and pop down our crafting table I’ve been bringing the crafting table with me when I’ve been building this because it’s so much easier building some of the stuff if I Run out of stairs or slabs or anything like that while I’m up on the roof I can pretty easily make them with a crafting table at hand so yeah let’s widen this out so it is five by five we should have enough slabs to finish that off that’s four by five And there we go just add those around the sides yet now we can add maybe some fences kind of around the outside to make it look like the stuff is better contained add some fences to this side to square it off like so and then maybe we could put some other materials in Here now I’m not certain what I want to put in here yet but you know if it was carrying up say a couple of Shilka boxes worth of stuff those look pretty good as crates alternatively if we wanted to we could put down another crafting table up Here and I’ll put that next to the fence the problem with the using fences for stuff like this is that blocks will join to those fences and there isn’t really a way of preventing them from doing that without using a debug stick which is something that you can’t really get in Survival at all it’s just something you can spawn in for yourself in creative mode so yeah let’s make a little balcony over here real quick let’s actually make this out of oak so it really stands out from the rest of the build like so and Then maybe we could put in I don’t know like a trapdoor or two along the side here just to make it look like this is kind of temporary it’s the sort of thing that could fold down you know what even having a section of trapdoors on each Side of the build could look quite good let’s give that a try oh you know what instead of that maybe we’ll use those instead of these fences there’s a little bit of trial and error involved in the process of stuff like this so it’s always fun to experiment with a few Things now those are gonna have to go on the outside because if we put them on the inside like that hold up a trapdoor there we can’t put one next to it on this side of the block it would have to go on the outside like So so let’s remove this and pop one there like so like that yeah okay so that looks like it’s squaring off the corners more and then those won’t necessarily attach two blocks if we want to put them up on here so let’s let’s go with that instead of hanging them down Like this a zombie came out to play during the daytime just gonna take care of you real quick oh no he set me on fire oh dear that was not what I intended where’s my bucket of water there we go let’s put ourselves out don’t normally get set on fire all that Often so it’s a rare occasion we can use the bucket of water right let me let me get back up on there but torches on each side here so I can give myself something to place the trap doors on wonderful because otherwise if you try and place Trap doors like on the side of something it doesn’t always work that way say if I wanted to place a trap door like here and then I wanted it to fold up that way it’s it’s based on whatever position you were facing when you put the trap door Down not whatever position you’re facing when you want to open it again so it’s a little bit of like I said a little bit of trial and error making sure everything is placed in the right orientation and what do you know we had the perfect amount of trap doors for That so I guess it was fate and that actually looks like a pretty decent lifting platform I will probably put a torch on here just so it stays lit up and yeah we can we can figure out some other sort of system to attach it to This maybe we will put a a stair on there like that and so it can look like the edge of the platform is a little bit more reinforced let’s quickly jump into bed and I’ve flown back to the house to grab a little bit more dark oak wood Because I think if we make some dark oak pillars on the sides here we can make a pretty convincing kind of lattice sort of thing using fences of both oak and spruce if we do something like this and then kind of alternate them going up like so it’ll look like this section is A little bit better supported and perhaps we can strip away these top logs because the platform has been rubbing against those or something like that I don’t know I think that’s that’s probably a a good start for the moment we might work on this a little bit later On maybe I’ll do a bit more on it off-camera perhaps we’ll put the corners coming down like so so it looks like it can rest on the ground a little bit better yeah I think that’ll do I think that’ll do for the moment okay I did a little Bit more I did a little bit more just to place a couple fences in there to make that look like it was a little bit better supported and I changed these out full stairs so that it didn’t look like the trapdoors were just resting here on the walkway out to This but yeah I think this is good I think this is good so we’re back in the house and I will drop off some of the stuff that is just hanging out in my inventory here we can put some of this away for the most part and I want to get On to talking about what we’re gonna do in today’s episode today I’m going to introduce a concept that a lot of you will probably be familiar with already if you’ve watched any other Minecraft videos but it’s it’s a fun one to get into at this stage in the game and we’re Gonna need a few furnaces for this in fact I might actually take down some of the furnaces that we’ve got stacked up downstairs because the little country house like this probably doesn’t need this many furnaces maybe will yeah we’ll take those out and we could put in Another bit of cobblestone there just to kind of blend that into the chimney structure and let’s make a couple of other furnaces with this as well so what we’re gonna talk about today is the process of automating smelting so normally in furnaces you put stuff in manually you end up smelting it manually You put in the fuel you put in the input and then you just take out the stuff that it outputs manually but there is a way of automating that thanks to some of the stuff we’ve already explored elsewhere in this series I’m talking about things like hoppers and minecarts We’re not gonna get into the minecart side of things just yet I’m just gonna take all of this iron what am i doing and I’m going to I’m gonna cover the basics of automation first so those of you guys who are familiar with stuff like this already might think I’m like Not doing this the most efficient way but trust me we will get to the most efficient way a little bit later on so I’m gonna make six hoppers to start out with and we’re going to need a couple of additional chests so luckily I’ve got a Fair amount of oak wood I can convert into chests let’s leave six of those as well so six furnaces six chests and six hoppers that’s probably a pretty good start and we’re gonna head up here to the industrial area which is kind of what I’ve decided I’m gonna call this place And we’re probably going to eventually build a giant kind of smelting system up here in the top area of the sugarcane farm but for now I want to demonstrate on a nice flat area so you guys can see what I’m talking about without any of the the other stuff getting in the way So the humble furnace has been used from the very beginning of the game to smell things into other things and you may or may not know that this furnace can actually be interacted with in a number of different ways by hoppers for example if you place a hopper on the top of a Furnace you can actually put all of the resources that you want to smelt in there I actually didn’t bring a great deal of stuff that I could smelt let’s see let’s actually smelt some of the chorus fruit sure why not so we’ve got some chorus flowers so we can always Grow a little bit more but we’ll use this as an example so if I put the chorus fruit into this hopper you’ll notice it starts to drain away and it’s going into the top slot of the furnace where the input stuff goes so where the material that you want to smelt is Supposed to go now if we add a hopper to the sides or the back of a furnace or even the front actually I’m fairly certain you can feed fuel in to the front as well but notice the hopper is facing directly into the furnace like so If I now add some coal to it and I can do that by throwing it directly on top of the hopper like so the hopper is picking all of that up and that is feeding furnace fuel into the fuel slot so that has now actually started to Smelt up the chorus fruit because it burned one as soon as it got in there and that’s coming out as popped chorus fruit which we can combine with the blaze rods in our inventory to make another source of light as I mentioned any of the faces of a hopper any of the Side faces you can add fuel in and it will automatically start adding it to the fuel slot and it will do that until the fuel slot is filled up or the hopper has completely run out of contents now obviously if you want to do have a chest Of stuff on top of these two hoppers like so you could put all of the fuel into the chests that the hopper would suck it up and put it straight into the furnace likewise if you started to put the other ingredients into the chest up here where the the input for the furnace Is then it would start inputting all of the the additional chorus fruit that you wanted to put in now because furnaces obviously can’t smell to more than one thing at a time if you put the chorus fruit in with some other kind of material that can be smelted it’s all Going to get taken up by the hopper but the cobblestone is going to wait there in the number one slot wildly chorus fruit is cooking and then it’s going to be cooked afterwards the problem with that of course is that when the chorus fruit turns into popped chorus fruit and It ends up in the output slot here there’s nowhere for the cobblestone to go once it has been smelted so the cobblestone is going to sit here not cooking even though there is fuel in the furnace until the items that they are in the in the output slot are removed so until we Take the popped course fruits out of here it’s not gonna start smelting the next material in a similar way if a hopper continuously feeds items into a furnace say for example that we had more than 64 Corus fruit the maximum amount of items that could stack in the output Slot would be 64 so even if there were more Corus fruit coming in and it was all the same kind of material you couldn’t start smelting the next batch of stuff until you taken the stack of 64 out of the output slot of the furnace so that’s where hopper number three comes In for this stage we want an output chest like so that the hopper can be facing into like that and that is going to take the output of items from the bottom of the furnace and place them in a storage chest alternatively if you don’t have a chest there they will just End up staying in the hopper they’re not going to go anywhere they’re not going to de-spawn or anything they’re just going to end up in the bottom inventory of the hopper so in this case we’re going to have an output hopper collecting items in this chest we’re Going to have an input hopper for fuel on the back and we’re going to have an input hopper for items on the top like so and we can add chests on top of all of these like so and that will enable us to put our input items in here in this Case the chorus fruit our fuel input in there in this case the coal and once everything starts smelting in here it’s not going to do it any faster than it would with a normal furnace but it’s going to do it in an automatic fashion everything is going to be put through Here the popped course fruit disappears immediately and it’s going via this hopper into this chest where we can collect our chorus fruit in the meantime and as you might have guessed it is possible to double up on items like this for example even if you didn’t want to Make a double chest even if you wanted to have two chests side by side we could reproduce the same setup like so with a completely different set of furnaces a completely different set of hoppers and as long as everything is facing into the correct things so for example these two Hoppers are both directed into their individual furnaces both collecting from their individual furnaces and ending up in these individual chests all of that stuff is going to end up smelting independently of this furnace to its left now I’m gonna add a final cobblestone into here and remove both The output chest and the hopper to show you something that was added in the most recent update to minecraft minecraft’ one point team one of the advantages to using a furnace regularly is the fact that it gives you XP when you collect the items from the output slot but in the case of Automated furnaces it is actually not possible to do that because all of the items run straight into the output chest here and there is nothing for you to collect from the output slot meaning there is no way for you to collect experience until you smelt something with the hopper underneath either locked So that the items stay in the furnace or you remove the hopper and the output chest entirely in fact you doll only have to remove the hopper because that’s the thing that’s transferring the items do the output chest but anyway once you collect a single item whatever it Happens to be from the output slot of a furnace you will be able to collect experience for everything that furnaces smelted up until now everything that has gone into the output chest while it’s been an automatic furnace has been collecting experience as you go and it is stored in that furnace until you Remove an item in this way it is possible to automate the smelting of a whole bunch of resources and still collect the experience from them which it was not possible to do before minecraft 1.13 so that is something that has recently been added into the game And I think is a really useful feature now if you want these furnaces to work together if you want them to smelt all of the same stuff from the input chest share the fuel chest and output to the same output chest it’s entirely possible to do that as long as the hoppers are Still facing in like so you will still be able to collect all of your items in this output chest here you’ll be able to share a fuel chest and an input chest just the same way now one thing to bear in mind actually is that when you’re breaking chests above hoppers like so It’s usually a good idea to break the hopper first because the hopper has sucked up that chest and will actually have put it in the fuel slot of this furnace because the chest is a wooden item and can still technically be burned like a wooden item and chests are not a Very efficient fuel because they take eight wood and I’m pretty sure they only burn like one or maybe one and a half items so best not to use your chest as fuel break the hoppers before you break the chest but like I said if you want to Combine them like so you can just chuck all of your fuel in there and it will actually be distributed evenly between the two hoppers let’s say for example I put 28 coal in here we should end up see it takes it two at a time and you should End up with 14 coal distributed evenly between the two there we go fantastic stuff let’s explore some more of our options here so instead of placing a chest on top of here and having the chest end up falling into the furnace slot there how about we place my shelcha box of cobblestone on Top here it will actually still function the same way a chest does the items will be drawn out of the Shilka box into the furnace like so and the cobblestone is going to start building up in there to the point where we can maybe bring a whole shulker box of cobblestone pop it On there bring a hill shulker box of fuel pop it on there and that would enable us to collect all the cobblestone in a Shilka box and not have to worry about taking it all out to place it in a chest we can just add one to the other Now as before remember that if you break your shocker box over the top of a hopper it’s going to go straight into the hopper so make sure that you don’t end up accidentally cooking your shocker boxes although I don’t believe they can actually be smelted but I haven’t been Brave enough to try quite yet now notice as I said before the items have started to get backed up in the hopper here because we have 64 items in the fuel slot and once those 64 items ended up in here the input slot would still fill up But we would need to remove those either in an automatic fashion or in a manual fashion for it to continue but of course adding more furnaces to this setup is going to mean that you get to smelt the items faster or the individual items themselves will not smell much faster But if you end up with full furnaces doing the work you end up distributing the items evilly over the furnaces you end up smelting things twice as fast as you would with two furnaces if you’ve got four blocks that you want to smelt you’ll get all of them at once instead Of smelting two and then having to wait for the next two so it’s usually a good idea to build up a decent amount of furnaces in order to have a bunch of items smelt at once of course the problem at this stage becomes evenly distributing all of the items among These four furnaces when you just have one chest that you want to input the items into obviously if you wanted to put a couple of chests side by side and just manually fill them up with cobblestone then that’s no problem but there are smarter ways of doing this and Perhaps the best way of doing this is by once again using minecarts oh we’ve lost a little bit of cobblestone there let’s grab that from the furnace there we go and we’ll put a block at this end as well now minecart rail can be placed along the top of hoppers because this Allows you to input items from a minecart whether it be a minecart with a chest or a minecart with a hopper anything that’s got an inventor you can actually have it travel back and forth along these hoppers and distribute items evenly between them now obviously the rails will need to be Powered and the minecart will need to be running like so and then we can fill the minecart inventory up with cobblestone and it will distribute them between the furnaces like so now obviously it’s going to favor the ones in the middle a little bit but they are pretty much Being distributed evenly among these furnaces even if the minecart doesn’t look like it’s traveling far enough over to place items in this hopper it is look there we go we’ve got sixteen items in each furnace a perfect division of the 64 cobblestone we put in there originally and naturally if you have Enough powered rails and enough hoppers you can do the same with the fuel input line so you can have a second minecart with a chest or a hopper minecart if you wanted it to drag items out of an inventory over here like another chest for example you could just have that Travel along the back row here and apply fuel to all of these furnaces now the problem right now is that when I placed these down the minecart rail is actually going to switch positions because it thinks I’m trying to build a slope the tricks are not having the powered rails Joining up like that is actually to extend them one block past where you want them to travel for the time being because that that means the the powered rail will not try and divert midway through the tracks so now we can place those four blocks on there because if we Placed for example a fifth block on here and wanted the powered rail to travel one more because this rail terminates here it thinks oh you want to join it to that next one and so it tries to join them together and diverts the rail from Where we want it to go but like I said instead we just place another block on the end here add another powered rail to that and we’ll still be able to place a powered rail there now we’ll be able to automate the input of our fuel and the Input of our items and all of that stuff thanks to the fact that I’ve fed these two hoppers into the hoppers that were inputting into this chest will all end up in here once it’s been smelted and having these two powered rail lines running adjacent to each other is Actually really efficient when it comes to power because all you need to do is place a single block there with a lever on it or maybe even use a redstone block if you want to use that as a power source but once there is a power source There it can power both rail lines at once like so it’s nice and easy and don’t forget that once you place the powered rail it’s not going to change position if you take any of the old rails out so we can place blocks at end of this row powered rail here now I’m gonna make one or more minecart and we’re gonna place another minecart chest on the fuel track and have that constantly running back and forth we’re gonna place one on the input track and have that constantly running back and forth and now we have an automated smelting setup that will distribute Items evenly between these four furnaces it would distribute fuel evenly between these four furnaces if I had two more hoppers behind here and then it will gather up all of the items and input them into this chest here so let’s split up these blaze rods I’m going to imagine That I’ve managed to get two more hoppers to put in there because I don’t really have a huge amount of iron and I don’t want to use it all up on hoppers right now we’ll put the rest of the blaze rods in here where they’ll be distributed evenly between these two Furnaces and this one is already smelting some cobblestone that I let for and fall in there earlier so let’s let this minecart distribute things evenly between these four furnaces and watch how quickly the smooth stone starts to flow into this chest here it’s probably going to come in forward four at a time There we go yet we got our first four we’re gonna get another one from that chair of that furnace that started early but then sooner or later you’ll be able to smelt up all of the cobblestone you put in here nice and quickly and once again the only limitations to a setup Like this are going to be the amount of resources you have for example the hoppers alone it will take five iron each to make likewise the minecart will take five iron each and if you want to make a hopper minecart that’s an investment of 10 and per hopper Minecarts so if you want to have stuff automatically collected from a nearby chest it’s gonna cost you 10 iron just to have that and then obviously if you want to expand your furnace setup to include a huge amount of furnaces that’s gonna require as many hoppers you’re gonna need three hoppers per furnace Because you want an input fuel input and an output hopper that’s gonna be a lot of irons so it is generally not a great idea to try and invest all of your iron into a nice auto smelting setup unless you’re planning on doing a whole lot of Digging or unless you have built an iron farm which is something we’re going to cover in a separate video but then within about a minute or so we’ve actually collected most of the stone that I put in here to smelt in the first place so it looks like this is going Pretty well and it’s going to be something that we can add up here above the sugarcane farm so that we have a smeltery we can set to automatically smelt a ton of stone if we want it that would have been really useful in the constructor of this roof which as you can see Required a large amount of stone brick like I lost count of quite how many stone brick blocks I put into this not to mention the stone brick stairs I had to craft for the overhangs and so forth it is quite a mammoth task building anything on this scale and so an auto Smelter is always going to help you when you need to smelt a whole bunch of resources at once and once you get to the point where you’re pretty comfortable for resources pretty much anything is possible if you imagine having 64 furnaces which would require you to have 192 hoppers but Sixty-four furnaces all running at once you could smelt a stack of items in the time it takes a single furnace to smelt a single item which would mean basically you could have as much glass or smooth stone or whatever you wanted to smelt as you wanted as long as you had enough to Put in there in the first place and I hope this video has gone some way to explaining the possibilities for you and I hope you guys enjoy your first trips into automated smelting but that’s got to be it for this episode thank you guys so much for watching the Minecraft Survival Guide my name has been picks or ifs please don’t forget to leave a like on the episode if you enjoyed it subscribe if you want to see more and I’ll see you guys soon take care bye for now Video Information
This video, titled ‘Introduction To Auto-Smelting! ▫ The Minecraft Survival Guide (Tutorial Lets Play) [Part 35]’, was uploaded by Pixlriffs on 2018-12-18 11:00:01. It has garnered 330792 views and 6633 likes. The duration of the video is 00:25:51 or 1551 seconds.
The Minecraft Survival Guide continues! This tutorial will show you how to set up hoppers and furnaces to make a basic auto-smelter, allowing you to automatically smelt and store a large amount of items. I also spend a bit of time adding some details to the Sugar Cane factory building.
The series will teach you how to master Survival Mode, and will also be my Single Player Let’s Play series! Watch the full Minecraft Survival Guide playlist here: https://www.youtube.com/playlist?list=PLgENJ0iY3XBiJ0jZ53HT8v9Qa3cch7YEV
World Seed (Java Edition only): 7574084833700264939
—- Support me on Patreon for access to my private vanilla Minecraft server, plus other awesome rewards! https://www.patreon.com/Pixlriffs
Follow Pix on Twitter for video updates, screenshots, and other fun stuff! http://www.twitter.com/pixlriffs
#Minecraft #Tutorial #SurvivalGuide #Survival #AutoFurnaces


![Unleashing Ultimate Power on Hypixel Skyblock [7]](https://img.youtube.com/vi/j83qIaYHrPY/0.jpg)


![Pixlriffs – Introduction To Auto-Smelting! ▫ The Minecraft Survival Guide (Tutorial Lets Play) [Part 35]](https://newsminecraft.com/wp-content/uploads/news/minecraft-news-popular-25.jpg)