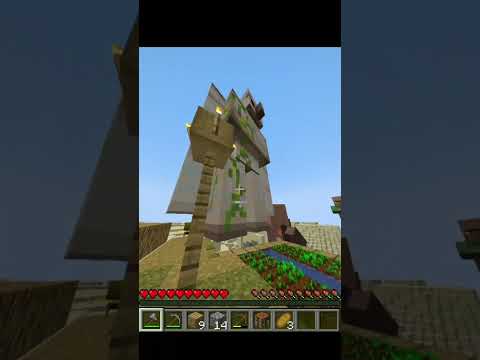
Hello everybody my name is python and in today’s video I’ve got three basic house designs for you guys who are just starting out in your brand-new minecraft worlds these designs consist of materials you can get early on in the game so you can make them within the First few days of you spawning in your new worlds for each design there is a mini tutorial and on screen are annotations to each one or for those of you mobile users this time codes listed in the description these designs incorporate the brand new bone block Added to the 1.10 PC release since it’s the cheapest of the four new blocks available and so ladies and gentlemen without further ado let’s get in to the first design alright guys so this is the first of the three designs we’re going to be building in today’s video as you Can see this is a pretty basic build in fact all of these builds are 8 by 8 they’re very very small builds and they can fit pretty much anywhere so as you can see this first one is pretty basic it does use the new bone block as you Can see down there there’s a little bone block accents all over the place but aside from that it’s using pretty basic materials we’ve got spruce logs we’ve got cobblestone and and a whole bunch of other stuff inside as you can see this is the interior along with the little Tables consisting of boosters but also superb got these sort of torch sconces on the wall and everything is looking amazing your brewing stand which is actually probably the most expensive thing here considering it requires blaze mods but ya got chests storage or crafting tables and everything is Looking good and if you just have a look at it from the outside we’ve got little details here and there including these little flower pots along with these iron trapdoors obviously you can replace these wooden trapdoors if you so prefer but if we just keep going around the edge we’ve got little details Back here as well again with the flower pots and a little bit of grass just to add a little bit of scenery so yeah pretty nice and this is the block chart we have right here obviously we got the bed but the bone block we’ve got spruce tears spruce logs cobblestone mossy Cobble we have ourselves cobble stairs glass iron trapdoors torches slabs and just all of these utility blocks including of course the item frames as well so in terms of where you could probably start off making this in your microphone if you spawn in like a mega Tiger bomb that’s probably going to be The best place to get mossy carbon unless you’re very lucky and find a dungeon but that further ado let’s get into the bill tutorial oh right guys so as you can see there’s little signs here which are basically going to state what we’re going to be doing in each step so this One we’re going to be starting off with the spruce wood log pillars for our house so without further ado let’s start laying down the law with some of these hair logs so we’re going to be putting down a bunch of three block tall pillars so in this formation so these are all Two blocks apart so there is in fact a gap at the back and we’re going to be having another couple of pillars back here again three blocks tall and once again another little row right here and then the entrance pillars are going to be slightly indented and in fact it’ll Be four blocks tall there we go alrighty guys so my second step is where the bone blocks come into play as you can see the sign says the bone block accents windows and the first layer of the roof will all be dug within this step so let’s go ahead and get this Thing Violin I’m gonna start off with the bone block accents at the bottom here as you can see these works similar to logs in that there is a darker texture either on top of at the side depending on how exactly you place the blocks so basically what I’m doing is on The single blocks I’m having these face upwards and on the multiple blocks but having them face sideways so let’s go ahead and get this thing going whenever selves a block here and a couple blocks here a block here and a couple blocks over here and the next thing we’re gonna Do is place in the windows now I’m using glass blocks as opposed to panes because obviously the panes you know I don’t think they’d work as well as glass as they do here so let’s go ahead and get these things placed in there basically going on top of all of the bone blocks There we go and then we’re gonna go ahead and start on the first layer of the roof with these hair comb stairs as you can see once again just going over the top of the glass and in these sort of little mini spaces they’re gonna be Facing sort of inwards so there we go and without further ado we got a source and next up to get on with how do you say here we go with the third step we are finishing the roof with cobble cobble stairs and slab so the only places where the cobblestone blocks are Going is right here and right here and these are going to have slabs on top of them like so and now what we need to go ahead and do is we need to fill in the ceiling on the inside so something like this it’s going to be all the Level so here we go just vero putting in the ceiling there we go let’s just get this thing finished there we go and then we go back to the roof and we start placing in some stairs basically going up one step at a time like so here we go So we just wrap around the corner like so just to again give it a bit more character and then well I thought alike before the cobblestone does come in useful at the top as well so yeah and then at the top we’re gonna have ourselves some slabs just to prevent Mobs from spawning and there we go step three complete my friends alrighty guys the full step consists of adding in the floor and the details to the exterior and this is where the redstone torches and the iron trapdoors come into play but if you decide to use wooden truffles You will not need to go ahead and use redstone torches I’m simply using them because I feel like they look better so we’re going to be putting wrestling torches underneath the cobblestone with iron trapdoors facing on them and basically the way you get them to activate is by basically updating them By having a block next to it placed so let’s go and do the same right here so let’s place that down and those two get activated and then what we’re gonna do is place in the little flower pots with the saplings simply because I feel like saplings work quite well so we’re gonna Do the same thing over here this time we’re going to be having two redstone torches because obviously two blocks wide we’re going to have a grass block here cobblestone here and then flip it on this side so cobblestone and then grass and then once again we’re going to Be having iron trapdoors like so making sure to update them as we go along and there we go we’re gonna have ourselves a bit of bone meal here bit of bone meal here and let’s get rid of those bits because well they’re not really supposed to be there and once again going ahead Putting in some flappers like so and then all we need to do is work on the interior floor which I’m going to be randomizing the the mossy cobble and the normal cobblestone the way I like to do that is placing in all of the cobble like so and then simply going ahead and Randomly breaking blocks as we go along so something like this should do the job nicely there we go alrighty guys and the final step simply consists of adding the interior to the house along with the door so let’s start off with the door place in a double bed right here with Spruce wood stairs on either side we are going to be going ahead and having crafting tables next to the windows right here open our chests right here along with furnaces underneath them so they’re nicely tucked away and then what we’re gonna start doing is placing in some spruce wood tables so very simply We’re just gonna put some upside down at spruce stairs like so we’re going to ever saw some chests at either side for a nice amount of storage and we’re going to double up the storage so let me just go and pick block out the cobblestone let’s make sure there’s no sort of Details missing out and let’s put the chests down there let’s do the same down here and we go some once again with the chests and we need to start placing in some of these here things so we’re going to start off with brewing stones on either side we’re going to go ahead and Put ourselves some carpet down and we are also going to start placing down some of these torch sconces which are very very easy to make all you got to do is place on an item frame put a slab or an anvil in it and all you got to do is Make sure when you sort of hover over it isn’t on the item frame and you can put a torch on top of it like so and there we have it so the last thing we need to do consists of getting out a flower pot and we’re gonna have ourselves flowers On the inside because why not and here we go here we go here we go and here we go and that is just about it we have ourselves our first house design done reasonably cheaper again you can go ahead and replace the brimming stone with something cheaper if you don’t have That so yeah there you go my friends the first hash design done so then this is the second house design which I came up with and as you can see it’s very much a source and castle design with almost like a pyramid shape on top it is the only design of the Three we have today which consists of two different floors and if we head inside as you can see the floor consists of bone blocks once again and underneath the carpet is in fact just regular sand we have a source of bed furnace and if we head upstairs we have ourselves a bit Of a storage area as well and obviously if you’re really feeling it you can grab yourself a bow and arrow and just snipe everybody so yeah pretty cool and of course the block palette very very simple this time got ourselves bed the utility blocks as per the norm we got Smooth sandstone which is of sandstone we’ve got bone blocks regular sand we have sandstone stairs and of course sandstone slabs as well and some of that further would do let’s see how we build this thing now any guys so once again we’re starting off with the corner pillars and the sort of supporting Pillar so we’re going to be going ahead and using smooth sandstone at the bottom and on the sides we can have ourselves a little two by two areas of smooth sandstone so here we go and on the front and back we’re gonna have ourselves to more pillars like so so let’s go ahead And get these things placed then we’re gonna have ourselves two layers of chiseled sandstone obviously you can use whatever you want for the purpose of variety I’m going ahead and using chiseled sandstone and then we’re gonna have ourselves bone blocks on top of the taller pillars like so with a sandstone Slab on top and then what we’re gonna go and do is grab the bone blocks and go to town around the bottom of the place with these hits or sideways bone blocks to make the walls look a little bit prettier and there we go first step done My friends alrighty guys I next that consists of adding in the window gaps the top off of the walls and of course the staircase now first of all we’re going to go ahead and place in the doorway like so and basically how the windows work is they all consist of Having sandstone slabs at the bottom and the reason why we’re doing this is of course so baby zombies can’t climb through so let’s go and get these things in and what we’re going to do with the sandstone stairs is on the sides we’re gonna have them facing inwards and then To add a little bit of a gap we are going to have upside-down sandstone stairs like so there we go and of course we’ll have upside-down stairs like so here as well and once again with the upside down stairs like so let’s place these little Babies in there we go and then on top what we’re going to go ahead and do is we are going to add some bone blocks in the corners like so well not quite the corners but they kind of match the pattern with these sort of sort of Pillars here so here we go going to once again put slabs on the top and then what we’re gonna do is place in some stairs facing inwards so like so and there we have it and of course let’s not forget to place in the staircase as well so We’re making this nice and symmetrical put in a corner staircase like so and there we go that’s that complete alright our third step consists of adding in the floor and the second floor we’re going to start off with the second floor we’re gonna start placing this thing in like So it’s just gonna be a very basic flat floor consisting entirely of sandstone slabs so let’s just get this thing filled in and make sure we do still walk up of course here we go nicely done and then what we need to do is start placing in the floor So let’s go ahead get rid of this grass and start placing in all the material we’re going to be using so how it’s going to work is we’re going to check up all the bone blocks like so all around the edge and in the entrance of course As well and let’s start placing in the flat ones there we go around there in there in there there there there and there okay cool and then we’re gonna place in the sand in the center like that’s with the white carpets on top and there we go that is that step complete My friends here we go my friends the fourth step consists of adding in the second floor detailing so what this entails is going ahead and putting in some towers like so and then what we’re going to do is we are going to add in some sense those stairs to either side To give it sort of a semi pyramid shape and then what we’re gonna do is gonna have ourselves an upside-down stair there so you can go up and down and it looks a bit more seamless so again on this side there we go and then all we Need to do is place in the roof like so so here we go just wrapping it background in on itself and there we go the roof the second floor detailing has been complete step complete I already guys and the final step very short and sweet just go out and place in Your interior books so I’m gonna have a crafting table down err crafting table down here we’ll have some torches as well just to provide a little bit of light here we go let’s head upstairs add in some chests underneath this area obviously because these are stairs you Can still open the chests let’s have a chest here and a chest here and finally we are going to need ourselves a door so let’s give ourselves a and birch door outside feel like these work best with sandstone boots and there we have it my Friends it is now done and yep there we go now it is done now it is done just needed to add a bit of the old torch action up there to add a bit of light and yeah that’s just about does it and here we have it my friends the third and Final house design we’re going to be going through today as you can see it’s a very basic stone slash would build with a little bit of gravel around the edge to give it and so nature feel and yeah I’m not the fond of this house because there’s a little bit of Detailing on top it’s not really detailing it’s more sort of block variation we’ve got stone brick stairs and cobblestone obviously the stone bricks act as an accent we episodes a little entrance area right here and if we head inside got ourselves a nice little storage area and on top of some Trap doors because I thought that’d look pretty cool as a little detail right there once again with the torch sconces and we’ve got some tables here once again using chap doors along with a bed furnace and crafting table and of course the broom stand so without further ado Let’s have a look at the block pallet for this thing as you could see it’s a bit more extravagant so we’ve got a bed glass we’ve got ourselves a bunch of oak wood relate stuff stone related stuff we’ve got gravel trapdoors item frames we have a soft foam blocks once again Brewing stance and of course all of these here utility blocks as well so here we go my friends let’s get on with the tutorial alrighty guys as you can probably guess by now we are going to be starting off with the wooden pillars and the lower Half of the wall so let’s go and start off by making for three block tall pillars in the corners making sure that there is a gap between the edge of your build and the actual build itself so let’s go and get this thing going and Then we’re gonna do is place in the wood like so so sort of indented so this leaves a gap for some scenery later on down the line and let’s get this thing in and of course the doorway completed here and there we go my friends first up complete Oh right guys the second step consists of getting the floor the walls and the outer floor done as well so let’s go for the outer wall we’re using gravel basically just a gravel ring road around the entire thing like so here we go and then we’ve got the bone blocks here the Foam blocks are gonna once again be checkerboard so let’s get this thing going so one there one there one there one there there and that’s in the wrong place there let’s get this thing all going there we go and next of all we’re gonna do the glass windows like so so The glass is literally just going to go on top of all of the wood parts so we’re gonna have ourselves a Oakwood log area above this glass here and then just regular planks along the top of these ones and then we’re gonna go ahead and put this along like so now ready guys The third step includes going ahead and putting on the roof and the way we’re gonna do this is in a very specific formation first of all we’re going to put a little roof over the eventual scenery area and then what we’re gonna do is on this block above the actual House itself when I have cobblestone and then over on the outside we’re going to have ourselves some stone brick stairs to give it a bit of an accent to make it a bit more interesting so again going around this server got the cobblestones like so look up the stone brick stairs Like so right here so let’s get these things rolling there we go and what we’re gonna do is start placing in some planks as we go along the placing in this roof so again let’s just continue on with this thing make it all nice and symmetrical so again here let’s Place in these stairs nice and carefully so we don’t wind up wage building which is something I get sometimes here we go one right there one right there and then what we’re going to do is placing some planks like so and then once again with the old stairs let’s place in the rest Of this here roof going around the outside to the other side to get this thing put in as well DUS get that thing put in there nothing put in there and we’re going to ourselves okay fences inside of the little gaps at the top my friends third step complete okay step Four consists of detailing to the exterior and also the interior the first bit of exterior decoration we’re going to do is adding a little out dent like so and then placing in the door so it’s got like a sort of porch area right there next of all what We’re gonna do is place down some grass with a bit of bonemeal on it alongside some trap doors to make it look a bit nice here we goes through the same on this side wooden trapdoors and a little bit of bow meal you could of course use flowerpots If you so wish and that’s just what I decided to go for and if we head inside what we need to do is place in some trapdoors like so for the work areas and of course the storage areas and that should just about do it nice one alright guys and the final step Simply consists of adding in the interior features so let’s get this thing going starting off with a bed with two furnaces either side because you know you like to be nice and warm in bed huh there’s placing some brewing stands alongside a crafting table underneath it There we go and then we’re going to go ahead and do ourselves a little bit of a favor with the torch sconces again so once again precision placing the torches so they wind up on top and we’ve got a combination of regular chests and also trap chest of course they could be Placed right next to each other there we go and that should just about do my friends the third and final house design completely done gotta say pretty happy with this one and there we have it three only game house designs for you guys to make on your brand new minecraft survival World’s I want to thank you guys for watching if you did enjoy the video or you find it useful be sure to drop a like rating and of course share it with your friends on Twitter or Facebook entirely up to you and of course it does Its go button if you want to know in the future of videos I’ll add but there again my friends three only game house designs hope you enjoyed it and I’ll see you guys in the next video Video Information
This video, titled ‘Minecraft 1.10 | 3 Basic Starter House Designs w/Tutorials! (How To Build) | PythonGB’, was uploaded by PythonGB on 2016-06-11 15:00:00. It has garnered 34387 views and 704 likes. The duration of the video is 00:18:45 or 1125 seconds.
Minecraft 1.10 – Today, I’m showing you 3 Basic/Starter House Designs along with a tutorial on how to build each basic/starter house! Enjoy! 😀 ★ Subscribe For More! – http://www.tinyurl.com/PythonGB ♥ Be sure to leave a Like if you enjoyed the video! Thanks folks! 😀 ♥
● Twitter – http://www.twitter.com/PythonGB ● 2nd Channel – http://www.youtube.com/PythonGB2 ● Twitch – http://www.twitch.tv/PythonGB ● Website – http://www.pythongb.com/
★ Design Timecodes (For Mobile Users!) ● Design 1 – 0:36 ● Design 2 – 8:06 ● Design 3 – 13:15 ——————————————————————————– ★ More Minecraft! ● Minecraft 1.10 In A Nutshell – http://tinyurl.com/hy7f7h3 ● Python Plays Minecraft – http://tinyurl.com/h3g5klj ● Hermitcraft Season 4 – http://tinyurl.com/h44yewd
★ I Also Do Terraria! ● Terraria Summoner Playthrough – http://tinyurl.com/hbqn3aj ● Terraria Modded Playthrough – http://tinyurl.com/z76m8oe ——————————————————————————– ♬ Background Music (In Order Of Usage) ● “Stal”, “Taswell”, “Aria Math” & “Haggstrom” ● Above music is all by C418… https://c418.bandcamp.com/album/minecraft-volume-alpha https://c418.bandcamp.com/album/minecraft-volume-beta
● OUTRO – “Buddy” (By BenSound) http://www.bensound.com/)