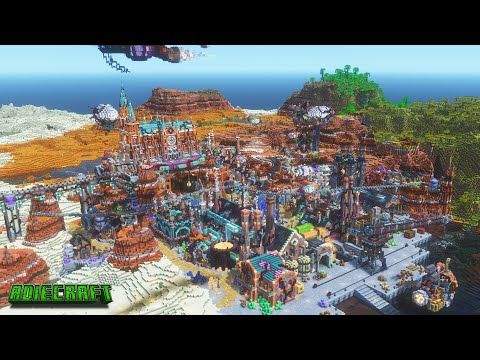
With the trails and tales update Minecraft finally made a non-green leaf block with the cherry blossom tree as with most Minecraft trees they look okay but today I want to show you how to take your cherry blossom trees to the next level before we start I want to let you Know that this is not an exact block by block tutorial as doing that with large trees is next to Impossible you want the exact trees I made there is a link in the description for a download of all the custom cherry trees I have made starting out these are the colors That I like to use in my cherry trees there won’t be an exact count because it depends on which tree we build but the main color of the trunk is going to be the cherry wood and then we have these colors to complement it we rarely use the strips Spruce mostly just for Highlights but we use a lot of the nether brick and dark oak for the stairs and slabs as there are no stairs and slabs for the cherry wood it just turns pink when turned into slabs and then for the leaves I like to use mostly the Cherry leaves but I’ll highlight the Leaves with a bit of wool pink and white along with the glass I’ll use some pink and white glass as well and then I’ll take the pink and white candles to hang underneath for some of that particle effect so the first thing I’m going to do is Actually teach you how to modify a vanilla tree to make it look better as this might be one of the easiest ways to make a cherry tree first of all the Cherry logs that stick out like that just don’t feel the best so I like to Put either a full plank or a nether brick stair on there and it will just find the other areas that that is done and every tree is different but those things still apply then we’re going to work on making some Roots at the bottom you can use some full blocks some stairs And then I like to end off with a couple slabs at the bottom just like that it’s pretty easy but it’s just gonna make the tree feel a little bit better remember it’s never a wrong thing to have to break or replace a block until It looks good so we’re gonna also add a brick stair right there and then maybe another one there I’m gonna do a full block there and a slab right there just to make it feel a little bit smoother and then doing the same thing on this Side as well you can see it already looks so much better now we’re gonna work on trying to make the leaves feel a little bit more fluffy and how to achieve that is just by breaking some of these random blocks to put some air gaps inside of the tree Natural trees have a lot of air between the branches and I think Minecraft trees look best when you give it a little bit of air space inside so just breaking some of these leaves is going to help with that effect we will come back in and replace a lot of these later But for now let’s just break a bunch of these if you’re in survival you can collect these leaves as we will use them later once you feel like you have a good amount of leaves broken just come back in with some leaves and make sure to leave a lot of air gaps But there you can see I’m just trying to make it a little bit more fluffy by not connecting them too tightly but leaving some air gaps between them this whole process takes a lot of time and practice just learning how to place leaves randomly coming back seeing how It looks like right here I feel like a leaf would look good right there and just working on the process until you feel like you have a tree that you like now you can see the cherry tree looks a hundred times better than it did before Much more fluffy and more vibrant and I really like the shape of it as well I feel like it looks quite nice the next step is adding some more highlights I like to put the pink wool bit inside where it’s a little bit darker where it Might be more shaded just to give a little bit of contrast not too much but a little bit is a good thing just for a nice bright pop of color then I’ll take the white wool and put it on the top as it provides a nice contrast from the pink Once we have that done and we like the shape I’m just gonna take some stained glass and Pop That in different places white and pink it doesn’t really matter where you place it you can also use the the panes the White and the pink paints just for a bit more contrast and color If you really don’t want to and you’re happy with just the leaf effect that is probably the easiest thing to do but I always like to take my builds to the next level the class sort of helps add to the translucent effect that the leaves have without being a complete full block like The wool next I’ll show you how to add some candles underneath it or on top of it for some of that particle effect you can add candles up here on top of some of the wool and glass And then also candles underneath you have to have the candles sitting on something like that place all your candles and then you can break the block Place some more candles and then you can break both of those and we’ll do that a couple places around here And there you go a very simple cherry tree is now done using the vanilla trees that you’re going to find in the wild every tree is different so you’re just gonna have to sort of adapt for each tree something to note before we get started on custom trees is if you’ve Ever seen someone build a tree layer by layer and you’re not sure how that’s done well I’m here to tell you that is not how trees are built they are only using a mod to rebuild the tree they previously designed now that we’re all ready here are the five tips to building A great tree number one find inspiration because we are building trees go to Google and find some real trees to look at to get ideas for how to lay out your trunk and your branches and number two trunk and Branch layouts when building trees it’s very easy to get caught up in All the details so I would recommend just using one full block that is one color and trying to get a basic shape not too smooth or anything but you get the idea that we’re going for here number three trunk and Branch shaping and coloring The Next Step that I’ll Take is using stairs and slabs of nether brick and a dark oak to try to smooth the entire build out so you can see you could take the build to the next level by doing this and Number Four Leaf shaping this is another important step of the Build that I will talk in more detail later in the video when I do the tree builds I just use the leaf block to get the general shape before I add any other blocks number five leaf detailing and coloring putting other blocks like wool glass and candles underneath can really bring the Details out in a tree and make it pop much more than if it was just the regular leaves so that’s the last step that I normally do to try to make the build complete now that you’ve seen the five steps that I use I will build the Tree using that process and going into more details for building the best trees alright so get your cherry wood and let’s start building a trunk by just placing blocks around on the ground trying to get an idea of how wide it is I’m not going to go too big but I want My trunk to be somewhat thick we’re gonna have two branches one going out that side and then one going out that side sort of like the vanilla trees have I’m also gonna make these roots come out a bit like this and remember we’re not detailing yet we’re just trying to get a General shape in for the builds we are going to make this Branch come up and a lot of times if you make the branch too straight it doesn’t look too realistic so I like to try to come out here and make the branch a little bit crooked Wow from the front you can still see it’s going out but on the side it’s going out in a direction and it’s not straight because straight doesn’t look very natural on trees now we’re going to bring this over and start working on the opposite branch And I’m gonna make this one go in the other direction you can see I have two branches there they’re a little bit basic and I can see that’s a little bit too straight so I’m just gonna come in here make it a little bit less straight and fix it up a little bit Until I like what I see and I I like this I think this is starting to get the shape that I want so now that I have the two main branches I’m just gonna bring some odd branches coming off of that in different directions so there we go I Have two smaller branches coming out and I think I could do the same on this side Got that branch then I’m going to build a branch over here so I think that looks pretty decent the trunk is a little bit straight so maybe I’m gonna come in here and try making it a little bit more curved on that side and then the seam over here also trying To make it feel a little bit round and not too straight roots are an important part of a tree as well it makes the tree feel grounded and realistic to have roots that come out into the ground so I’m pretty happy with this rough shape I Think we can make an excellent tree out of this but you saw how quickly we built that and let’s go to the next step now we’re gonna work on smoothing out this tree trunk and branches note that you can really do as little or as much as you want on this step It’s not like you have to have it perfect a little bit can go a long way especially on the roots adding some slabs here at the bottom makes it a little bit smoother going down into the ground as well as using nether brick walls really can add a little bit of Depth because they’re not quite a full block so I really love using Nether Bricks because of the ability to use nether brick walls you can also use stairs that help smooth things out slabs also smooth it out breaking blocks replacing them is part of the process just working on trying to Make the branches a little bit smoother I like to try to end the branch with a slab as well because the slabs just look a little bit better coming back to look at your build a lot while you’re doing it really helps you identify problem areas right now I See this area looks just a little bit thick so I’m just gonna break that and put a slab there and then maybe put a slab there make it feel a little bit more smoothed and then I’ll put maybe a stair like that that way it doesn’t feel Quite as chunky a great transition to go between these blocks without having this little Gap right here is to replace it with a bottom and a top slab that way you get a little bit more of a smooth transition at the end of blocks it’s not super bad to have that but in The middle of a trunk like right here it’s better to do like two slabs and maybe a stair like that to smooth it out versus having that very tiny Gap holding it together you can also just add little things like this on the end of branches as branches separate Putting some walls in for some extra detail also just trying to generally smooth it out but I think this is coming along nice I see that area right there is a little bit flat so I’m just gonna come in there with a stair like that that looks much better Continue to work around here maybe put a stair there up here I could put a slab right there and maybe a another brick wall there but yeah this is looking pretty nice and I think we can move on to the next um Next Level which is placing some Leaves down once you have a trunk shape that you’re happy with it is time to start doing the leaves and remember if you’re not happy with the trunk after you do the leaves you can always come back in and make some changes but what I like to start doing is just start Placing some leaves down on top of the ends of your branches just to start getting an idea of where things are gonna go move around quite a bit and if you are building in survival breaking the leaves you’re gonna lose it so either use a hoe Or do like a filler Block in between it and then break that block but it is very important when building to leave lots of air gaps between the blocks and not just put a bunch of blocks like this without air gaps because that ends up looking Really blocky and not very much like a tree because there’s not a lot of air gaps in between there like real trees once you have little Blobs of leaves on the end of each branch it is time to start shaping it out and what I like to Do is to try to connect it like this to try to get a general shape so that you can sort of view the area that you want to fill in with leaves this at least gives us the idea of the size of tree that we want to build that way we can Fill out an area while leaving it pretty Airy and light and fluffy and this doesn’t have to be a hard or fast rule we can always expand it later this also doesn’t have to be completely flat you can go up and down with it because that Is how branches work not all the leaves will be one level either we’ll drag a lot of these down and then we’ll do a lot up as well the next part I’m going to do is try to figure out how high I’m going to go with the tree And make a little bit of a bubble over top of it if you’re doing a bigger tree like this you’ll want to shape each bubble individually like that instead of doing one big bubble so here would be a small bubble here would be a small bubble here and likewise for each one of Those branches but for a medium-sized tree like this we’re gonna just start with trying to make one bubble and then we’re gonna shape it later on once we have some leaves built in here so I think that looks like a nice shape just remember don’t make things symmetrical Keep things looking wacky and weird that way it looks a little bit more organic and more like nature I’m just gonna do some connecting lines as well just to start filling in this bubble and remember it doesn’t have to be perfect we’re just trying to get some Leaves down so we can start getting a general shape in building custom trees is not really the easiest task in the world it just comes down to a lot of leaf placing it can be time consuming and you might get a little bit frustrated with where you’re at Because it doesn’t look perfect but just remember keep going try to continue to try to get better and with practice will come Perfection now that we have a lot of these connected I’m just gonna start coming in here and try to randomly fill out these sections once again I am Leaving a ton of air gaps in here breaking some of the blocks that I placed before just so that it’s not completely straight or there’s not any hard lines on the tree that way the tree looks pretty natural that’s the one of the biggest tips they have for making trees Is just try to be pretty random because that is what nature is nature is pretty random you can’t build a tree like you build a house because you don’t want it to be square try to work on sections a little bit at a time don’t feel like you Have to finish one side of the tree and then move to the other just continually go around the tree working in blocks here and there until you finally come to completion later don’t feel like you have to have it all done on one side before you can move on to another side Along the bottom edge here I’m going to start working it out a little bit by just bringing out the block and breaking the other block on top of it and sort of expanding the leaves going down as the edge here is just a little bit high And I like the leaves to come down past the branches a good amount building trees involves a lot of patience and time but it’s also really relaxing you can see we’re slowly but surely filling in the gaps and it’s slowly but surely turning into a nicer and nicer tree And as I was talking about the inspiration in the tips section you can use inspiration to find the shape of the tree as well and try to use that as a reference for the shape that you’re going for once you have a lot of the Holes filled in you have this bit of a dome here that we’re going to try to expand a little bit down further and just do that by adding some leaves on the bottom here trying to go out a little bit and you don’t want to make it Completely flat on the bottom you want to make some come down a little bit further than others if I did just do this the whole way around the tree until you’re happy with the shape once again just trying to keep things pretty light and fluffy by not Having too many leaves and adding lots of air gaps having some dips along the bottom were some droop down further than it dips and then you have another dirt uh just makes the tree look a little bit more real and once again I’m gonna say this a lot Makes it look more natural once you’re happy with the general bottom shape it is time to go on the inside and once again we’ll come back and keep tuning things a lot but you got a big empty dome in here so what we’re gonna do is We’re just gonna come in here and start filling it out leaving a lot of air gaps but it slowly turns the whole tree into a pink tree without being able to see through it but at the same time you can see lots of air between the leaves which Makes the tree feel nice and fluffy and as like real trees you can always look up and see the branches you can see the sky is slowly disappearing but at the same time the tree is still feeling very fluffy and natural if I’ve said it too Many times I’m just gonna keep saying it because the most important thing about leaves is leaving lots of air gaps once you’re happy with the amount of leaves on the inside it’s time to come back on the outside and start shaping it a little bit more right now it’s kind of One big dome and to give it character we’re just gonna come in places and draw it out a little bit and make it not feel surround make areas that stick out a little bit more maybe on the top we’re gonna break just a little bit of a gap in the middle To make it feel like maybe this is a separate Branch over there but imperfections are what makes a tree look nice also on the top just putting little random blocks sticking out make it look like little leaves sticking out of a tree but yeah just work on the outside now And try to get it looking like it has more character and not just like a round Bowl Just Gonna Keep placing leaves that is the thing with trees you’re just gonna keep placing leaves till you like how it looks place and break place and break making the outside fluffy by just putting these At random blocks sticking out is also a great way to add character to the tree and we’ll just do this the whole way around just randomly adding blocks sticking out a little bit that way it can feel nice and super fluffy I do like how it slopes down a Little bit but I think I’m going to make it float down even more and a couple of these areas like that fill it in back here that way you can’t just completely see through it I like how that looks that’s a pretty nice kind of come up here and take that Edge off that way it doesn’t feel so straight maybe break a couple more of those to separate the two we could also make one side a little bit higher than the other so this Branch section is a little bit higher than this one maybe but it’s really up to you and the shape That you’re going for that’s the fun thing about trees for me is there’s no right or wrong shape it’s not like building a house or building an animal or something in Minecraft you can just make whatever shape you want just comes down to your patience that you’re willing to give the project I think I’m pretty happy with this shape now I think it looks pretty good besides maybe coming down on this side a little bit more but overall I think we came out with a pretty nice shape and now we’re gonna move on to the next step of detailing now I’m going to show You how to add a little bit of flare and color to the tree so it’s not just all leaves I like to take pink wool and put it in here where it would be a little bit more shaded where there’s a bit more shadow and just do that the whole way around The build it adds some nice color and texture it’s a little bit darker which is why I put it where the Shadows would be once you’re happy with the amount of pink wool that you did we’ll do the same with white wool but I like to put white Wool on the top or there would be a little bit more sun and that’s also where the white flowers would be so you can just pop that in here it just makes it pop a little bit more to have that white contrasting with pink we’ll do this the whole way around the Build until we’re happy with the amount I think that looks pretty good next we’re going to add some stained glass stained glass just helps with the translucent effect that you get with trees in general so I’m just gonna place this sort of randomly around the builds and do the Same thing with the white glass it’s all very random just to get a little bit of pop of color and add another Block in the build once you’re happy with the amount of glass then you can also take weight glass panes and pink glass panes they’re just a little bit smaller so It’s just a smaller amount of detail that you have and it really depends on what you’re going for but you can get really detailed and use this for some really cool shapes but I like it just for a little bit of added color and texturing next we’re going to bring some candles In here for a little bit of particle effect we’re going to take some Moss or any block that you want to bring it down as far as you want the candles to hang come up here at the top break it place the candles break that block Place more Candles and sew on the whole way down and then you can break the last block I think that looks really nice to go along with the floating petals that come down we’re just gonna do this the whole way around this builds maybe about 20 times or so Sometimes I like to put less candles at the bottom so that it seems a little bit more sparse also you want to vary the length that you do some of them you might want to go four down some only two it just all depends what you’re going for That way you don’t have all the candles ending at one length And now the tree is looking complete if you want to add grass around the bottom as well as you got the pink petals underneath like leaves falling down that looks pretty cool adding grass and leaves around the base makes it feel like it’s growing out of the environment Yeah that looks pretty nice I hope you learned something from this tutorial and I hope that you can build some amazing cherry trees in the future thank you so much for watching and I’ll catch you in the next video Video Information
This video, titled ‘How to Build Cherry Blossom Trees | Minecraft 1.20 Tutorial’, was uploaded by MrMattRanger on 2023-06-30 11:00:34. It has garnered 131832 views and 4877 likes. The duration of the video is 00:27:32 or 1652 seconds.
How to Build Cherry Blossom Trees and also Modify the Vanilla Trees | Minecraft 1.20 Tutorial
Downloads of all my builds https://www.patreon.com/mrmattranger
Timestamps 0:00 Intro 0:32 Material List 1:24 Easy Small Tree 6:31 5 Steps for Making a Great Tree 8:27 Trunk Layout 11:07 Trunk Smoothing 14:09 Leaf Placement 24:08 Leaf Details 27:20 Outro
Find me on Instagram | https://www.instagram.com/mrmattranger Find me on Twitch | https://www.twitch.tv/mrmattranger Find me on Twitter | https://twitter.com/themrmattranger Find me on TikTok | https://vm.tiktok.com/ZMeM7DKjk/ Join My Discord | https://discord.gg/6usKvHZ8g9
Do you need a Minecraft Server to Build and Play with your Friends?
DedicatedMC is a Minecraft Server Host, with top of the line hardware and great customer service. Link: https://dedimc.promo/MrMatt Code: MrMatt for 15% off (Use at Checkout)
Looking for a bit more energy while gaming?
Try Rouge Energy Drink Link: https://rogueenergy.com/discount/MrMatt