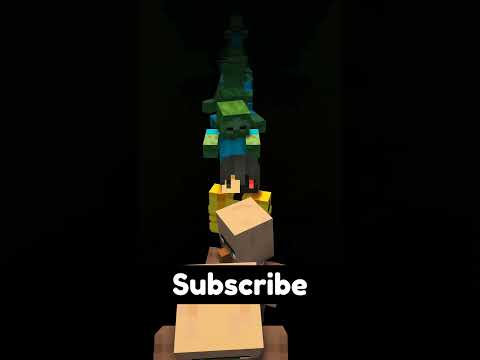
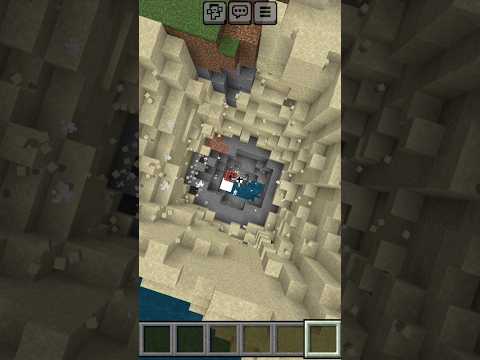
Welcome back to let’s play with Sergeant Preston as you can see we are in a zombie dungeon and we’re going to convert this spawner well we’re not going to convert the spawner at all we’re going to make an iron farm an ultimate iron farm that would done by prow 8413 I’ll put a link in the description of his tutorial this is a great Farm we’ll have a Trader Hall as you can see this is our what it looks like when we get finished I have plenty of librarians and each one of them will give me a Reduction because of the zombie spawner so I hope you enjoy this episode as we make it and please subscribe and like and any comments you want to make please put them in there thank you for watching and let’s get on with the video so here we Are at our spawner and we’re going to dig down 12 blocks dig across 13 blocks all the way around and make shorter three blocks above the spawner and here is our finished area we’ve got I put deep Sate uh polished deep Sate all around and it looks pretty good it’s Uh 13 across 12 down and three up all right so I made some steps going up this is where we’re going to bring down our villagers I’ll eventually put a rail system down here this is all going to be temporary I’ll fill it all up and here’s what we found we got 40 Diamonds iron copper gold Redstone lapis and some okay so now we’re going to work on our spawner area we’re going to put some temporary blocks I’m going to use dirt as a temporary block and then I’m going to to put a magnet block the magnet block is going to be where we’re going To have nine allog together eventually and this will be our killing chamber the magnet blocks will kill the Zombies which drop and also the Iron Golems now they won’t kill the Iron Golems fast but the with the help of the zombies they’ll be killed and because we’re using 40 Villagers will get three iron gems and hopefully it will produce enough it’s not a great form for for production but it is a good farm for reducing villager trades okay so I put two Hoppers up here the first one we’re going to remove and we’re going to put a mine cart the mine Cart will take all the drops from the iron golems and the villagers I mean they uh zombies and then it’ll push it through the hopper the hopper will go into a collection system which we’ll build later on during this video before I go any further I’m going to put some Dirt around the hopper okay this dirt is going to be for the first four beds and I’m going to put the four four beds in and the four beds will keep the mine cart in position while I work on the queuing chamber and the water and which is going to be Above all right so we got our little let’s go ahead and put our magnet blocks up There like I said we’re going to use nine all the together I think I miscount one but we’ll take it off yep so this is the actual killing chamber and when the water flows it’ll flow down in here and it’ll take care of it it’s not the fastest Method all right let’s go ahead and put our first four beds in like I said this is going to hold the mine cart in position while I work on the water system and the killing chamber okay so now we’re going to work on our water platform the platform is Going to be 8 by8 so we’re going to put seven blocks plus our magnet block it is eight and we’re going to put eight all the way around and then we’re going to fill it in so it’ll be an 8 by 8 which is a 17 by 17 when it gets all filled In you got to make sure you count it right because if you count it either wrong the water won’t flow correctly and then you have to start all over again um yeah I made that mistake cuz I didn’t count it right okay now we’re going to take this 17 by 177 platform and raise it up and we’re going to extend it all the way out to the exterior wall and then we’re going to fill it in all the way around this will make our water flow nicely right into the center okay so we need to also put in Some blocks in the corner this will make it so there is no standing water or a water source all the water needs to flow into the center and if you don’t have these Corner blocks you will have some water sources in the corner and if zombies happen to To go in there they’ll be stuck and we don’t want that I don’t know uh about the Iron Golems being stuck there but this is again I’m preventing things from happening I’m going to go ahead and remove most majority of the Torches uh I find that because I am Using a controller I find it hard to remove the Torches once the water is Flowing uh it’s kind of like being in a high river bread and the water’s flowing really fast or at least I feel that way when I’m using a controller so that’s why I’m removing all majority of the Torches before we put in our Water now we only have a few left and it is super dark in there which is that’s how we want It okay you will notice I have placed some sand in here this sand is H just a barrier for the water and what we’ll do is once I got all the water in I’ll remove the sand and the water will flow nicely down into the center last torch I want to remove Before I put the water in though is the torch right above the zombie we put that in so the zombies wouldn’t spawn now you probably noticed that I am building this in peaceful as I indicated in in the uh very first episode I’m going to work in normal Unless I’m building something and then I’m going to build and peaceful and go back back to normal once it’s built I find this is the better way for me to do it but um and that’s only because I’m still new and I haven’t yet built things uh while normal fact I don’t like People bother me when I’m building things in the real world so you can see we’ve removed our sand and our water is Flowing really nice so let’s remove these final torches you can I can feel the the uh pool of the water and you can probably see I’m being dragged towards the center Um so that’s why I I removed the Torches beforehand you see I’m I’m fighting to get up there it’s not a bad fight but still it’s an irritating fight we’ll just close this and we’ll go work on the Bottom okay so now we’re going to finish up with our beds we’re going to put our 40 beds up here and uh what we’ve done is we’ve taken the dirt as our temporary block and we place it around we’re going to use a total of 80 dirt for 40 beds Two dirt for four beds for per per bed so I did not Design This Farm uh prow 8413 did it and uh I will put a link at the bottom of course and he’s he made all the measurements correct and it looks I’ve used this uh iron Form before and the I’ve used the plain iron farm which he also has a a tutorial for not the one with the zombie he’s also created a newer one just recently but I haven’t looked at that one so I couldn’t tell you about it but check out His tutorials I use a lot of his and other people’s I’m using this one because I definitely like how the zombie uh I mean the Villager trade reduction is and it was really really neat um without having to cure zombies I mean villagers zombies villager it’s probably not smart that I’m using a diamond shovel uh because I could break the bed but I thought it might be a little faster to use my shovel and I only have Diamond shovels right now diamond tools so um I’m going to try to be as careful as I can because now we’re just removing our temporary Blocks and you can see I knocked out a bit already we should be able to fix that And I knocked out another one let’s go ahead and uh put these beds back in and we’ll continue to move the dirt and notice I’m no longer using my Shovel all right just like in PR’s tutorial we’re going to close up our bed chamber and U what we’re going to do is we’re just going to put a wall all the way around our beds all the way to the floor of the of this little um village Trader this will be our Um collection area room whatever you want to call it and um we’ll make a uh a simple collection right now later on maybe I’ll put a shorter in there uh for this episode we’re just going to put one chest just so we know that U things flow Nice and evly in there I don’t expect to get a lot right now so I’m not um going to make a lot of chest for something I’m not going to use a lot of just yet but as we start playing we’ll get a lot and hopefully it’ll work work Out I found that this uh polished de slate is a good uh good source because it well first of all it’s all the deep slate we got from digging out I just use the stone cutter to make the Polish deep slate and uh eventually though we’re Going to use some white concrete the uh White concrete will brighten up the room a little bit and change the contrast a little bit uh I’m not a fancy uh designer or anything but um I know white brightens up things so I like to use white when I can and since we’re Using a darker deep slate which is kind of bright but it’s not bright enough uh we use the white concrete to make it a little brighter and this will be our collection room chamber whatever you want to call it If you noticed I didn’t use a lot of uh time lapse in this video because I broke it up in little sections uh didn’t need to show everybody me digging all the way down and building this CH big chamber down um so I didn’t think that would be Interested to watch so I didn’t do time lapse on It okay now we’re going to do the corners um the corners are actually going to be 3×3 but what I’m doing is I’m going to put some of my extra material in the center and uh we use the white concrete to put on the outside to make it the 3X3 Um I could have uh just did concrete all the way around but um it it seems like it’s it does it better if I just do it here plus I don’t need to have this extra material hanging around it’s not a big deal um let’s go ahead and get get ready to Put in our white concrete okay I’ve already made up my concrete and if you know uh concrete is made with gravel and sand and a Dye um since I’m using U I’m using bone meal to make white conrete but you can use any color and make different color concretes now What happens is when you first create the take the sand and the gravel and the dye it makes a concrete powder and it is not it it falls like sand and gravel so what you need to do is you need to put it in running water or flowing water Um when I I first first started doing this I just dropped it in the lake and it didn’t do anything um so I had to figure out what was wrong and it was that I needed to have the water flow over it or flow near It so it couldn’t be a water source but it worked out I I did pretty good so as you can see I’ve got my I’ve surrounded in my corners and now we’re making little Chambers for our villagers um we’re going to have five villagers on one side um and five Villagers on the other we’ll have 10 10 villagers on the wall on each wall and there’ll be a center for opening before maybe we get out or in or whatever and and I am making I did make a a faster way to get in and out because we will be closing up the Stairs um because it was just temporary for the villagers you can see the concrete is pretty bright but when I put a torch on it you will see it gets even brighter um pretty nice nice concrete I use concrete also on the barn or the stable and I I liked it there um Again that was the uh I used the red concrete and white concrete on the bar Barn it looks pretty good so far it is kind of dark in here but we’ll light it up in a minute once we get all the walls in here and make sure we got enough concrete to do Everything now prow caused these uh the uh uh Trader stalls uh not cells but you know what they are cells the Villager once you get them in there and lock them in they’re not gonna move it’s like a cell but we’re gonna call them Sals just like Mr prow Does our last one there we go now let’s go ahead and put some torches on it see how bright it got very nice very nice I’m going to put torches I’m going to try to space them out out nice and evenly yeah it it definitely got brighter with the Concrete this is our stairs going up and we got put a center one here get our torch and we got another Center one Here back on this side here later on you’ll see I made an opening to go up and down all right time for villagers hello look I’ve got villagers back there and I did already uh get my swamp villagers and the jungle villagers I didn’t record the creating the little Village but maybe later on I’ll do a special episode and um so this is how I brought my villagers to the mine uh or our iron farm as I collected them on boats um I have I did have I have four boats four boats as you can see now but they’re um I can put two villagers on one boat and just send it on or maybe there’s four villagers and two boats forget how it was anyway um this is how I did um I want to show you how I did it so it was pretty easy but time consuming as you Can see I’m paddling along and um I guess if I made uh portals in every area I could probably push them through but I find that the boat is just the easiest way to do it and um I I can just attach a lead to a boat and drag it on And it works out pretty good so so uh as you can see I went all the way back um these I believe is my Savannah villagers I did get each villager from each biome uh at least I tried to and um then we went into a little Inlet here In our village this is where our steps came out to and it worked out pretty good um and all we have to do is drag them Up here’s my real system and as you see I’ve already brought up a couple villagers these are my jungle villagers I believe here’s how I did it now if you’re pulling a villager on a boat you actually don’t need water um you just have to be careful as you’re going up And they will uh go up the hills if you’re dragging with your lead but I found if you use water your lead doesn’t break as often and you can pull them a little faster than you would if you were just dragging them without the water I Found the Water Works a lot better than just anything so uh and I dragged them all the way up here I could have done two at a time which probably would have been a lot faster but I decided to bring five boats at a time 10 villagers and uh Which as you can probably imagine it um it did work but it was a mess uh but I thought hey let’s do it Anyway I have a a chest right up there for the boats and there is a I already have the mine carts on me so what we do is we take them out of the boats hopefully we don’t kill them and uh then we will put mine cart one villager per Minecart um not like a boat boat can hold two villagers but a mine cart Can Only Hold one so I decided hey let’s just do it this way we put them my cart down on the rail and uh just push it and a villager will pop in there just like that because There’s a lot of villagers the mine cart came back to me it didn’t move quite quite fast so okay so hindsight didn’t do very smart on this one we uh if I do this again it will be just two villagers at a time instead of 10 but uh as you see I’m having a heck of a time so I will uh eventually just push a couple of these out and then we’ll have less there we go let’s get this this get these out and down it took me a minute to get these in here to get them Moving all right and you know you can push the mine cart back on a rail and it’ll it’ll go but it went the wrong way so let’s go the other way I have a power rail there to give them a little push but if villagers or anything else is in the way They won’t go now if you notice I have that block of sand the villagers will not walk through the sand but if they’re in a cart they can go right through it if they if the cart stops in the middle of the sand they will die uh but uh I Try to make it so they wouldn’t stop they just going right through It we need a couple more left we got three left then I’ll take you down and we’ll show show you what it looks like down at the bottom I’ve got some Hoppers and I actually got some Cactus down there I’ll show you when we get down There two more two more let’s go let’s go guys let’s go let’s go come on guys let’s go really having a fun time all right now I can’t go through that sand so I have to BR break it out and I made some bamboo steps so that I can come up and down Faster uh I can use the bamboo steps as fuel to smoke other things um but because bamboo is so abundant now I don’t feel I’m wasting anything and I can use the steps as fuel you noce it is a long way Down and I prevent the other villagers from coming through as you see they made babies uh and which is good the minecart hits the cactus and then drops into The Hoppers and I can collected later and now I have all the villagers down and I’ve gave them all profession Box uh we have a lot of uh the um Librarians to give us a books and I get a lot of uh different items so and then I brought my mending thing here and look we already got reduction there you can see it dropped and uh that was good Thing and that’s what it’s all about so just making it right and this is the simple collection system I got uh as you can see we still we have some stuff already um it could get bigger maybe Not Video Information
This video, titled ‘Iron Farm with Auto Discounting – Let’s Play Minecraft with Sgt Preston – Episode 11’, was uploaded by SgtPreston on 2023-12-27 11:05:21. It has garnered 45 views and 7 likes. The duration of the video is 00:30:30 or 1830 seconds.
Thank you for watching my Minecraft Bedrock Playthrough.
In this episode, I am building Ultimate Iron Farm including Auto discounting by Prowl8413. Here is a link to his tutorial. https://youtu.be/a9CQkFMGQw4?si=0A6NCDInEJO-uWrq
My seed from Minecraft & Chill https://youtu.be/Q23lJO2K7LM?si=qqKKG-IVWyI8uWBM
I play mostly in Normal Difficulty as I have not yet become proficient at the game. And when I build farms like an “Iron Farm”, I play in peaceful difficulty until the farm is finished.
Resource Packs and Behavior Packs Natural Texture Pack https://marketplace.minecraft.net/en-us/pdp?id=167a11c3-759b-4eaa-b898-5d85dbbd7f5c
The following Resource Packs are from Bedrock Tweaks: https://bedrocktweaks.net/
Directional Hoppers Lower Shield Trading Helper
To help me with my world I will be using ChunkBase https://www.chunkbase.com/
All my farms are Tutorials by the following creators:
https://www.youtube.com/@Prowl8413
https://www.youtube.com/@silentwisperer