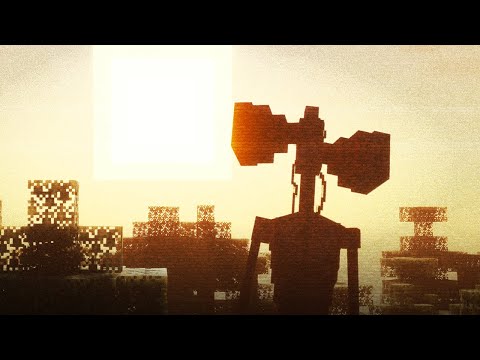
In this series so far i’ve focused primarily on building modules that have to do with the surface the only exception being the lush caves from episode four however i think it’s time to do a lot more underground modules and in fact i intend to add an entire Underground layer and what better way to start off this new cave system with the addition of the deep dark this by far has been the most requested biome in the entire series with probably over a hundred such suggestions so i know you guys are looking forward to this I’m looking forward to this so let’s build this thing This biome of course is going to feature all sorts of blocks that we’ve not yet seen in this series including skulk veins skulk blocks skulk sensors sculpt catalyst deep slate bricks deep slate tiles and chisel deep slight amongst others don’t worry we’ll get to a shrieker eventually For this module i’m going to be going with our standard 2×1 size and what’s going to set this apart from some of the other modules i’ve done is that we will be able to set something on top of it a surface biome one thing i need To start prepping for right away is the location of the skull shrieker because its build is quite complicated the block itself will take up about your standard blocks worth of space that is a 2×2 footprint on the surface however the stuff that needs to happen underneath the ground is far more complicated and Far more space consuming to accomplish some of the small detailing that shows up on the sides of the in-game shrieker i’m using battle droid arms connected to these hose pieces then in between them i’m going to sync this sub assembly that has a number of Clips on it these are the bits that are actually going to stick above the surface of the skulk this is where things get a little illegal the battle droid arms are bent a little out of place to accommodate for this sub-assembly so no you’re not going to see this specific design replicated in An official lego kit however i am really interested to see how lego goes about building their own skulk blocks when they do release a deep dark set hopefully in january of next year to create the teeth of the shrieker i’m simply attaching one by one tan tiles Into those clips this allows me to get a bit of the curve that that part of the block actually has and that is our skull shrieker completed i’ll just fill in these corners with skulk blocks on top of them you’ll see a variety of different blues to try to Replicate that polka dotty feel of the skulk i’ve even got one by one rounded tiles in glitter trans blue also put one of those in the middle of the shrieker i’m pretty happy that i was able to accomplish this much detail on such a small block It does take up a little more space than you’d like to see however i’m totally okay with that as long as this thing is recognizable and super cool even if it is a little illegal from here i’m going to continue to spread that skulk outward like the virus It is utilizing a bunch of different techniques to get some interesting textures one such technique that i’ll be using here on the side is some snot construction to get some smaller of those polka dot shapes coming through the ground the skulk is very organic in nature so i don’t feel The need to make too much repetition in this part of the build now i don’t feel like i could make the deep dark without having a portion of the ancient city so i’m going to start laying out the foundation for that using the three different textures that we talked about At the start of this video for the different varieties of deep slate that show up i’m gonna ease the skulk in and out of this build having two large patches and on the edge of that just like it is in the game we’ll have the skulk veins which i’ll use dark blue for To add of course that lovely pop of color that i always try to get my builds also because some of the walls of this build will eventually be completely buried by other modules i’ll be using just random colors that’s what the yellow green and blue stuff is It’s already time to tile off this portion of the build i’ll leave plenty of room for some of the blue accents to come through and i’m also of course placing down some two by two jumpers on top of which we’ll place the other various skulk-related blocks and leave room for the warden The sculpt catalyst is a super simple build i’ll just slot it into place right here the skull sensor is also relatively simple making use of a relatively new piece the 1×2 modified plates you see there in dark blue which have bar holes in the studs with black teeth sitting Inside them next they’ll get to work on the part of the ancient city itself because of their massive size i can only do a small portion of the city i’ve chosen one of the most recognizable structures which are the hallway builds that branch off from the main portal Room even though in the game the structure is entirely grey i can use a variety of techniques to bring a lot of visual interest to this build the main one being the use of different textured bricks and on top of that i’ll also have skulk crawling over two different Portions of this build we’ll get steve in here who is trying to sneak up on the warden in diamond armor i don’t know how well it’s going to go buddy because of the level of detail used in the skulk veins and the skulk blocks this thing is absolutely covered in plates and Because of that is very heavy and dense it’s just unusual in that sense compared to a lot of my other modules this thing will not come apart easily that’s for sure now the cable is at the same height as the ancient city structure i’ll continue and finish that Off i’ve made sure to tile off the underside don’t worry on the top there’s all sorts of various details including that chisel deep site and i’m going to leave room for two additional skulk sensors here too and then it’s time for the wonderful wonderful tiling Once everything’s tiled off on top the only other detail i need to add is the sole lantern that appears underneath it’s very similar to the official design that lego uses in their kits the last thing to do on this model is to finish off the cave roof the challenge Here is to continue the consistency with the textures i’ve created and also making sure that every side of every block is smoothed off to maintain that game accurate appearance that i’m going for with this entire series this process involves a lot of snot techniques and inverted 2×2 tiles i want a pretty tall Ceiling for this room to give it that grand feeling i feel it deserves so i’ve gone an extra few blocks than i originally intended in height on top i’m connecting everything through plates just to make sure it’s all secure eventually i am going to have another Module sitting on top of this so i just want to make sure everything stays in the place and nothing falls off that shouldn’t to make the top of the cave ceiling i’m going to use a number of wall panels on their side to give that flat appearance and that Also gives me a nice flat surface to lay the next module on top the last parts order to come was for these two shriekers so they are the finishing touch on this build for now i’m temporarily going to put the badlands module on top eventually i’d like to put some sort of Mountain biome on top of this you’ll see what i have in mind i’ve made some modifications to the warden that i showcased in a video a number of weeks ago he of course needs to make an appearance here if you’re interested in seeing how i’ve redone the face stay Tuned to the end of the video i think there’s one more thing i can put in here to add even more attention to this scene perhaps steve brought his dog along oh steve you fool now that we all have a deep emotional connection to this build I think that’s a good place to leave you up next i’m going to be doing a regular swamp biome this has actually been a very highly requested biome it will include a witch hut and a number of quite rare lego mobs if you want to access that video early all you need to Do is click the link in the description but until then thank you so much for watching have a great life and i’ll see you next time So here’s how to make the modified head for the ward and these are the parts you’re going to need start out by taking a 2×3 plate in black three of the 1×2 tiles in dark blue go on top and this is probably the most complicated part so You’re going to take one of these one by one bricks with the technic hole in it two headlight bricks are going to go in the sides with the stud facing downward on each of those studs you’ll place a one by one plate in black so as you can see there we’ve Switched directions pretty efficiently which is the whole idea here i’ll take the one by three plate dark blue place your one by two tile in black there and then the two by two corner tile like that so you should have an opening and then that’ll go right there so you should have the Anti-stud of the 1×1 technic brick there and that’s where you’ll put this modified one by one with the bar that’s where it’ll connect to the warden body then here you’re going to take a 1 by 2 plate and put a cheese slope and that’s going to go Right in there and you’ll do the opposite for the other side just like that take the 1 by 2 one by one and then that first assembly we made put together like that it’s going to slot into place there and you know the rest these one by ones with the hole in them Go in there and then we’re going to put our feathers Into place there and that is the modified warden head You Video Information
This video, titled ‘The Deep Dark | Custom LEGO Minecraft World’, was uploaded by Cheesey Studios on 2022-08-18 13:00:39. It has garnered 539031 views and 16761 likes. The duration of the video is 00:11:05 or 665 seconds.
Things get a bit deeper and darker with our plunge into Minecraft’s caves for this custom layout. This will be the first of many underground Minecraft MOCs for the build.
Become a channel member to get early access to new videos! https://www.youtube.com/channel/UCEHb6IYRK8AWeSc2cJM2CZg/join


![🟢 EPIC SLIME BATTLE! "Not Giving In" - Minecraft MV [Exit From Darkness E26]](https://img.youtube.com/vi/dJ8vyNIsP_4/0.jpg)