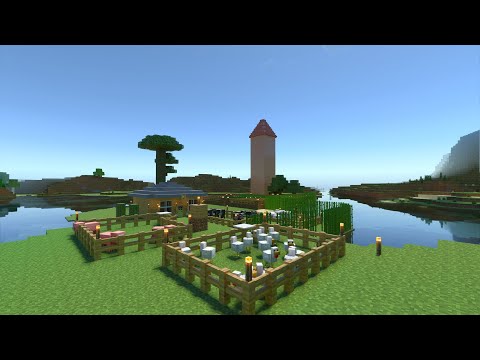
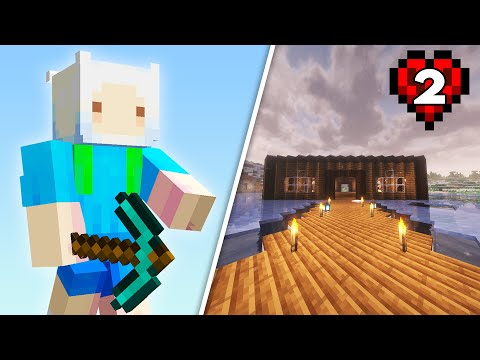
What’s up everyone how you doing blue here and welcome back my friends to our minecraft medieval harbour where i show you how to build in minecraft so guys before we get started let me just start by saying happy new year i hope you guys had an amazing holiday and i wish you All the best for 2020 now with that being said guys that there is a bunch of new things that are going to be coming on the channel and i have a bunch of new tutorials and a bunch of new content all lined up so there’s Going to be a few small changes to the channel which i just want to quickly go over so first of all guys we’re going to be taking a channel a little bit back towards where we kind of started with more tutorials on the channel i know a Lot of you have been asking for tutorials um so we’re still going to be continuing our let’s play series but i’m going to look at one maybe two survival episodes a week but the race is all going to be focused on tutorials now i’ve got a whole bunch of new Tutorials from small builds to very large builds all planned they’re going to be coming very soon and we’re going to start by doing most of our tutorials slightly different so as you can see we are actually in our um in our harbor in the medieval harbour World so there’s a bunch of new stuff here which we’ll talk about in just a moment um but today we are going to be building this build here and we’re going to start by doing this one a little bit different so i will be showcasing the Builds inside one of my worlds so you’ll see things built around it to give you ideas and stuff like that but what we’re going to be doing is building the actual build itself inside a flat world that way it’s a little bit more open it’s easier to see around and you guys Can kind of see how the build is done much easier you know rather than having buildings around and stuff like that um building it in a flat world is just gonna make it a little bit easier to see how the build is done and it also makes It easier for if you want to put it somewhere in your own world you haven’t got to kind of take any of the other buildings that i have done into consideration however like i said i will be showcasing it in this world so if you Do want to build it in the same location or in a similar place you’ll be able to see where i’ve done it and how it’s been placed so i give you an idea of i suppose a bit more inspiration for where to build it now with what that being That said guys let me just quickly show you some of the new things that we’re going to be doing on the channel because there’s a few new builds on the city here and i know there’s a lot of things you guys have been requesting so first of all guys the city gate i Know you guys have been asking me for ages about this one but i have been working away on the plan so i keep changing it and stuff and this is very similar to the um the main gate that i built in my survival world now this is a pretty Simple gate but it is really nice and i think it fits the theme perfectly so this is going to be coming in a tutorial very soon we will be doing a tutorial on the gate and the walls as well okay so we’re going to be doing That on both and as you can see the wall is slightly die uh slightly diagonal so it gives it a bit more depth as well now also with that being said guys we are going to be doing tutorials on some little things like market stores and Stuff like that we’re going to be doing some sort of smaller style builds as well which are going to be like this we got a stable here which is going to be coming very soon we’ve got this little build over here and we’ve also got another little build Over here which i think is a really cool i really like the way this one’s turned out as well um so we’re going to be doing a lot of tutorials on some smaller builds but we still will be doing the larger builds as well so if we head over the Wall into the city let’s just take a look at the wall from behind so you guys can see what i’ve done we’ve got a little section down here so this is kind of good for defending because we’re at a higher peak here so if anyone got through the gate you know archers will That would be able to shoot down at them and kind of take them out before they go anywhere so this is the back of the gate now if we turn around guys we’ve got a few storage units here which we’ve done we’ve done this one i think last time i Finished the last build we’ve done i made a little bit of a storage yard here i’m still unfinished but you know a little bit of a storage yard around the back of the build so it makes it look like um you know there’s some big heavy duty stuff being stored here Now we still got a bunch of plans here for a load of other builds but at the moment the only ones i’ve got that are visible here to be seen is this one here which is also the um trading center which is in our survival world although We haven’t built the actual trades trade hall inside it yet we’ve just built the actual building and this is going to be in a tutorial very soon actually probably the next episode or the one after and this is a really cool build i really love the way this one looks And then we’ve got this one over here which is the church i did show you guys this in last episode um and yeah i think this is going to be a really cool build and again guys i will be doing this in a flat world to Make it easy for you guys to follow along as well and this one probably to be done over the course of a few episodes because it’s quite a big build so i imagine two or three videos until we finish that one up um maybe three if We’re gonna do the interior um so we’ll see how it goes anyway guys with that being said let’s head on back to the outside and we’re gonna go and head into our flat world and we’re gonna start building this one just here which is a great little Survival style base so if you don’t want to build it in the city like what we’re doing this is a great little survival style base as well it’s very simple to build very easy to gather up the resources um so yeah with that being said guys let’s go ahead and build this Okay guys the resources for this one are pretty simple we’re going to be using some cobblestone stone stone bricks and some underside we’re also going to need just a few cobblestone stairs and stone brick stairs and a couple of cobblestone slabs as well now we’re going to be using some glass Panes you can use any ones you want i’m going with the light gray stained versions some spruce planks stairs slabs fences and trapdoors just a couple of bricks and brick stairs now guys we do only need a few of them so if you go into a river and get Yourself some clay you’re only going to need a very small amount of it and then just a couple of andesite walls now the rest of the stuff guys is all for decoration so we’re going to be using some barrels lanterns campfire some flower pots with some oak saplings A few flowers and ferns and some oak logs and that’s about it for the decoration guys so if that being said let’s go ahead and build it okay guys here’s the layout of the floor plan now as you can see it’s pretty simple the red block is the corner block the Yellow blocks are our two block walls the blue blocks are our five block walls and the ping blocks are just a marker for the moment for the little overhang at the side of the house so with that being said guys let’s go ahead and build this okay guys we’re gonna start from the Left hand back of the build just to make this one a little bit easier so we’re gonna start from this corner here using cobblestone and we’re gonna go one two three four five six seven downwards one two to the right then we’re gonna go to the right by one and then come down And go one two three to the right of this one two three four five six behind this one we’re gonna go one two three four to the left one two then we’re gonna go to this left one and then back one and go one two three four five And then to the left one two three four five okay so we should have something like this now we’re gonna separate these two builds so first of all from this little corner here we put two on top of this one and two on top of this one and then Basically we just want to fill the rest of this wall around here by two more blocks making it free in total so let’s go ahead and fill all of this and then we’re gonna go ahead and raise this one to six we’ve got one at the bottom already so two three four five Six and we’re gonna do that all the way around this bit at the back okay you should now have something that looks a bit like this so what we’re going to do now is we’re going to come here right to this block just one above the wall here and we’re Going to bring it over and join it to this corner here and then just raise this section here to that side just like so now we’re gonna break some holes for our doors and windows so first of all on the very front here we want to come one block over and break A two block gap for a door leave a one block gap and break a window here and a window here over here we have three blocks so right in the middle let’s break a one block for a window actually we’re gonna go up by one let’s break that one there for a Window okay so there’s two blocks at the bottom and then one block at each side now we’re going to go to the very top of the house here and just break that center block there for a window because we’ll be making a little archway there later on Now around the side here we’re just going to go over to the back here we’re going to leave a two block high gap and then one window right there so we’re one block from the side and two blocks high from the bottom okay and then on this little piece here We’ve got five blocks so we’re gonna break a window there and a window there and that is about it for our windows for now now that the windows are in place let’s go ahead and place some spruce planks across the top of this wall here and Then overhang this edge by one and this edge by one and then on the bottom half in front of them we’re gonna place our slabs now we’re gonna go behind it on this corner here and we’re gonna place one and then step it up one and step it up Let’s do the same over here we’re gonna go one step it up one step it up now we’re center with this piece here so let’s bring it down doing it again one bit at a time like so until we overhang on this edge here then we’re just actually gonna put in Some planks here slabs across that edge and then it’s just a matter of connecting the tops of these together so we run these ones all the way across like this this wall here connecting to that one and now before we put this one in guys we’re just gonna put in a two full Blocks like there and one two three across here and then we’re just gonna fill that one there put one there one there one there and then just bring this all the way across connecting it to the back just like this now to make this look a little bit nicer Let’s quickly go ahead and put in a upside down stair there we put another one above the windows now you can use either the stone bricks or the cobblestone or mix it up i like to mix it up so that it gives it a little bit More of a random look because we’ll be adding some more textures in in a little bit now over here where this window is we’re going to do the same just there and then round the side here let’s go ahead and do the same here again i’m going to mix Up what i’m using whether it’s the stone brick and the cobblestone and then we’ll do one for this window just here okay let’s go ahead and get the next roof in place so now what we’re gonna do is get our stairs and we’re gonna place one here overhang on that side and then Bring it all the way down to the back and overhang that side put an upside down stair behind it and then we’re gonna basically repeat that again so we’re gonna basically bring the stairs across upside down stair on this corner and this corner let’s do the same over this side so Place a stair here run it all the way across overhang upside down stair to bring the stairs all the way back remember to put an upside down stair here and then place an upside down stair on this side and this side now the connection in the middle is very Simple we’re just going to put a slab on top of the stairs then place a slab next to it one above one above and then two slabs like that in the center and then we’re gonna pretty much just join it all the way down to this side so Bring the slab all the way across to that one bring this slab all the way across and then before we do the next bit guys let’s just put in a wall here so bring one strip all the way across here which should be five blocks and then the same here five blocks all The way across here now we’re literally just gonna go ahead and actually get our planks and we can just bring the planks all the way across like this joining up and creating a nice little kind of arched roof like so and i think that’s looking pretty good Let’s go ahead and put in our glass panes make sure you put them in all of your windows and if you want to add any extra windows guys feel free to do so but i’m going to keep it as it is okay now i’m just going to go ahead and Place in a door so let’s put a solid block at the bottom there and then inside we’re going to place our door and then we’re just gonna fill the inside floor in here with some spruce planks or some planks of your choice it’s entirely up to you Okay guys once you’re flooring this all in place you might just want to neaten up the roof so just go ahead and put some upside down stairs on this side and some upside down stairs on this side and then underneath here we’re gonna put some upside down stairs inside here and Then we’re just gonna fill this little gap in the center here with some slabs and then we’ll grab our stairs again and just put two of them in there and it’s probably a good idea to add a little bit of light in here so maybe we’ll actually Just put one lantern in the center like that and at the top here i think we’ll put a lantern there and there well you could probably just get away of one actually to be honest something like that just to brighten up the room and make it a little bit brighter in here For you to see what is going on okay let’s go ahead and get the chimney so if we head around to this right hand side that i build here we’re gonna come down to the very bottom here and we’re gonna go one two three in this little corner here Then we’re gonna go one two on top one two let’s break that slab there and then two more on top at the very top here let’s put two stairs like that and then we’re gonna put one stair sideways like that at the very bottom put two solid blocks Here and then two stairs on top and one stair like that and i think that creates a nice little bit of shape there on the roof here where the edges as you can see we’ve made it look like the chimney goes inwards so what we’re gonna Do is break these two stairs here which are one inwards from the two here okay and then we put two of our bricks then another two bricks like that put one brick there for a minute or one block temporary doesn’t matter and then put an upside down stair there break that one And put an upside down stair just there now on top just place two campfires and then surround them with the spruce trap doors like this all the way around and then on top just place two of the andesite walls or even a cobblestone wall it doesn’t really matter any walls Of your choice will be just fine okay now the little overhang on the left hand side so from the left hand corner we’re going to leave a three block gap and place an underside wall here behind that leave a four block gap and place another one put a spruce fence on top of Them both then on the top of this one we’re gonna put a spruce slab and run it all the way across until we’re on top of that one then we’re just literally gonna step it up so one to the side one up one to the Side one up one to the side or one up like this and let’s do the same on this side here now there should be a one block gap at the back and then we’re just going to connect the slabs together so across there just like that Now just a few little details to make the building really sort of stand out a bit guys so first of all let’s put in some little posts we’re gonna put a underside wall here with two fences on top we’ll do the same on this side but we’re Gonna put one there and one there and then two fences are connecting upwards just like so let’s get our spruce trap door and we’re going to put a little shutter on the window at the top down at the bottom here for this window here let’s put a little slab just there To make a little kind of um like a little window ledge we’re going to get some spruce stairs and we’re gonna put an upside down one underneath that window an upside down one there and then a slab in the center just like that and i think that’s looking pretty good Let’s go ahead and get ourself some of the lanterns because we can add a little bit of light here because it’s going to be a little bit dark otherwise so let’s go ahead and we’ll put a little lantern right in the middle there okay that’s looking really good Now i think round the back here guys we’re gonna go ahead and put a little slab on that one and i think we’ll also put a little slab underneath these windows here if you wanted to you could also put a sharp just like that for that Window again add in that little bit of detail okay guys now all you need to do is make a little pathway to your doors just go ahead and use your shovel or whatever you want to make a nice little pathway make it look a little bit jagged and a Little bit rough because that way it blends in a little bit nicer it doesn’t look so clean and neat make a little worm a little bit of a pathway that comes underneath your shell here too okay guys once you get your pathway in place it really is entirely up to you How you want to decorate this so for me personally i’m going gonna just add in a few barrels down here something like that i might put one on this little corner here i think we’re gonna just put a few little logs of sticking out something kind of like this And then just make it protrude underneath a bit like that as well i think that looks pretty good you can even go ahead and get your campfires out so if we grab our campfires now we can use these to look like um like little log piles Um but if you want to you can either throw a water bottle on it or you in 1.15 i believe you can actually use a shovel to put them out just place a few of them about maybe something like that one over here and then either frown Water bottle on them or use your shovel to go ahead and put them out something like that and i think that will do for the outside area like that i like to put a few little fl flower pots with some saplings inside i think it just looks pretty nice something kind Of like that there we go just a little bit of detail it’s not much but it does add a nice little bit of detail as you’re going around the build okay guys and i think that is just about it for the outside um other than that You just want to texture the build so i would go around maybe grab one block at a time get your stone first of all and just randomly place a bunch of them in like this just replacing some of that cobblestone this just gives it a nice bit of texture And just makes it look a little bit more worn down and works really well especially for a little sort of slum area if you’re trying to make a run down area this works really well so go ahead and just do something like this put in some stone first of all and then Add your stone bricks maybe even a bit of andesite um just to kind of texture it up a little bit uh just so that it doesn’t look so repetitive with the same sort of pattern all right guys once you’re done you should have something that looks a bit like this and what i Like to do is i like to keep the cobblestone towards the bottom and then the stone and the underside and sort of bricks kind of scattered towards the top a bit more something a bit like this i think it just gives a nice effect and sometimes just a little bit more extra Brick there just to break up some of that there we go just something like that you know any little spots that look a little bit too plain just add a brick in there to just add that little bit more detail and uh yeah that should be good Now as for the interior guys i will leave most of the interior for you guys to work out but i will show you how to do a nice little layout in here that will make it look a little bit nicer okay so from the inside guys first thing I would probably do would be break these five blocks across the corner here just like that and then i would probably run at the planks from here all the way across and join up to this side and then just put in another floor probably about here something like that And then just come around this side get your stairs and then run those all the way across to the corner there just like that um you can even actually join them up there and then put a full block in that corner there and then go ahead and put a A stair in that corner as well now don’t forget to add probably another lantern probably somewhere around the middle of the room like that to make it nice and bright in here and then you just need a stairway to get up to the top of floor so what we’re gonna do is We’ll leave this wall here we’ll use this one we’ll put a stair there then place an upside down stair behind it place a stair here oops like that and then one there you can break one two three up like that break the fourth one there we go and then underneath go ahead And place an upside down stair like this that gives us a nice little walkway up to the next floor up here i’ll probably go ahead and get some trapdoors and then we can just section off the stairway across the side here something like that that looks pretty good now i think Yes the brick is here so what we’re gonna do is we’re gonna leave one there the brick let’s make a little connection that comes down like that okay on the ground floor guys i will probably keep it simple here so first of all let’s get in a little fireplace so Where the window is up in the corner here let’s go ahead and put an upside down stair in front of it a normal stair there and then what we’re going to do where the corner is let’s go to the side we’ll put a stair there and a stair there Make sure they’re facing the wall and then a normal stair on top of it facing that way and one facing that way and then in the center let’s put a campfire and there we go we’ve got a really nice little fireplace in the corner there now other than that i think we could Just go two blocks here all the way across to make a little section for the wall and i think we put one block there and one block there to make it feel like there’s a little section to walk through i guess you could put a kitchen in here A little sitting room in here and then your bedroom upstairs go ahead and put in your chests or some storage or anything like that that you want um but i’m gonna leave the interior for you guys to decide on what you want to do with it Anyway guys that just about brings us to the end of the tutorial now i do have a bunch more builds in this same style plans very soon um my idea here is what i’m gonna start doing is i’m gonna make start making a bunch of small villages And what i’ll do is i’ll compile maybe sort of 10 to 15 houses all in a similar sort of style so they blend well together and then they’ll all be different shapes and sizes and stuff so that you could put them all into a village together and we’re going to Start doing something like that so we can create a little bit more of a variety of the style of builds so that everything ain’t the same that we’re building now i do still have a bunch more builds coming on the docks like i was speaking to before we started the tutorial guys And i’ve got the castle coming soon the church coming soon there’s so many new builds that are going to be coming to the channel and i’m going to try and start doing these on a daily basis um but there will be a chance i’ll see that It might not be every single day but my goal is to get a video out every single day at some point very soon um so hopefully that’s all gonna work out and go to plan guys um but for now we’re gonna wrap it up just there so as always thank you guys So much for watching if you did enjoy it don’t forget to smash that like button and if you’re new to the channel please consider subscribing just don’t forget to hit that bell so you get notified every time i post a new video but for now this is blue nerd signing out and i Will catch you guys in the next one Video Information
This video, titled ‘The EASIEST Minecraft Starter House – Smallest and Simplest’, was uploaded by BlueNerd on 2020-01-04 20:19:35. It has garnered 152190 views and 4475 likes. The duration of the video is 00:24:59 or 1499 seconds.
Welcome back to another minecraft build tutorial! Today I will show in minecraft how to build a survival house.
Today we are back in the docks working on some simple small house build. This build is a fairly simple build that use’s easy to gather materials such as stone bricks, cobblestone, stone, spruce planks and some other easy resources.
Thank you so much for watching, hopefully i’ll see you on the next episode!!
► Want more like this? See the playlist: https://www.youtube.com/playlist?list=PLKZ36uW8BdjhTh0iS5xWsyvJRXDzr2rye&playnext=1&index=1
► World Seed: -3818011030321027201 ► Coordinates: X= 2108 Z=1381
► Texture Pack (edited version of JermsyBoys pack): http://bluenerdminecraft.com/bluenerd-1-14-vanilla-plus-texture-pack-download/
#Minecraft #Tutorial #HowToBuild
*******************
Want More? Subscribe and Never Miss A Video ► https://www.youtube.com/channel/UC1ANc72wQdusmOHwOL1-93g?sub_confirmation=1
Connect With Me:
► Twitter: https://twitter.com/BlueNerdYT ► Discord: https://discord.gg/mmPqzEK ► Patreon : https://www.patreon.com/bluenerd
*******************
Intro/Outro Music By No Copyright Sounds ► Marin Hoxha – Endless