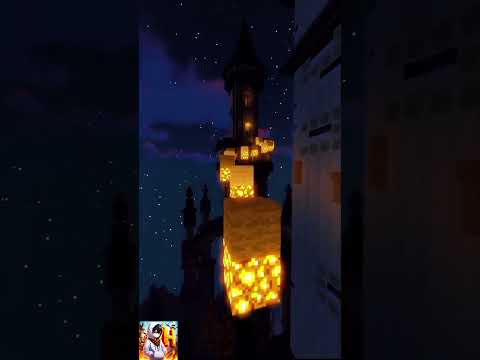
Hello everybody today I’m going to be going over five tips you can use to make your houses in Minecraft just look so much better and they really can just overall improve the quality of the build around you before we get into it if you aren’t subscribed already almost 98 of People who watch my videos are not subscribed so please make sure to hit that subscribe button down below and without further Ado let’s get into it tip number one I’m gonna have for you today is location location is one of the most important things when you’re choosing where to place your build and Depending on the kind of build you do you may want to change the location of it for example my house might not fit the best here because it’s just a plain empty backdrop behind me there’s no kind of trees to add around it to add any Kind of special detail to it but if you were doing something like a flower garden this might be the perfect area for you obviously you might want to add some extra decorations on top of this but it’s a great starting point for this example of a house I’m using you can Tell I definitely spent some time choosing the location in this you can actually go and see that in the first Long play I did where I built this house the original spawn for this was actually up over there where I was showing previously but I chose to move it down Here because it puts it closer to the river so I can build this nice Bridge there’s all sorts of other small details you can add it has the mountain as a backdrop and more trees I was able to put around it and obviously you’ll also Want to design the house to make it fit the location you’re wanting to put it in if you were to put something like a clay house right here it wouldn’t look as good as it would if you were doing it somewhere like a Savannah Biome you can also utilize the environment around you Using things like in this example a floating island and you can build the structure you’re wanting to do and integrate it into this area to just make it look even that much cooler tip number two I’m gonna have for you today is going to be the depth of your buildings This is another huge aspect that can just help your build stand out a little bit more this one does get talked about a lot and I just want to showcase that in this building and give you some specific examples so in this front entrance we have here we have lots of Different kinds of depth going on we have glass pains instead of blocks to add this little bit of inset we have these stairs and the corners sticking out a little bit of a ways giving it some extra depth we have different staircases placed in different orientations we have slabs with lanterns Attached to them giving all sorts of different crevices and Corners that you can look into and adds just that extra little bit of detail to your builds that can really help it pop a little bit more another trick I’m going to tie into this with a little bit is don’t neglect Certain sides of it just because you don’t see them as much this is the back side of my house I almost never walk behind here I always walk along the front but I still made sure to add a little bit of detail here especially with the depth I still added lanterns And lighting all the way around you don’t want to neglect one side of it just because it might not be the side you see as much so just take the time to add that little bit of detail around your entire building instead of just certain sides tip number three I’m gonna Have for you is texture and this is one that I only recently myself learned how to do a little bit better especially with building this house I learn learned a lot doing this so as you can see on these walls I’ve added lots of different textures I’ve used a combination of Smooth stone and a site Cobblestone and then along with that you have these strip logs that you can tell add a little bit of more wood texture to it and even make that stand out from the other wood in the area for example I use plane logs along the fence here all the Different fence textures as well as the plank textures on the stairs it just adds a little bit of variety but you want to make sure that the textures still go together you don’t want to have them Clash too much another thing with those textures is you’ll want to Randomize them a little bit add a little bit of variation as you can see I have a lot of cobblestone along here this was pretty much not intentional this was due to a lack of resources when I was building this in survival I should come Back in here and change this up a little bit but up on these walls you can see a lot of randomization you don’t be afraid to put the same block next to each other though you don’t want to have it be too random but you want to have almost like Patches a little bit you can see I have patches of smooth Stone here patches of cobblestone here there’s lots of different ways you can do this here’s another great way where you can achieve this randomization and still end up with some of those patches is you can create Sort of this array or pattern in your hot bar feel free to switch it up and don’t make it necessarily an exact pattern but you can just go along and you can kind of just scroll with your wheel as you place blocks and this kind of adds a little bit of randomization But because of that you’ll still end up with some patches of the same blocks and you can do things like this and you end up with these small patches of andesite here and lets you add lots of randomization with little to no effort alright moving on to tip number four is Going to be colors the big thing with colors is in making sure not to go too overboard and don’t add too many colors but you also definitely want to have a little bit of variety in there the easiest way to find things like this is you can Google something like Minecraft Color palettes and this will pop up with plenty of ideas for you in this example you can see I went with a pretty generic one of just wood and stone colors there’s even even a website called block palettes.com that I will link in the description for all of you guys and that Basically just gives you suggestions on different color palettes you can use for your builds depending on what kind of blocks you’re wanting to use and it just gives you ways to make it still look nice aesthetically without going too overboard and here’s a little bit of a preview of blockpallets.com as you can See they provide you with lots of different options you can see certain ones have staff picks you can go to featured palettes and it’ll show you the most popular ones or you can just click palettes and it will show you some overall ones if you wanted to use a Specific block let’s see you wanted to build something inside of a stronghold and you wanted to utilize the stone bricks in that area it gives you all sorts of options of color palettes that include stone bricks so you can include all of those into your build without it looking like it’s Clashing too much and before we get into the fifth and final tip I just want to give a huge shout out to you guys for getting me to 500 subscribers and if you want to see more videos like this which are a little bit different than the videos I’ve typically uploaded in the Past make sure to hit that like button so I know that this is something you guys are interested in learning alright our fifth and final tip for this video is going to be one that I don’t see seen talked about a lot but it’s something I absolutely encourage you to try doing And that is size and the thing with size is when you’re first learning how to build if you try to do something like a crazy megabase you’re going to lose motivation way faster because you aren’t comfortable with the basics of building in Minecraft and just to show you guys What I mean this is not one of my builds this is not something I personally would be even capable of doing at this point in my level of skill with building this is actually actually a map created by Leonard on Planet Minecraft and I will Link it down below if you guys want to check it out and see just how incredible this map is but just to show you guys there are so many different building techniques utilized here you can see the difference in color palettes with the blues and the Reds and the blacks all Coming together lots of depth lots of Minor Details that you need to be comfortable with on a smaller scale before you move into something this massive otherwise you’re going to lose motivation very very quickly my personal recommendation is you start with something small like the house I built In that survival world get comfortable with certain techniques get comfortable with color palettes fine color palettes you enjoy using and make sure to start small anyways guys I hope you enjoyed this video if you want to see more kind of like tips tricks hacks kinds of Videos like this make sure to let me know and leave a like down below so I know personally that this is something you want to see more of anyways guys I hope you enjoyed and I will see you in the next one oh okay Video Information
This video, titled ‘Top 5 Building Hacks to LEVEL UP Your Minecraft Builds!’, was uploaded by Straunge on 2023-08-16 00:42:46. It has garnered 413 views and 14 likes. The duration of the video is 00:08:02 or 482 seconds.
Hello everyone! In this video, we show off five different building techniques to improve your building skills!
–VIDEO LINKS– Block Palettes: https://www.blockpalettes.com/ Linard’s Megabuild: https://www.planetminecraft.com/project/100k-reddit-karma-special-build-creative-mega-base/ –VIDEO LINKS–
–––––––––––––––––––––––––––––– OKAY by 13ounce https://soundcloud.com/13ounce Creative Commons — Attribution-ShareAlike 3.0 Unported — CC BY-SA 3.0 Free Download / Stream: http://bit.ly/2BA9Npw Music promoted by Audio Library
• OKAY – 13ounce (No Cop… ––––––––––––––––––––––––––––––
If you like what you see, subscribe here for more!: https://bit.ly/3yRvRJV
Minecraft Version: 1.20 Running Fabric, Sodium, chocapic shaders, and many other performance-enhancing mods