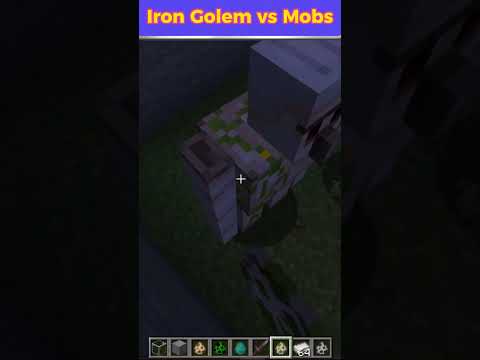
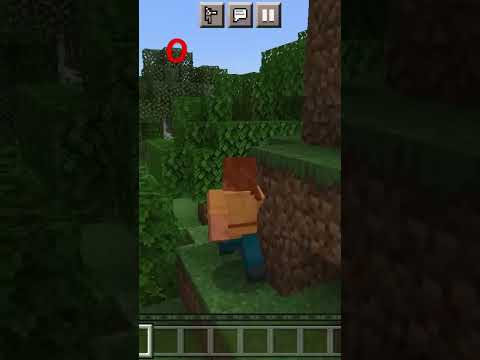
Hello everyone my name is pixariffs and welcome back to the minecraft survival guide this video will be separate from the main minecraft survival guide world and is intended to be a guide to video settings and accessibility settings in minecraft java edition i’ll do my best to explain what each setting does and in The case of video settings which ones you need to tweak if your computer is struggling and you want to improve minecraft’s performance without installing mods to help you with that this will also walk you through my preferred setup for playing minecraft although it’s worth noting i have a Fairly beefy pc at the time of this recording my pc specs can be found on the about page of my youtube channel for those who are curious and hopefully this video will answer any questions about the way i have minecraft configured which might come up over the course of The series of course if any changes happen with my setup in the near future like installing mods to optimize performance i’ll do my best to recap those and go over any extra options they provide so without further ado let’s open the options menu go to video settings and i’ll explain what’s going On here the full screen resolution is pretty self-explanatory i play on a 4k monitor and so the resolution is 3840×2160 at 60 frames per second you can drag this around and it will change the full screen resolution note that right now i’m playing minecraft in windowed mode But it’s filling up the entirety of my monitor so the resolution isn’t changing as i drag this slider around we can change between 30 frames and 60 frames but once again that’s only affected if you’re playing minecraft in full screen which you’ll notice right now i am not Biome blend is the area over which minecraft will smooth out the transitions between different colors of biomes this will be most noticeable when you have an overlap between different grass and leaf colors like here where we have a border between a savannah biome a plane’s biome and even a river biome Over here the other place you will notice these biome borders more significantly is in ocean biomes turning the biome blend off or setting it to a low value will show you obvious borders where the biome color changes note however that this doesn’t always give us The most exact border of a biome in some places like around here we’ll notice the savannah grass color is present on this block which is still within a plane’s biome as we can see from the f3 information there on the left hand side so in some places occasional blocks of One biome will take the colors of another to make the outlines feel more natural setting a higher biome blend value which goes all the way up to 15 by 15 smooths out this area to the point where all of these colors blend together in a much more smooth fashion the area That i feel benefits most from a higher biome blend value is the ocean where the borders can look a little obvious unless you have it set to a higher value and this can feel much more immersive to some players however i prefer to play on the normal 5×5 setting because spotting These boundaries between biomes can actually be very useful for gameplay later render distance is the radius in which the player can see around them this is measured in chunks which are a 16 by 16 area at lower render distances it can be easier to see these 16 by 16 Areas popping into view although minecraft will try to obscure this transition with a circular area of fog centered on the player while it’s nice to play on a higher render distance this is probably a setting you will want to adjust if your computer has a lower end Graphics card and is struggling for good fps performance i usually prefer to play it with a render distance of at least eight and typically i have it set to 16 so i can usually see into the next couple of biomes around me in my immediate area the maximum render Distance provided by vanilla minecraft is 32 at which point even my pc starts to chug a little bit simulation distance is the horizontal radius in which the game will update entities we’re gonna turn that way down for this example where the minimum is currently five chunks in layman’s terms this controls How far away an animal or monster can be before minecraft decides it’s a waste of resources and freezes it in place i’m going to increase my field of view to 30 so that we can see this a little bit more clearly and most mobs will stop walking around once they’re 32 blocks Away from the player but outside of the simulation distance their ai is completely switched off you’ll notice the pigs in the foreground over here are still within our simulation distance so they’re still turning around while the pigs cows and sheep behind are completely frozen and so mobs outside of Your simulation distance will have no activity whatsoever sheep will no longer try to eat grass villagers won’t use their workstations or socialize slimes will stop bouncing it even has some effect on whether or not water and lava will update and continue to flow if they started flowing before you moved away It’s important to note that hostile creatures can still spawn up to a radius of 128 blocks regardless of whether that’s inside or outside your simulation distance i tend to keep my render distance and my simulation distance at roughly the same value these values were only recently split for minecraft java Edition and before that render distance and simulation distance were the same thing so by force of habit i tend to keep these things roughly the same value graphics allows you to choose between fast fancy and fabulous along with a tool tip that explains in more detail what each of these settings does fast Graphics will remove the transparency from some blocks like leaves and reduces weather effects fancy allows for transparent leaves but will still reduce particles like weather and bubbles from rendering behind transparent blocks here’s a good example with the magma blocks we can see the bubbles on this side where there are no transparent Blocks but behind the glass the bubbles do not render until we look above setting graphics to fabulous will allow the game to draw effects like this through transparent blocks and also opens up some options for resource packs to control light bloom and a variety of other things but these can be more Resource intensive the chunk builder controls how the game renders the environment around you when you’re making changes to the world you won’t usually notice the difference but if you’re bothered by occasionally seeing through the world when you destroy a block and you’re happy to get occasional performance hitches to avoid that Consider switching this to semi-blocking or even fully blocking i personally have no problem leaving it on threaded smooth lighting toggles between three options off minimum and maximum this is sort of like biome blend but for light levels instead of biome area switching it off can improve performance but the game Will have a noticeable lack of shadows and when you move into darker areas you’ll notice the lighting appears very linear from block to block even setting this to minimum will look like a big change in quality and maximum allows for much more subtlety for the game’s overall approach to light and shadow V-sync is a common visual setting which caps the fps of the game to the refresh rate of your monitor it might not be possible to enable this if your monitor is older and doesn’t support it but most modern monitors do if you’ve noticed screen tearing happening while you’re playing minecraft enabling vsync could Fix this issue if you want to cap the fps manually consider adjusting the max frame rate slider typically the higher frame rates you can allow the better but even with 144hz display you won’t really notice the difference if you’re getting above 150 fps anyway i run my monitor at 60hz Because it’s a low end 4k panel and i’m only uploading to youtube at 60fps anyway so i’m seeing what you’re seeing call me a player if you like i’m perfectly happy with the quality from this point on most of the options are more about comfort and player preference Than they are about performance view bobbing adjusts whether you perceive a side to side wobble while your character is walking or sprinting switching this off will remove this effect making your movement feel like more of a glide i prefer to keep view bobbing enabled since it feels a little bit more natural To me but i know that some folks who are prone to nausea will prefer to switch this off your gui scale will affect how large or small the hud and the menus of the game look on a 4k monitor like mine setting this to 1 is absurdly tiny and 9 Is just in your face large this will also adjust the size of the f3 debug information so if you rely on that but you’re wondering why the text appears kind of huge or really small it’s probably just your gui scale making it look that way i usually prefer to have My gui scale set to 5 because that’s the point at which menus like this don’t have scroll bars attached to them but i might set my gui scale to 6 just for the purposes of easier visibility on smaller devices if you’re watching on a mobile device like a tablet or a phone the Attack indicator appears on screen when you’re attacking something and it represents the speed at which your next attack charges up a wooden axe or a stone axe will make this most noticeable if you want to try this out the attack indicator has three settings crosshair hotbar and off the crosshair indicator Appears below the plus in the center of the screen and a tiny pixel art rendering of a sword will slowly fill up once you swing disappearing when your next attack is fully charged the hotbar attack indicator does exactly the same thing but with a different graphic now Next to your hotbar switching the attack indicator off removes both of these but the height of the weapon in your hand will still indicate when it’s ready to do the most damage i prefer keeping this set to crosshair the graphic is only minimally intrusive and it allows you to Keep your eyes on the target when you’re attacking something and you can time your swings more effectively brightness is self-explanatory controlling how bright the game feels some people prefer to play on moody or on lower brightness levels to capture the vulnerable feeling of a survival experience but personally i prefer to Play on bright both for my own comfort level seeing the scenery around me and also for ease of viewing here on youtube since dark areas of footage tend to be ruined by video compression clouds can be set too fast which renders them in the sky as flat shapes fancy which gives Them more 3d volume or off i’ll probably go back and forth between these throughout the series but most of the time i play with clouds off because they will clip through taller terrain and builds which means you can suddenly find yourself in a cloud while exploring a Mountain cave or building a tall tower it gets kind of disorientating and switching them off also gives the game one less thing to render in game terms clouds do render at a height of 192 meaning it is perfectly possible to pass through the clouds or for the clouds to Pass through the terrain itself full screen is another pretty obvious setting here i mostly play in windowed mode but with the window taking up the full screen of my monitor and i do that so that i can tab out to click on recording software and other things but If you find that the resolution doesn’t quite match up with the size of your monitor you might want to switch full screen on particles is where these options dip back into things which affect both gameplay and performance particles include things like the colored swirls of a potion raindrops on The surface of water warning grains of gravel and sand indicating those blocks could fall on top of you the purple fuzz effects around an ender chest or a nether portal and so on and so forth i prefer to keep all of these effects on both for immersion and to signpost Things like a fish about to bite but switching these particles to minimal or decreased could improve performance for you if your computer is having a rough time mipmap levels are hard to describe in simple terms but it’s basically the amount of detail minecraft draws into a Scene at a distance or the amount of smoothing it does when those details look a little too harsh if we turn mipmap levels off completely and take a look at this jungle across an ocean you can kind of see what i mean the textures in the background get a little bit more Grainy and by turning midmap levels all the way up the whole picture looks a little bit smoother it’s not trying to render every single detail in the background and that lends to a more natural looking experience so i prefer to keep this as high as possible for better visual quality entity shadows Controls whether entities like mobs or dropped items will leave a shadow on the ground as we can see right here both the horse and the sand block have a circular shadow which if we turn entity shadows off are no longer present while the player won’t have a shadow in first person it Does include the player when you’re looking at yourself in third person it’s pretty simple really i prefer to keep this enabled because i’ve played this way for so long it looks weird without them and it has a fairly minimal impact on performance distortion effects and fov effects are things that we can cover Together they both affect the player’s field of view when certain things happen distortion applies a warping rippling effect when you step through a nether portal or get the nausea effect from eating a puffer fish fov effects stretch the field of view in different ways when you have the speed Status effect when the soul speed enchantment takes effect or when using a bow i prefer to set both of these relatively low for viewer comfort but not so low that they are gone entirely folks who are prone to motion sickness might want to switch these all the way Off entity distance controls how far away the game will render entities which includes mobs such as cows zombies or these pigs that are down here the bees in the background here are going to be a good example if i’ve got my fov set to 30 and i turn my entity distance all the Way down to 50 percent you’ll notice that i can’t see any of the bees anymore they’re all too far away for the entity distance to render if i set this to a hundred percent still not seeing any but one just popped into view in front of me And then disappeared again if i end up cranking this all the way up to 500 which is where i usually have it you can see lots of bees busying themselves about the trees in the distance it’s also worth noting that this doesn’t include blocks that don’t render in at Longer ranges like chests and banners those will still disappear at a certain distance regardless of how far your entity distance is set notice that the horse and the pigs in the background here were visible the entire time while the chest and the banners vanished you may want to configure this so that it Only renders entities which are within your simulation distance note that it only goes down as far as 50 percent which is a radius of about four chunks and it’s also worth noting that just because an entity isn’t rendered doesn’t mean it despawns from the world it just Means you can’t see it finally from our video settings screen the auto save indicator now lets you know when the game is auto saving which it does frequently in the background if you don’t want to be notified of this you can just switch this off when it’s Switched on the words now saving will appear in the bottom right hand corner now let’s go through the game’s accessibility settings which can be found through options accessibility settings the narrator is useful for blind or visually impaired players but i’ll let her explain narrator narrates all button left click to switch to narrator Narrates chat there are a few narrator settings which control which elements of the interface are narrated narrator narrates chat narrator narrates system button left click to switch to narrator off narrator off i’ll be switching the narrator off for my remaining videos but it’s worth knowing this option is there If you need it i play with subtitles on they take up a minimal amount of screen space in the lower right corner and for viewers who are deaf hearing impaired or have other auditory processing issues it can be useful to have a visual indicator of the sounds happening around you even For players who don’t require them for accessibility reasons subtitles can be a useful tool indicating the direction that a sound is coming from like water flowing which might indicate there is a cave nearby around here it allows you to still understand what’s happening in minecraft when there is background music People talking in the same room or any other noises which might make it harder to listen to these sound effects i sometimes play with the game volume turned down or i talk over the sounds in my videos so hopefully these subtitles make it easier to understand what i’m Reacting to in an episode of the minecraft survival guide the next five options all relate to chat readability allowing you to control where the text background appears along with the background and text opacity line spacing for ease of readability and chat delay so messages don’t scroll upwards before You have a chance to read them consider tweaking these settings if you aren’t a fast reader especially if you play on a multiplayer server after that we have auto jump which i have switched off this is useful for players with low manual dexterity or motor skill issues since The game will automatically jump for you when you’re approaching a block i know mobile players will also be used to the auto jump feature since it’s kind of useful for players who only have a touch screen to interface with the game i prefer not to rely on auto jump for this Since there are many other places in the game in which you’d want to jump which the game won’t do automatically and i find it much better controlling my jumps deliberately the next two options control whether your sneak and sprint controls are only active when you hold Down the button or if you press the button once to toggle them in the case of sprint even the default hold only requires you to tap the sprint key once but you will lose your sprint if you stop running or encounter an obstacle if you toggle sprint on it basically sets Sprint to your default movement speed but remember this will consume hunger at the same rate as sprinting does by default setting sneak to toggle can definitely give your pinky finger a rest if you’re bridging out over a wide area we covered distortion effects and field of view effects in the video settings Portion of this video but they appear here as well as accessibility settings and finally we have a couple of options for visually sensitive players the mojang studios logo on the starting screen can be switched to monochrome for people who find the default color scheme too bright and hide lightning flashes Will switch off the flashes in the sky when lightning bolts appear in game the bolts themselves will still happen but the sky will no longer flash white with these settings toggled on last of all i’m going to load up the options menu one more time and we’ll talk about field Of view which you know i was surprised isn’t in the video settings but it’s kind of nice to have it more accessible to players here the normal field of view is an angle of 70 degrees meaning that if you imagine a 360 degree circle around the player you see a 70 degree Angle on that circle from the left hand side of the screen to the right you’re getting a 70 degree angle of what you can see around the player adjusting this either tightens or widens that angle so if you zoom all the way in on the fov screen you’re only seeing a 30 degree Angle of that circle and i often find that it’s fun zooming in this way to either take screenshots of landmarks or builds or even just to get a quick look around if you don’t have a spyglass or a mod that allows you to zoom in like optifine but naturally setting your Field of view to a higher value like this can make it kind of difficult to interact with objects which are close up and so the normal field of view of 70 is usually pretty standard i honestly like to play the game on 80 a little bit better it gives me a slightly wider Field of view especially having been playing on a 4k monitor for a while i find this more comfortable and some people even like to stretch their field of view out to quake pro which honestly stretches the peripheral vision a little bit too far for me but that gives you an Angle of 110 degrees which means that you can see almost a third of the circular field of view around the player and once you go into third person you can see a whole lot more personally though running around with the field of view stretching like this Is a little bit too nauseating for me so personally i’m gonna switch that down to 80 and keep it there for the remainder of the series except in cases where i want to zoom in on stuff to take screenshots like this but that is going to be it for this video on video Settings and accessibility settings i hope you’ve enjoyed this video i hope it’s given you a good look at the video settings and explained some of the ones that seemed unfamiliar to you and hopefully you’ll be able to use this as a guide to setting up your own minecraft Experience if it’s your first time doing that as usual you can leave questions about this video in the comments section and either i or somebody from the community will hopefully be able to answer them for you but of course we’re going to be touching on some of this Stuff as we go throughout the series so if you didn’t see something covered in this video don’t worry we’ll probably get to it in the minecraft survival guide itself for now that’s gonna be it from me thank you so much for watching this video my name has been pixel riffs Please don’t forget to leave a like on this video if you enjoyed it subscribe if you want to see more and i will see you guys soon take care bye for now you Video Information
This video, titled ‘Video Settings & Accessibility! ▫ Minecraft Survival Guide (Tutorial) ▫ Caves & Cliffs Update 1.18’, was uploaded by Pixlriffs on 2021-12-02 11:00:15. It has garnered 209239 views and 6886 likes. The duration of the video is 00:20:51 or 1251 seconds.
The Minecraft Survival Guide is back for 1.18! This video is a reference guide to Minecraft’s Video Settings and Accessibility Settings, with explanations of graphics settings and how they can impact performance. If you aren’t sure how to set up Java Minecraft for the best possible experience, this video will help you out!
If there are any other settings you aren’t sure about, they’ll probably come up during the main series itself – but if you have any questions, feel free to ask in the comments!
Season 2 of the Minecraft Survival Guide will teach you how to master Survival Mode in Minecraft 1.18 and beyond!
Follow the Season 2 playlist here: https://www.youtube.com/watch?v=u7lE0MG80qw&list=PLgENJ0iY3XBjpNDm056_NSPhIntVMG0P8 —-
Watch my streams live every Tuesday, Thursday, and Sunday around 3pm UK Time! http://twitch.tv/pixlriffs Follow Pix on Twitter for video updates, screenshots, and other fun stuff! http://www.twitter.com/pixlriffs
GNU Paranor001
#Minecraft #Survival #Tutorial #SurvivalGuide #Settings