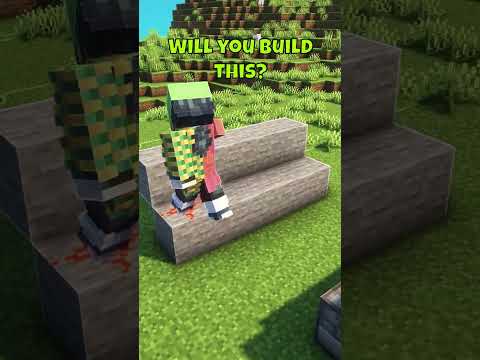
All right this is uncle Jam back at it with another resource pack video this video we are going to be going over some custom color options provided to us by Optifine it’s going to be a quick one I just wanted to show you guys that these Options are there so as you can see the mycelium particles are displaying some rainbow colors my sign text here is actually a brown tinge which I changed and the redstone is yellow as well as we have different colored stems for our pumpkin and melon stems you can also Change the XP particles as you can see I’ve tried to make them a bit of a rainbow effect and many other options within this video as well as the XP level indicator as you can see is blue online so yeah we’ll cover all of these in this video so let’s get into it Alright so let’s get into it so there’s two types of cuts from colors you can add into the game you can add in ones which just require an image or a color map file and you can add in ones that are coded in in color dot properties so You’ll see I have two images representing both of those options and to start off I think we will go over the ones with the custom color map because those are the most confusing ones so what we need to do is head into our resource pack folder if you don’t know How to get here check out episode 1 in my resource pack series head into assets into minecraft and now you need a folder within here entitled MC patcher as you can see I have one already created if you don’t have one just right-click and create a new folder called MC patcher no Capitals or spaces let’s head inside and within this folder we need a new folder these three are from previous episodes so we can ignore those and we need a folder entitled color map now if you watch the past episodes you’ll be familiar with this folder however let’s Head inside now within this color map folder is where we want to install all of our custom color map for these various features in the game so they each have different dimensions so I’ll pull those up on the screen right next to them so you can see the Dimensions required by those color maps so let’s start off with demonstrating say the redstone dot PNG so we see it requires a sixteen by one document so let’s open up Pixelmator and we’re going to just create a new document with sixteen by one as the dimensions in Terms of pixels and there we go we get a tiny little strip and now basically with the redstone image zero at this end is when it is all the way off and sixteen is when it is fully powered or 50 because redstone powers up to fifteen Blocks so we can grab our color tool here our pixel tool and select a color we want redstone to be so I’m going to do green so we’ll start off with green and slowly we just want to make sure it gets dimmer as it goes down the line Here so let me do that and I’ll get back to you okay so now what we want to do is export our image so let’s head over to export we want to make sure we select PNG file and we want the name to be the exact same as I have written on the Image there so in this case it’s redstone if you are doing those other stems or the lava drops or mycelium particles and things like that you make sure the name is the exact same as I have written and we click Save there we go we’ll see it appear on the desktop And now let’s install it into our color map folder simple as that now the color of redstone will change so that’s pretty simple in terms of installing those various color Maps just follow the dimensions and install them right into this folder now there’s a couple little Tricks with a couple of these that I want to show you so I’ll show you really quickly for the mycelium particle color map it’s going to choose a particle at random from your image so if we did a rainbow kind of color map here we might see a rainbow effect on our mycelium Particles so let’s try this one out for the mycelium a durability color map you want to make sure the right-hand side is full durability and the left-hand side is going to be when the durability is down so keep that in mind when you’re making your color mount right-hand side is full durability Left-hand side is when the durability is just about to die and create your color map based on that once again I’m just going to throw in another gradient here and we will do a red ish gradient so we’ll say dark red is full and light red Is going to die alright and for the XP orb this is a bit of a tricky one because the XP orb what it’s going to do is it’s going to take this image it’s going to start at the coordinates of 0 0 on the image and it’s going to move in a Sinusoidal pattern a sine wave if you took math in school you should know what a sine wave is so now to create this image you have to cater to that property that it’s going to do a sine wave pattern so let’s try this one out I’m Not fully sure how exactly to get it to line up but I will try my best and we’ll see what happens in game here’s the color map that I’m going to try out in the game so hopefully the XP orb will pulse through these various colors here And we will see if that happens so I’m going to save my document and that’s it and we’ll try these out in-game alright so here we are back in game and we can see the Redstone once again as change colors to the green just like we specified we can see the mycelium Particles are working by randomly selecting the color from our rainbow grid and we can see our durability on our sword here which is red even though it’s full and that’s because we changed it now let’s test out the XP which I’m a little bit unsure about what it’s going To look like and as we can see it’s definitely blinking custom colors through that color map that we specified now it is going a little bit fast and so I can show you in this next properties file we’re going to cover how to slow down this blinking image so let’s move On to our next options so here I am back in my color map folder now let me just show you how to add in a bunch more of color options into the game so if we back out of our color map folder back into the MC patcher folder and we create A new document within here a text document I’m going to use TextEdit on Mac on Windows you can use notepad we make this a plain text and if you’re on a Mac change the encoding and open and save to western windows latin-1 now this document we can specify tons of Options and if you check the link in the description below you will see all of the options that you can put in this document I will not cover them all because there are tons however you can see my image on the side has some general colors that you can specify Starting off with lily pad so how you edit these colors in this document is you type say we were doing lily pad lily pad equals now it needs a color value now you may be thinking how do i specify a color with just text well you have to Use actually a color code now in order to find that color code there will be a site online you can check out in the description or most image editing software’s allow you to actually view color codes rate in the colors palette so on my image editing software all I Have to do is click this little hashtag and you can see this is the color value that we have selected so if I change the color here we’ll see the color value actually changes this is a color code so let’s select what color we want our lily Pads to be so for visual purposes let’s make them red so we’ll come over here we’ll grab our color code we’re going to copy it head into our document and paste it right there so that’s how you edit colors in this document now as you can see all the options in the properties File on the side all you do is you type in those various options and then you would apply a color value now i really suggest if you’re going to do this method to check out the link in the description below it will show you all of the options you can use and it Specifically how to refer to say each potion or each monster egg or each map block and everything like that I just did this to show you guys that this is possible so let’s do a couple more of the text options here so I will do the XP bar text There we go and we’ll get a new color code come in here and we’ll say we’ll change it to white come back here and we’ll just grab the color code there we go and let’s do that’s probably good for now now as you can see there’s also a Some other options you can specify within this file one of them being the XP or time now make sure you write everything exactly as I have written so there has to be a dot in between there now this XP time allows you to customize the pulse of the XP orb now the default Value for this is 628 now that is referring to milliseconds so that is why this is going so fast so if we doubled that or triple that to 24,000 2400 sorry we can we should be able to see a difference in the speed of the XP or Pulse so these are just my demos that I’m going to use and once again use those properties on the side check that link in below to see all of the color options you can use in this document these are just some examples to show you How to do it so next we need to save our document this is a crucial part we need to call it color dot properties there we go make sure our encoding is Western Windows latin-1 and click Save now we need to install this into our MC patcher Folder key right in the MC patcher folder drop it in there and let’s head in game and reload our pack so here I am back in game and you can see I’ve reloaded my pack and we have the lily pads showing up as red and if I go into Survival mode we’ll see my XP number is white 31 in white now let’s check out these experience orbs and see how they changed now as you can see it doesn’t look like there is much difference so let me try adjusting the value and see if we can Get a difference to show up all right so I’ve adjusted the value in my document and as you can see they are pulsing way slower way nicer we can clearly see all those colors and it’s a really cool effect now let me just show you what Values I set here to get this pulse speed what I did was I changed the value of the XP orb time to 24,000 this time so it’s a way slower than usual so that covers basically all of the custom color options you can do in the game now I Know that I didn’t go in depth however if you check out that document below and also use these methods of grabbing the color codes and applying them into there you should be able to create all of those custom color options on the document now if you have any questions About these make sure you leave them below and I will try to get back to you so have a good day You Video Information
This video, titled ‘Minecraft – Change Hardcoded Colors! (Resource Pack Tutorial)’, was uploaded by Uncle Jam on 2017-04-10 15:26:30. It has garnered 50789 views and 961 likes. The duration of the video is 00:12:15 or 735 seconds.
This video will show you how to create custom colors for colors that are hardcoded into the game files. (Requires Optifine) See more below
➤Required Programs For This Video – An image editing software that can export to png format – A text editing software that can edit in plain text (Mac – textedit, Windows – notepad) -Optifine for Minecraft: https://optifine.net/home
➤Locating Minecraft Game Directory – Go into launcher and head to your current version and click “go to folder” – Mac: ~/Library/Application Support/minecraft – Windows: %appdata%.minecraft – Linux: ~/.minecraft
➤Useful Links – Page with all of the color options: https://github.com/sp614x/optifine/blob/master/OptiFineDoc/doc/color.properties – Color codes: http://html-color-codes.info/ – Wiki page for creating resource packs: http://minecraft.gamepedia.com/Tutorials/Creating_a_resource_pack
➤Other Info – Reminder this method requires Optifine to see
➤Music is created by me Uncle Jam