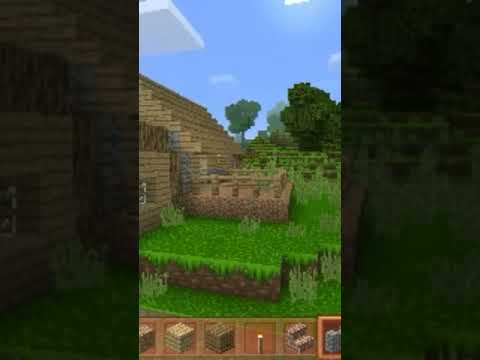
To all the geeks and nerds out there welcome back to another episode of simply minecraft this is a series where each episode we take a look at the game and see if we can do things as simple as we can now this episode is going to be a little Bit different we’re not going to actually build anything in the world at all in fact we’re going to do something a bit yeah a little bit interesting so uh in the last few episodes i’ve been using various mods to show you different aspects of the game And i get a lot of questions about what mods do i have how do i use them all that kind of stuff so today i’m going to show you how to install two of my most favorite mods and i’m going to show you a couple of basic things you can do with them That are super super useful even for beginning players it’s really useful indeed so stick around if you want to learn how to do that stuff and we’ll get right into it the two mods we’re going to look at today are mini hud and also light Matica now let me show you a quick demo of each one of those so you can see the kind of things you that we can do with them and then we’ll get into a bit more detail show you how to install them how to set them up How to configure them and a bit more of a bit more information about how i use them as well so first of all let’s talk about mini hud so to give you a quick demo of a few of the features um i can press a hotkey which is the h Key once it’s installed and you can show your own customizable debug screen so we can show this kind of nice clean screen you can you can configure this to have the information that you want make it as big or as small as you like you can reorder the lines all that kind Of stuff we’ll show i’ll show you that a bit more detail later on uh but that’s the first thing you can do this is this is like a replacement for the standard the standard f3 key if i press f3 there’s a whole bunch of information here and A lot of it you don’t even need it kind of gets in the way so instead of having this we can turn this off and we can use mini hud and just have this so this is good because if you just want to have just like the coordinates for example in the corner Also which way you’re facing as i’ve got here and also i’ve got another thing and i’ve got another configuration where if i get close enough to a block it will show me what block i’m looking at in terms of the coordinates so this is always super useful And you can add more lines to this for more things which we’ll show you in a second the other thing you can do with mini hud is you can show the the the despawn sphere which is the sphere which is a hundred which has a radius of 128 blocks away From the player so if i’m standing here i can press another hotkey this one right here i’ve got configured and this shows you the sphere so this one i’ve shown uh before a couple of times and this is useful so if you’re designing a farm you can see exactly how far away mobs Are going to spawn and you can you know do what do you need to do to spawn proof the right area that all that kind of stuff so this is also super useful so and the other thing is that there’s two more things i want to Show you there’s more to this mod than just the things we’re going to show you today i’m just going to show you like some of the things that i like to use and then you can explore a bit more for yourself but the other thing is it’s got shulker Box viewer installed so if i just hover over the shulker box you can see the contents of it so i don’t have to put it down on the ground and open up you can just hover over this and and see it the other thing which is also super cool let’s turn off the Sphere just like that the other thing that is super cool is you can see the light levels so if i press my other hotkey you can see that uh it shows you the the light level uh this this is the block light level so this is uh Light that is emitting from blocks so if i was to put a torch down you can see the numbers here so this is also good when you’re designing farms in creative especially this is good so you know that you’re lighting up all the area and you don’t have any spots that uh you Know mobs bobs couldn’t there was gonna spawn in so that is also super useful as well all right so that is mini hud a quick whistle top tour of some of the things you could do with it now there is a lot more to it than that The next one i want to talk about is lightmatica and that is super cool what do i use lightmatica for well in this series we use it for showing the material list so i’ve got it installed of course and if i press the m key i get the litematica menus right here And to show you um show you the material list i click on this load schematics and i’ve got a schematic here um in my list so when you when you create a whole bunch of schematics you’ll have a whole list of them in here and i’ll show you how to create those Uh in a little bit so you click on the schematic that you’re interested in and then there’s this materialist button right here click on that and there are all the materials to build the iron farm so this is the iphone that we built a few episodes ago if you’re interested in that But yeah here is uh basically how i do it so i’ll just show this up and then it gives you an accurate um list of all the materials and of course all the numbers you need exactly now these numbers mean something slightly different so this first number That’s the no the total number that you need uh of this particular item to build whatever this schematic is for and then missing that is the number of blocks that aren’t placed in the world yet in the right place we’ll come on to this in a bit more detail About what that means later on and then available this is how many of that item you’ve got in in your inventory so if i was to come out of this go into the inventory and if i uh if i find some glass so it’s a that’s fine get myself let’s Give myself three stacks of glass and then we go back to back to the material list just like that you can see now i’ve got i’ve got to 190 192 of the white stained glass i’ve got plenty goes green so uh yeah we’re so we’re all good to go So this this number here goes orange that means uh these are these these items aren’t placed in the world in the right place yet but i do have them so yeah we’re all good so obviously here is this is super useful for when you’re building up your farms but i guess so This question is how do we create one of these one of these schematics so when i go here to this list how do we create our own in here well let me show you and in fact what we’ll do is let’s okay let’s create a schematic Of for one of the buildings over here in the village and so for this series what i’ve been doing is in creative i’ve been designing the various farms that we’ve we’ve been showing off and then when i get to a point where i think that they’re right to show then i create a Creative schematic of it and then show you the material that’s in the world so let me show you uh creating a schematic so let’s imagine we’re going to create a schematic of this church right here so this may be something you designed in creative and you want to create a schematic of it So what we need to do is there’s various ways to do this i’m going to show you just a simple way to do it um so we what we need to do is we need to basically select this uh select all of these blocks and the way to do that is Or a simple way to do that at least is to put a block down which is uh one corner of the blocks you want to you want to select and then place a block diagonally opposite it uh over here so that would be if you’re trying to line this up so that the Structure comes out here so let’s do it there so that lines up with that and then over here it comes out one more block so let’s put that here so this this block here is one corner that’s there let’s check the other one is that in the right place yeah that looks good Okay then you get yourself a stick and as you can see in the bottom bottom left-hand corner uh we’re in we’re in the corner mode and we are in area selection so if we go back to our go to our menu what you need to do is If we do area selection mode make sure that is clicked onto simple and we want to make sure our on our our tool mode over here is on area selection you can click this there’s a whole bunch of different modes we’re not going to go into much of that detail today but Area selection is the one you want right there and then what you do then is we right click one of these blocks and then go over to the next one and then left click this one and then as you can see it draws this box around all of these uh all of these Blocks right here so then what you can do is get rid of these temporary blocks if they’re not part of your part of your structure that you want to actually copy or create a schematic for and then you click on nm the end menu then go to your area editor So we’ve just we’ve just created a selection area right there and then we can name this area so let’s just call this let’s call this a church and then you press set just like that and then we can save schematic so you do that then you could just confirm the Name schematic you want there press save and now it’s in your list so now if we come right out of this we can go to load schematics here’s our church we’ve just created click on that and then click on the the material list and there we go Here are all the materials you need to create a church not too bad huh all right so that is pretty cool now there is a lot more to like matica than just the material list because what we can do now is we can place a copy of this like a Hologram of this somewhere else in the world and it will help us build it up so there is our church with the selection box around it but what if you want to build a second church exactly the same as that well we can use our schematic we’ve created So let’s imagine we want to build it over here let’s go to our lightmatic menu and let’s go to load schematics let’s click on the church and let’s play load schematic so now it’s loaded into the world and it’s right here but as you can see It’s not really here i can go right through it this is like a hologram of all the blocks that need to be placed now it’s kind of off the ground and not really where i want it so the first thing we can do is we can maneuver this And place it exactly we want it first of all so let me show you that if i press m and then you can go to your placements so this this hologram that’s known as a placement so you go to like schematic placements and you can see we’ve got our church here We can click on configure and these coordinates here this is where the uh where the where that that kind of hologram that that schematic is in the world and now what we can do is we can change these numbers so you can click click on These to go up and down so if you left click or right click uh left click goes up and then right click goes down so you can do that for all of the all of the axis to maneuver it exactly where you want now if you want to do that a little bit Quicker what you can do is hover your mouse over this button and use your scroll wheel so if i just grab my wheels like this and then you can very easily maneuver this where you want it so let’s uh let’s do this let’s put it i guess let’s put it there That’s probably okay and then when you’re when you’re done you can just press escape come out of here and now you’ve got to you’ve got your got your automatic here in the world and then it’s just a case of making sure you’ve got your blocks on you and then So we need to get rid of some of these blocks now if you place down the wrong block so if i put a grass block here where this stone block is this cobblestone is you can see that kind of goes like a red colour kind of tints it all red that means it’s The wrong block so let’s take that out if i uh use the cobblestone block it places it that that so this gives you a guide of exactly how to build a church just like this so here you can see there’s a piece of grass there that’s kind of red that’s wrong So you can kind of get rid of that and then what you can do as well is you can use pick block so as long as you’ve got the blocks in your inventory you can kind of uh uh hover on on the on that block then press your mouse wheel that will Select the block as long as you’ve got it in your inventory and then you can place it so that makes it super easy to place these things now a couple of things here so you can see we’ve got some other colors here we’ve got this kind of pinky color That means that this is normally an air block but there’s a block in there so if you just remove that it changes that color back again the red ones we’ve already seen that’s the wrong block in the wrong place the next one you’ve seen here is this one this kind of orangey color That means you’ve got the right block there but it’s in the wrong state now what you’ll find here is when we place uh these walls net this uh these blocks next to the wall here it will change and now that is correct so now you can use this to Build your build your church up and it’s pretty straightforward so this is really cool if you design uh some of your farms or some of your contraptions or whatever it might be even even creative builds um you can design them up in creative first of all when you’ve got full freedom Then you can create a schematic of it you’ve got the full material list and then when you’re in survival you can plop down a schematic of it like this and then rebuild it and it’s nice and easy you know i mean if this all this really Does is it sort of saves you have to have like a copy of the world open on another screen where you can sort of copy backwards and forwards or have screenshots that kind of thing just places it in the world to make it much more convenient so this is super cool now I think what we’ll do next is i think we should uh show you how to install these things so you’re ready to go and then after that i’ll show you a few more things you can do with them and yeah it’ll be super cool so how do We go about installing these mods well the first thing we need to do is install a mod loader called fabric so if you go to fabricmc.net there’ll be a link in the description if you come here and then click on the use menu up here you’ll come to this This this screen that tells you how to install so basically if you’re on windows then click on this one here the download the windows exe that’s the installer if you’re on a mac or linux you can use the universal one this one also works on windows but it’s probably easier just use the Usually this one so you click on this and it will download and you can see it’s down there in my bar and then once it’s downloaded just click on it and it will run once it’s started up you’ll see this window appear and it will ask you what version of Minecraft you’re installing for so it will default to the latest version so 1.16.3 is the latest version you can even uh tick this box to see snapshots so if you’re designing stuff in snapshots and whatnot but uh i guess most people you’ll just be using the latest version of minecraft And then all you’ve got to do is uh this uh crate uh profile just keep that to keep that ticked and make sure this uh this installation folder is correct it should it should pick it all up automatically so you shouldn’t need to do anything else and then just click install And that will install a brand new uh profile in your in your launcher so now we can click ok for that and then we can close this window down if you then open your minecraft launcher you will see that you’ve got a brand new a brand new installation right here a Brand new profile fabric loader 1.16.3 has been installed now if you want to see this if you go to your installations list it will be here now i’ve got a whole bunch of installations here for various things i’ve been i’ve been working on but yeah you’ll get this new one here up here Fabric loader 116.3 so this is the one you need to make sure you select so you can change which one you’re playing just here so make sure that one’s selected and then you can press play to play your world and now with the game all loaded up you Can see in the bottom left-hand corner here we are playing minecraft 1.16.3 fabric modded now with the fabric loader that won’t change anything about the game at all so this is although it’s modded at this stage nothing has been changed the game is still running and it’s kind of vanilla default fashion So nothing’s changed but now what we’re going to do now is we’re going to download our mods and we’re going to get them installed and so the next job is to download the mods we want so the first mod is mini hud so i’ll put a link in the description But this is the the mini hud page on course forge and you can see here we’ve got the uh in the description we’ve got a bunch of information here about the mod uh some of its key features and whatnot some extra information but to download it what you need to do is go To the files tab right here and then look down here for the the version of the game that you’re interested in so we’re interested in 1.16.3 and then you just click the download button and it will download and then depending on what browser you’ve got you might get this kind of a Security warning that’s fine just so press keep or whatever it is on your particular browser and that that is the mod downloaded ready to go the next mod we’re going to look at is lightmatika so again again on courseforge and there’ll be a link in the description go to the files tab And again download the mod that is for your your version of the game so 1.16.3 is the one we’re interested in so click the download button that goes down and again keep press keep to do that of course on the description tab as well for like mataka there’ll be a bunch of Information so i recommend looking at that to help you along um but i’m just going to kind of come over this kind of quickly now these two mods are made by the same author and he is a guy called masa and he is part of the cycraft server And on the sidecraft discord they have a channel dedicated to support uh for these uh for master’s mods he’s got some other models mother some other mods as well that are super good so yeah i recommend if you uh if you need some help then get on over to the sidecraft discord And check out that channel now because these two mods are by the same author some of the common functions they have are in a separate mod to keep things a bit easier so you need to down that mod you need to download that mod as well So that one is over here again on course forge and as as and of course there’ll be links in the description so this is a masters lite mod library so if you go to the files tab again just like we did before and download this one for 1.16.3 Press the download as before so now we should have three mods downloaded in our downloads folder so how do we install them in the game well i’ll show you that next and now for installation so over here on the right hand side we have my downloads Folder and here are the three mods that we downloaded uh just here these are all ends in jar they’re they’re they’re the mods and over on this side i’ve got my my minecraft world folder so here you can see how i have my saves in here i’ve got My screenshots and in the same the same place i’ve also got a folder here called mods now that folder was created once i started up my game now these these mods when you drag them in they won’t affect the game so you need to close your minecraft Game down so close close also it’s not running and then we’ve got this mods folder so if you double click on that we’ve got this this is empty by default of course so we grab our three mods drag them into here so now all we’ve got to do now is Restart our game and they should be loaded so i’ve started up my game and as you can see we’re now in one point sixteen point three we were in one point sixteen point two previously and as you can see now we’re here and we’ve got uh got light mattica installed so you Can see the see the hologram from before that we used and also we’ve got mini hud so let’s turn off our default f3 there’s press h which is the uh the the key four key for uh key for mini hud and there you can see that is working as well so that’s How you download and install these mods now the next thing i want to talk about is give you an um an overview of how to use these in a bit more detail so let’s look at mini hud first of all so how do we use and configure mini hud Well i’ve already said that the h key is the one that’s going to show and hide the overlay but if you pre if you hold down h and press c by default that will show you uh the mini hud config so there’s lots of options here along the top And each of these pages has a bunch of controls now i’m just going to go over this super quickly and i recommend getting this installed and playing around with it for yourself so the first tab here is generic this is uh all about all the basic uh features That you can either enable or disable so if i uh scroll down this list you’ll see uh which which ones there are so for example we’ve got um we’ve got the shulker box preview which is down here sugar box preview you can see i’ve got that turned on so If you don’t like that feature you can turn it off uh you could also change the background color that kind of thing so there’s lots of features here so this is basically how you turn on and off all of the features of mini hud now obviously down here as well here is The control for showing this show in the screen so h and c and then also if we scroll down here as well you get other configurations down here for example the font size so by default when you first start mini hud uh your your your display font is much smaller so while you’ve Used this number to get it much higher now with all of these screens up here there is this search box as well so you click on the search here and you can now search for anything you like so if i search for a font you can see We get uh back to this control here so it filters down what you’re looking for and that is that is available on all of these screens so the next one pretty self-explanatory is colors so all the different things in there in really hud that it draws on The screen for you you can control all the colors if you don’t like the defaults and also here info toggles this this is the list of items that you can have on your debug screen so you can see most of these are false i’ve turned them all off by default most Of them but you can see here we’ve got coordinates is on i’ve got the uh info facings that’s the direction we’re facing got that turned on and i’ve also got turned on the looking at block so there’s a bunch of stuff you can turn on here So you can turn on other things like if you want to show your fps there’s also things like a clock so if i go to the search and talk and type in time we can see we’ve got info time irl so i can turn that on for example And if we come back out of here and if i press h you can see now we’ve got uh the date and time uh where i’m actually recording this right now it’s pretty late it’s almost midnight but yeah that is that so let’s get back onto the uh back onto the menu And yeah so that’s how you turn on and off all of the features you want on your debug screen and then you can use this next tab the info line order to control in which order they come so there’s a bunch of numbers here and basically the the this is the line The line order they’ll be in so if you want to move things around just change these numbers and you can you can change the order so the lower the number the higher up in the list they will be the next thing over here is uh some Some hotkeys you can set for each of those line items so normally i mean a person i don’t use this but you can set set some hotkeys here if you want to show and hide those as you play structures over here this will show you this will give you a Bounding box of all of these different structures in the world so at the moment i’ve got them all turned off but let’s say for example went to a bastion remnant we can turn this on that will give us the the the the bounding box of it you can see here we’ve got tool Tips for all of these things so it explains what all of these things do you know if you’re not sure also if you scroll down in this list there’s also some hotkeys down here so you can show and hide those things for a hotkey which is also super Useful so well worth looking at now the next one rendered hotkeys this again is as the name implies it’s all about some hotkeys to show and hide different things in the world so you can see here we showed showed earlier the light level so i’ve got that Set up on the o key so if i press o once mini hud is is on then it will show that so if i uh let me just show you that so i’m here if i press h so that disappears if i now press o you can see the overlay comes on says It’s on but actually i’m not seeing anything that’s because uh the debug screen isn’t on so press h to get the debug screen then if i press o then this comes on so that’s what you need to need to make sure you do on that front so there you go you can Control all of the different features here in terms of their terms of the hotkey and the last one over here is shapes and that one is controlled by this shape render hotkey over here which is you on my my system now this is how you this is how you see The the the despawn sphere so here we can drop this box down and there’s a few different shapes here so the most interesting one is this one debug despawn sphere this is the sphere that’s got a radius of 128 blocks there’s other spheres here that are interesting for the game But this is probably the one you’ll use most most often so click on that and then click add shape and then you get this line here you can now configure it so this is the center point here of the of that sphere you can move this Around if you want to or if you move around as a player you can then press set here and that will move it to wherever you are and of course you can change the color as well if you want to so that is all good so now if i enable This and then come out you can see that the the spawn sphere isn’t here but if i now press the u key it now displays the sphere so there it is so this is a this is a great way to work out where your afk spot is uh in your Farms you can move you can go up and then make sure this is all in the right place so that is mini hud in a nutshell and obviously there’s a lot to it so i recommend downloading it giving it a try and then yeah seeing what you think next Up let’s look at light mataga so here we have our church from before and i’ve taken away the blocks that i placed earlier so you can see here we just have the placement uh in the world so a couple of things now to kind of help you uh when it comes to Using these these schematics in your world so the first thing is if you want to get to the get to the just the the normal menu press the m key uh we’ve kind of talked about that before now if you want to get to your list of placements there’s a shortcut For that so if you hold down m and press p you’ll get straight to your placements now one thing we could do on this screen we went to the into the configure menu uh previously but if you press uh the placements here you can toggle it on and off So that just kind of shows shows or hides that placement so that can be super useful you know as you’re building stuff through the next thing you could do here’s on the configure menu obviously we’ve already talked about moving it around using using the coordinates over here A couple of things to mention here is you can rotate it as well which is sometimes useful i know sometimes i’ve designed stuff in creative and then want to build it in in the in the real world and actually i’ll build it in the wrong rotation so You can use that here you can also mirror it as well and also you get access to the material list from the placement as well now we’ll talk about the verifier shortly but that is a very powerful tool which we’ll come back to in a bit but next i think it’s worth Talking about how to configure like matica so if you go to the main la matica menu we’ve got this configuration menu right here and there’s a shortcut for that it’s m and c uh that will take you here now just like with uh with the mini hud there is lots and Lots of options with these over here i’m not going to go through all of these here but basically pretty much the same as before there’s a search option here to search for the things you want and then you’ve got all these all these features you can either turn on and off And then you get various configurations of how you want things uh configured and laid out so the the the cool one that i would like to show you now is this render layers so at the moment by default it’s render all so we can see the whole of the Of the uh the placement but we can change this to be just one particular layer so if you go to single layer and then this is the the y level that’s going to show and as you can see and now it’s only showing this y level Just here so this is really good uh when you’re building this up so if you just show one layer you can then start building this you can see all the blocks for this layer but you can place them all down just like this and then when you want to Do the next block there is a shortcut you can set up so i’ve got mine set up as a command and up arrow so that shows me the next layer so once you’ve done the first layer you can then work up then do the next layer obviously i’ll Place the wrong blocks there but i can do i can do that and then you can press that again so you can slowly work up the layers and build up your build up your your construction of whatever it might be now if you can if you have a look over on the uh The top right hand corner you can see here as i hover over this block here it tells you what it is so this is cobblestone and if i go over this one here you can see this is glass and it gives you the other all the other information like the Orientation or the kind of all the states it might be now if i place down an incorrect block so let’s go down to the bottom layer right here you can see this is a this block here is shown as mostly cobble but if i put a cobblestone block Here obviously it goes red but also in the top there it says uh it says the schematic is mostly cobble but the clients that’s the block we’ve actually placed is a cobblestone so that’s uh really useful information uh when it comes to building this up all right so That is really cool now the next thing is to talk about the verifier so here what i’ve done is i’ve completed the build i’ve filled in all the blocks and everything is now right and correct now this is particularly interesting when it comes to maybe more complex designs So things that might have a lot of redstone like when you’ve got a lot of repeaters you have to make sure you’ve got all the settings in the right place so i’m going to do now is i’m going to purposefully uh change one of these blocks i’m going To change that out for a cobblestone now that is uh change that for a multicore should i say so that is now an incorrect block now if you’ve got a complex build and you step back um you might have might think you’ve done it all and it Might be all correct but how do we check how can we confirm that everything is in the right place including all the states where we use the verifier so if i go back to the placements go to configure i can now click on schematic verifier and now here we get This screen right here and all you got to do is press start verification and it gives you a list of all of the kind of output that we can see so here we only have we’ve got wrong blocks we can see it’s expecting a cobblestone but we’ve found a muscle cobblestone So here is one that’s mistaken that you know that’s the wrong place uh the wrong block should i say now here we’ve got some other things like wrong states so if you’ve got a say for example a repeater on the wrong setting it will show up under here if you’re Extra blocks that’s blocks that you’ve placed within that area that it’s not expecting and over here missing blocks this is just blocks you haven’t placed yet so they’ll get a whole bunch of lists here now sometimes that can be hard to find whether where it is you might think well We know we’ve got one wrong but where is it well if you click on this here and then come out of this you’ll see it highlights it here in red so it’s nice and obvious that is the wrong block so let’s just fix that shall we just get rid of that Place the correct block and that red then goes away so that is a really cool tool very very powerful to make sure your build is exactly as you designed in your in your creative world so there we have it two of my most favorite mods how you install them and how you use Them so a big thank you to masa for creating these mods they are amazing and brilliant so thank you to for all the effort you put in uh they are super cool and yeah i just want to say that these these mods are client-side only you don’t need anything on the server to Make them work um so yeah you don’t need to make sure your whatever server you want to play on uh has anything specially installed they’ll just run uh in your own your own minecraft client now i think there are a few things that don’t work on servers But check out the descriptions on the mod pages to get more information about that so with that said i hope you enjoyed the video and if you did then please hit the like button and if you’re new then feel free to subscribe any comments or suggestions then get in that comment section Alright my geeks until next time i will see you Later You Video Information
This video, titled ‘How to use MiniHud and Litematica (Fabric) Mods Tutorial | Simply Minecraft (Java Edition 1.16)’, was uploaded by LogicalGeekBoy on 2020-10-01 14:30:05. It has garnered 680724 views and 16314 likes. The duration of the video is 00:26:17 or 1577 seconds.
This episode is a little different. I’ve been getting a lot of questions from people about the mods I use and show in this series so I thought I’d show you what they are, how to install them and how to use them. Today we’re looking at MiniHud and Litematica, two Fabric mods by Masa. With these mods you can create your own customised debug screen, material listing and schematics. I’ll show you some of the basic features of these mods to get you started.
★ Fabric: https://fabricmc.net/use ★ MiniHud: https://www.curseforge.com/minecraft/mc-mods/minihud ★ Litematica: https://www.curseforge.com/minecraft/mc-mods/litematica ★ MaLiLib (required for both mods): https://www.curseforge.com/minecraft/mc-mods/malilib ★ SciCraft Discord: https://discord.gg/scicraft
Other tutorials you might find useful:
★ Easy Slime Farm: https://youtu.be/XnSHyn1oNRU ★ Easy Hoglin Farm: https://youtu.be/cKoXjXFw9uA ★ Easy Gold Farm: https://youtu.be/Fu4WeUCIM5U ★ Easy Iron Farm: https://youtu.be/6EOCDu0r-h8 ★ Easy Villager Trading Hall: https://youtu.be/RDFxhpQkqww ★ Easy Infinite Villager Breeder: https://youtu.be/oeesCRfaabg ★ Easy Carrot & Potato Farm: https://youtu.be/A8DQYpk5944
If you enjoyed the video then please hit the like button and subscribe if you aren’t already! Welcome to the home of the geeks!
You can also find me on:
★ Website: https://logicalgeekboy.com ★ Patreon: https://patreon.com/logicalgeekboy ★ Discord: https://discord.io/logicalgeekboy ★ Twitch: https://twitch.tv/logicalgeekboy ★ Twitter: https://twitter.com/logicalgeekboy ★ Merch: https://teespring.com/logicalgeekboy ★ Search YT for #LegacySMP
Looking for awesome Minecraft server hosting? I’ve partnered with CubedHost to give you a special offer:
★ Affiliate link: https://www.cubedhost.com/logicalgeekboy ★ If you use the promotional code LOGICALGEEKBOY, you’ll get 25% off your first 3 months of service (first payment and first two renewals)!
Thanks
Logic
Music:
★ Good Times Patrick Patrikios (via YouTube Audio Library)