
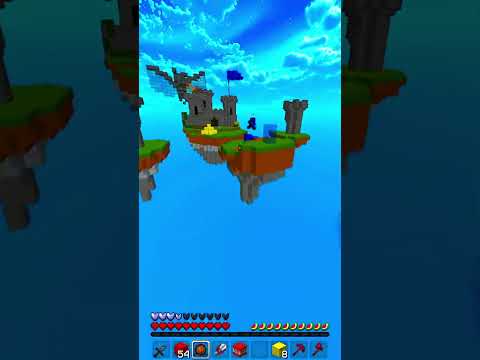
Hello welcome to part 2 of how to generate some epic terrain for your minecraft builds now I’m already in blender because you know this is part 2 you should have already watched part 1 but this will be how to generate terrain in blender this will be the nodes set up Rather than a empty landscape now amt landscape is very useful however a little weird and I would recommend watching the first video because I go over a lot of things which I’m probably not gonna go over in this video so just be have a warning make sure you watch The first one because I’m not going to go over everything all over again now we’re gonna actually just gonna import a plane into here just by a shift a mesh then go to plane I don’t know why I skill mine up I just like skin line up Just make life a little bit easier later on because of the camera scale so yeah that’s a good idea scale up a little bit umm I’ll show you that later and in fact we’re gonna add in a camera right now so might as well show you it might show you It now so press is 0 on your number pad to get into the camera view if you need to press in now we go to our rotation and we can just turn that to 0 and turn put the location up now what we can do is go into the output properties and we Go into a of 1080p there we go which actually you know I want mine to be more along the lines of 512 I’m not entirely sure what the size of its going to be at the moment so doesn’t necessarily matter too awful much now I’m gonna go into the camera settings And move my microphone and then now it’s going to the camera settings okay orthographic view now I want to turn this up to be around eleven point seven the reason why is we want a little bit on the outside because let’s say if we have it like this all of this is gonna Be black and that’s not very good because whenever this is completely black it’s gonna have a lot of well this is gonna be glitched it’s gonna be severely glitched on this section over here and I can actually render that image out let’s see it should possibly be purple Yep it’s it’s purple right if we go into Evie so we render that again as you can see it’s still purple and that is the issue right there so that’s a reason why it’s purple is because I have a HDRI that’s not currently active so anyway so It lets a scales back down have a little bit on the edge and that should fix that problem now I’m actually going to go into here and I’m going to go into my shader editor and that’s where we’re going to do most of our work now I’m actually going to go Out of the camera view wherever the camera is I think I want to move this down a little bit there we go and move this down just make life a little bit easier I think a let’s see is that right yep that is correct and there we go okay I want to look at this one by pressing the del button or the full stop period whatever you want to call it button down at the number pad now we’re looking at the center of this plane and now I’m going to go into material view that’s Actually how you make sure that you see the material that we’re about to make in a minute I’m going to my shader editor and I’m actually going to completely unplug this because I don’t need it and will render this again and now it’s black which is fine with me and it Doesn’t really matter what what everything is in fact you could just have a basic just you can just have some really basic stuff in here and they’ll be fine just a just a background white there you go to strength one it doesn’t really matter this is basically what It’s gonna be like whenever you start it doesn’t matter necessarily because yeah I just you’ll see in a minute but don’t worry about this this entire setup is just for my rendering I do a lot of rendering stuff for for builds and I have this as an advanced setup because Of reflections and stuff because of like water and glass textures you do not need to worry about it whatsoever no we’re going to the object view here we go so create a new material and this is where most of our works can be done now the most important pieces of this entire Thing is the mix RGB this is one of the most important pieces and a texture node so we can go shift a and then go to color and then mix RGB is right there and on textures these are pretty much what we’re going to be using like Musgraves very important noise Veroni Wave all those are very very important and that’s where most of our work is going to come from next most important thing is the color ramp the color ramp is another one of the most important elements and making this and I’ll be showing you what Each of these do and I won’t get just a basic noise texture so you can see what that looks like now the next thing would be let me double check to make sure everything correct we do not need separate XYZ like we did last time and a Lot of these are very important and I showed you that in the previous one however I really want to show you exactly what these do because this this time is going to be extra extra important we’re also going to be doing some texture painting in a minute which I’ll show you how to do that however here we go so this is what the noise texture looks like it gets a just a it’s a noise texture as you can imagine so it just gives it a very standard noise and we can detail it or undie tail it and It’s going to be super blurry or very detailed distortion makes it look really odd and wiggly and I don’t personally like it all that much so I’m not going to be using it now also remember that have no drinker on so that’s if you don’t know how to turn that on it’s an Edit go to preferences and then you know there’s add-ons right here and then you can type in node and then it’s right here note R angular that is what we’re going to be using so that there’s a lot of cool stuff like for press ctrl T it Sets up this mapping part right here which saves you can edit a little bit of stuff if you want to get some different textures and back time we’ll leave that all in there just just so we can change it a little bit should save could possibly save some time now the noise Texture just generates noise as as you might imagine and we can do that with different things with scape OOP sorry with scale and because of how it’s generating it in 3d space if we go in the z direction which is e is this right Here so if we move this in the Z this is what’s happening to the texture so whenever imagine that there’s a plane this size in a 3d texture generator so when we move it up we’re moving it in in 3d space and our texture so this Actually it as you see here is set up in 3d and we set up in 40 it is a very similar thing we can adjust a lot of really neat things doing this and get different combinations using this which can save us a lot of time now as you can See here if we adjust the scale in different directions it’s going to cause it to do some odd stuff and especially the location that does some cool stuff in there too because in the location we’re going to be traveling through 2d space whenever we go through the location and this right here we’re Traveling in 3d so we’re going up through the texture in a way it’s very odd anyway I don’t really want to explain too much about it it’s it’s it’s odd but basically if you have it in 40 or if you have in three it gives you a Lot more randomized texture so if you’re very picky on what you want you might want to go into 40 it could save you a little not really a little bit of time but it can definitely make it look a bit more customized if you are very picky About which texture you use now I wanna set this up to be around here so we can get you know some blacks in there there we go so this is basically you know our textures that we have for the mountain now I want the scale of this to be much Smaller because my it’s an island but here we go now then we could also increase the scale not the scale but we could increase different things over here to try out different pieces of it so as you can see here we’re sort of moving that white dot over there I think right here Is actually a pretty decent one but we might want to move the location of it to get this towards the center a little bit better because I sort of like that it sort of looks like an island already though maybe maybe it increases scale just just a little just a little bit Because it wants some detail in there there we go I think this might be a tad bit better but yeah that’s okay I think I like this now I’m going to go over the mix node this mix node are here we can do different things with it so for Example if we get to color I’m just gonna get to just just two out just to input like color things may get a value that’s a wrong one sorry about that okay here we go me just get just the color a color node wherever that is I hardly Ever use this thing here we go so shift key if we go into here and we put in these two colors and we’ll be blue and this will be green if we put this into our factor and put this over here as you can see it’s gonna have different It’s gonna be in different spots so let’s not put that in mix color burn here we go that’s a wrong one mix but as you can see there’s like a different colors for the different spots and is right there that’s better that’s better one to do purple so if we turn this up All the way turn this down all the way you can sort of see it a lot better there we go so as you can see we’re let’s look at this one so where it’s white where it is white it is red right there’s white and Where it is black it is it is green right or where it’s darker in color so if we do this and go into here again there’s gonna be a whole lot less red but I think if we did linear probably a little bit better here we go once there That’s a lot better as you can see now where it’s white it’s like that where it’s black it’s green or it’s gray and there’s like this a gradient between them so that’s how you can use this right here we can mix red and we can mix green together to get this right here Then obviously this is like supersaturated and most of this is unsaturated because of the gray values there’s more gray values and there are white or black which is a good thing because we don’t want too much of either we don’t want something to be pure black But most the time we don’t something to be pure white most of the time because that can cause some issues later on which we will see that later so that’s how we can use that and it’s very useful because then we can mix two textures together based on a different texture so We can mix this texture and we can get a different texture let’s get a you know let’s get ever roni texture you’ll see what this looks like I do like that let’s get shift D here we go let me make sure this looks good I don’t like at the moment so let’s get Flying there we go set this back to pretty much where it was now let’s look at this one and I want this to be b-spline as well it makes it look out more smooth there we go now we can go connect these two up and it gives a bit of a different effect So these are gonna be peaks of the mountains if we have it like this which may or may not be a good thing we could definitely make it a good thing if we want it to be and personally I think it’d be really cool to have some stuff Like this however I don’t want it everywhere and that’s where some difference some other stuff is going to come into play which I’m going to show you in a moment now I want mine not to be randomized all the way but have some sense of order I think this looks pretty Cool we can did get different effects like right here there’s Manhattan attribute if yeah this whatever this is let’s see EQ Lydian there we go that’s better and we can get different kinds by doing this and there’s smooth f1 this one is definitely going to be a lot Smooth it has a bit actually yeah I like this like being able to smooth it out a little bit I don’t want to be too harsh I want to be ever so slightly blurred a little bit but yeah me show you distance to the edge first so distance to the Edge as you can see it’s a little bit different than the other one and then okay here we go in sphere radius let’s see what this looks like doesn’t really seem to have anything in there let’s go let’s go back to smooth one so we can set this back up There we go smooth this be a little bit blurry I don’t want to be too awfully crisp because it is supposed to be for Minecraft and make it a bit less random the scale can be a decent amount I do want quite a bit of scale in there Possibly a bit more let’s see trying to get a good a good texture in here I’m for the mountain possibly decrease the smoothness there there we go I think that’s pretty good now with this that’s actually yeah this is one thing that’s gonna help us if we Increase this a little bit it’s very difficult to fiddle of this sometime smoothness turn the smoothness ever so slightly down there okay I think this is good this is just good enough let’s just continue on I don’t want to fiddle with this too much because it doesn’t need to Be perfect right now we can always adjust it later in world painter and also not just that this is a tutorial if you guys want to fiddle with something as for an hour then you can do that however I’m trying to make sure I do this and I decent amount of Time so I don’t waste you your all’s time and here we go so we can go into texture paint mode and we can go into tool since I haven’t unpress ten but you can press n to do that to open us up if you don’t already Have it opened up and now we can go into here and we can turn on a texture so we go get a base color and we just want it to be black and now we can actually paint on top of this and as you can see It popped up a little node into our setup over here we didn’t even need to do anything so now that is set up we can go into here we want to set this into our factor because we’re gonna make it black and white there you go factor it Up and as you can see here we can paint where certain stuff is and we can undo a lot of it as well so we can paint this to be completely black and then we can paint certain areas that we want to have done the peaks so we want a peak there We want Peaks in these other areas as you can see so yeah you can do a lot of cool stuff by doing that however I think I need this to be his linear because I want there to be these cracks but I don’t want very much else it doesn’t Seem like there’s a very easy way of doing that so we’re just gonna deal with the our odd or odd stuff that we have going on with that okay here we go so we can we can see where we’re painting it but here we go I want the strength to be all the way up so I can paint black all over the screen again here we go and now I want the strength to be quite low and with the radio speak we’re high and we can adjust the we can adjust a lot of what this is Going to look like so texture here we go let’s actually find the here is fall off and I want it to be a peak like this so as you can see here if I get this white out do that it there’s a little point there’s a little point and that’s it That is where the center is if we did this it would be that so all these different things give you different effects and but I want this piece or like a point doesn’t want to have a lot of fall-off now obviously we can adjust it ever so slightly if need be we Helps give us a lot of control so as you can see here you can do all sorts of stuff with this which is very useful we can adjust the entire thing out I’m going to be how we want to have a little bit less of a fall-off If we need it to be and I think I want to be a bit more extreme in this area and then I want to fade the fade out a little bit easier yeah this is this a pretty decent as I mentioned this one already is good enough so I don’t really Need to change it I just want to show you that just in case if you do need to change it so here we go shift we can control shift click on that and adjust that as you can see here we can paint over it and it’s mixing into our stuff And we can adjust everything that way here we go go out and I want paint a little bit on paint a little bit over here and I think the scale of this could be increased quite a bit because we’re trying to add in a lot of these little Cracks and crevices into here we don’t want to go too far overboard with what we’re doing you just want to add some slight cracking and obviously turn a lot of this down or a lot of this up depending what we’re doing there we go I think maybe turning us down would be Better and I think maybe you’re more like a V might be bit more appropriate and obviously those are going to be Peaks so they’re going to go up where they are so there we go I do like that quite a bit now the thing is is that I Already know sort of what I want in this area now I’m actually going to shift indeed us again so much duplicate it and then I’m going to actually add another texture and I’m topes accidentally clicked on the screen but we’re adding another texture so we’re gonna go back Up I don’t know the texture with a base colour with black okay there we go I’m just gonna leave it standard how it is one click over here and I’m gonna mix these two and I want this to be color burn right there so then what I do is Now we can paint on this texture and I need it to actually be white because the base color is already black and I need to probably switch these around a little bit here we go unless I need to invert something let’s see color let me make sure this is all Good doing just fine there we go apparently is working just fine probably just because the strength is not up all the way there we go let’s go back to 0.5 we need to paint on this a little bit more make sure let me double check make Sure is so good there we go that’s better as you can see here you can paint and we can paint where we want it to be so this is what it looks like already and now we can go back over to here and we can set this up so let’s go back down And obviously we want to have some fall off because otherwise it’s going to not really work all that well so I want the shape of this to be more or like that and I want to have some little island sort of going off in the distance so I Get the radius that’s the B but smaller strength to be I want strength to be turned down a little bit and I want to go off of the mountain like that I want to have these little things that go off I think that’s probably gonna be too bright so we can Adjust that later obviously yes sir it looks like a starfish at the moment which is fine we can obviously always adjust it adjust it out as much as we need to so we can go over here and adjust you know that out looking justice out just that uh not helping the Starfish aspect of it at all here we go just I just thought just this out turn down the strength there we go trying to get nice good little thing going on here let’s see if you can just get some gray values just trying to slow that down a Little bit not slow it down I just want the texture this to be a little bit different because I don’t really like texture at the moment come for that one so let’s actually go back to this one over here click on that and then we can adjust the value of those because They’re a little strong there we go that’s a lot better so now we’re just going to continue painting this a little bit you know actually I’m just going to add an island and I think that’s gonna be it as when I had like a small island off somewhere wherever is gonna be until She need click somewhere to get this to work there we go we are clicking now so there and I want an island off somewhere in the distance and need to increase the strength of this apparently I’m not doing it correctly that’s perfectly fine probably perfectly fine let’s make sure That we have the correct one turned on apparently we do there we go that’s better so we can turn we can get an island out somewhere I see trying to get an island off over here there we go that’s what I want now I can turn this Down and just adjust the shape of the island there we go now we have an island we have everything set up I like this now obviously one thing that’s a little bit obnoxious is that whenever we have an area like this there’s a lot of these there’s not really very many gray values Which is quite unfortunate and I don’t know what I just did put in wireframe view on accident but there’s a lot of these gray values which can cause some issues which is very unfortunate however there’s not a whole lot that we can do because it goes it does it very very Quickly if you understand my meaning hopefully you understand my meaning at least here we go get back into a proper view probably an orthographic there we go get into orthographic view of this and change the radius there now we can click these and I want to set up just Some small details we can do a lot of really neat stuff by doing this I’m just trying to just get some little bumps in there because it is because it is an island however as I shown you the gray value in this is a little odd it doesn’t really work all That well and that’s because of the color burn how that works in fact I would say you can pretty much fix that by just adjusting the factor a little bit you can adjust the factor ever so slightly to make it in the favor of this Over here by making yeah just this and I think this is okay I mean as as I mentioned it’s this is not an exact science I’m at the moment it’s quite difficult to get this to be you know exactly how you how you want it but yeah We pretty much have some decent gray values I think this is okay but one thing that we can do is do this one more time and this is a pretty already impressive setup for thee textures but now we can go back over here you know The base color and we want to be black and we need to get this over to here and to not accidentally move our entire node set up here we go so now we can go over here and we get shift D again shift D set this into here put this into there And here we go now we just need to mix and let’s actually see what this looks like as you can see now we can adjust the height of it I want this to be the tallest area so we can adjust the height of that to be the tallest area now that We have this set up so I want the piece are like this so I want this to be the tallest area now obviously we can sort of set some some gray values up I’m doing this as well and so I want this to be tallest area and we can sort of like Adjust this out hello I actually forgot to mention something in the video and that is if you actually do want to erase parts of the map you can actually use the you know the thing we did with the texture painting and we can set up in The factor right here and have the cull second color just be black and we can factor in or out black on that part and obviously we can you know set these gray values to have a good gradient between them so yeah I don’t know what I was thinking showing you that method of Doing it but yeah this is a little bit more efficient and this is however and trying it out anyway back to the video not sure how this is gonna look but I guess we’re off to something one way to find out so let’s actually try self so we’re on a Render and image out once we set this back up yeah it’s an Eevee so good let’s make sure the color management is in standard even though we’ve been you doing it in filmic yeah we’re out just do it in filmic because we’ve been setting it up in filmic I would Recommend standard but I forgot to set that up earlier now okay first off and you make sure that the output need to tell you guys about that the output needs to be P&G 16 bits compression zero time however it can also be T iff it could be PNG or TIFF I believe there’s One more but those are pretty much the two that are going to be okay because those two are pretty much the only ones that allow 16-bit because II per much have to have it be 16-bit and then pretty much you have to make it you know zero compression so it doesn’t have any Glitchy issues with that and here we go as you can see that seems to be all good with the textures not entirely sure how this is gonna look in game because first off this this black area is perfectly black and that is a little bit of an issue but As I mentioned we can always obviously increase the size of that later and actually you know I want to set this up be like a gray value let’s take you over here get a medium wrong one get medium get a medium value over here and see if we can add in some Some little some little hills or something I don’t want to have the entire thing be black in that area I don’t think there’s really a whole lot that we can do at the moment but that’s just because that was my fault for now setting up the map correctly but you Guys can obviously paint in some little tiny hills over here and make sure that it’s not pure black because when it’s pure black it can have a couple issues but it’s fine it is fine so it should look good either way so don’t be so don’t be concerned it should be all good Let’s see you set this back out okay seems to be good we’re just gonna render the image out this should be fine and obviously and in world painter if there is any issues sort of like how most of its pure black we can obviously fix a lot of those Issues in and world painters so we can just save the image as you know our terrain and what you can exit out of all these different things and let’s go into world painter and I’m going to leave my blender open just in case if I need to Resave the image be bigger for example because we could obviously make this island a lot bigger if we want to so if we think that the island is not big enough we can just easily re export the image just a slight bit bigger and because we generated it it actually will Save us a lot of time for sure so it’ll save us a lot of time because we set it up to be with the texture no matter how big we go it will always have enough resolution because it’s generating the texture it will generate a new texture Whenever it whenever it needs to so it can save you a lot of time that way now what I just did there was a complete accident which I’ll show you that in a minute because I wasn’t supposed to be doing that I was just talking and I Forgot what I was doing but here we go we’re gonna load in this height map now the bottom of the world is basically where the black value is I like I’m just gonna set mine to be on 45 because I don’t want you know I want I don’t want The map to be too ridiculously tall looking then with the top of the map the white values I don’t really want to 255 I’m just gonna have mine be like 200 so I was like 50 blocks above it and it seems that a lot of the stuff is Underwater still so as mentioned we can obviously just you know create a new world again so we just since I didn’t really change anything but actually let’s change let’s create a new world and we’re going to set this to be a flat world and we’re just gonna set this to Be zero and water level to be 62 let’s leave that there not zero it wants to be like – there we go so we can create that then we want to import height map it doesn’t really matter what you do with the the way that I just did we just Make it like a new a new world for the most part you want to be a water world if anything so actually here let me show you that again sorry I probably need to show you that so we need to be hilly and we want to be probably a water world So yeah it’s the ocean it’s an ocean seed and we want to make sure that the level of this is at you know like 1 or whatever that we need to be so here we go so we can create this and now let’s actually go back and over here Here we go custom terrain height map into current dimension there we go then we can go to our latest one which is 24 going to here now we want this to as I said to be like you know 55 because the water levels at 62 so if we set this to Be about 55 most of it should be above water they set this to be 200 and height so 200 height there we go and now most of it is above the ground and it looks to be pretty good has some water areas seems to be all good now we’re going to Go and paint this a little bit so I just went into terrain and I put this into the tools moat the little pencil I go into terrain I press the stone I would do above 45 degrees now I’m going to paint everything everywhere to have that Wherever it needs to be and then we’re going to go a few things below so to about 33 or 32 and we’re doing only on terrain on grass we’re gonna get some perimeter and we’re gonna paint that wherever it is too much like that and there we go This will be good now I’m gonna save the beach in that area so I’ll be fine now I’m going to export the map and here we go someone go over here export export as a new minecraft map and what I was doing earlier is what I should have done Now so I’m gonna go to stone mix and we’ll change this to stone because whenever it’s a stone mix is trying to generate the stone and different textures and it takes a little bit of extra time now that’s fine if you’re doing it as a final export the final Export should have stuff like resources in the ground so you know go to resources then turn off resources which is you know coal and iron and stuff the reason why is because it will save time whenever you go to export also seen with structures it will save you time so that you don’t Have to load all that stuff in and yeah it does actually save a lot of time to do it this way so that’s why I would recommend doing it in that manner so here we go and now we can build into Minecraft because for example loading in With the resources I don’t know it makes it with resources and the stone mix I don’t know takes quite a bit longer especially for large Maps is going to take a lot longer and most of you are going to be using this to make large maps so that’s why I would say whenever You’re doing your tests make sure you generate it with the least amount of information possible so it saves a lot of time when you’re testing because as I said this is like a test we don’t know what the Minecraft map even looks like but here we go let’s actually fly up see There we go here it is so now obviously we would need to lower this a lot if we actually want to make this a real map as you can tell the mat looks pretty doggone good this is the highest area just how we wanted it to be and then we Have a lot of these little lines how we designed them to be in the map using the Veroni texture and as you can see I think the map looks pretty good now obviously we could increase the size of this map as much as we want or add in some new Mountains if we need to we can just do so much using this method especially the way that we did it we can customize almost everything that we need to using it it’s just a very very customizable method of generating terrain for free as well completely for free you don’t need To do anything else just generate the terrain how you need to using blender there’s these cliff areas and there’s these beach areas yeah I think this is a pretty good pretty good island that we just generated right then right there only took a little bit of time and guys Can see here this is something that happens sometimes because we didn’t have enough gray values in there but then we also set up these other areas so I think it looks really good the way we had it set up now obviously we can go into we Can go into world painter or we can go into blender and we can fix any of these issues when Garrett brushes out and we can you know go over here if we want a Mountain over here we can you know do raise the terrain however we once we go over here you There we go let’s try it let’s see what this looks like now that we just did a little bit of editing we did a little bit of stuff that’s it I may have messed it up let’s just double check it I mean this tutorial is already I’m sure over 30 minutes long so there’s not a whole lot that I can do about that so I might as well just show you guys that you can you can play with it it’s fun you can play with it try it and try new things so as you can see over here we got some Beaches now we got a few more Hills going on we got Hill going on over here yeah and some beaches as you saw there we go probably need to have a bit of a gradient between those two that’s fine got another hill over there made this mountain way too large so we can Obviously edit that down a little bit unless we add it in like a little mountain ridge going down over to here either way I think it’s already pretty nice map especially now that we did a slight bit of editing would even do that much editing which pretty much has added In a beach but yeah this is just such an easy not really easy method but it is a very fast method of creating terrain and it does a pretty good job in a very short amount of time and we just generated this terrain now obviously if You want if you need to you can just add a little bit of detail by using world painter or if you need to you can also use you know things like world edit you can transfer this terrain to bedrock and things like that so this is not just for Java this is for really anyone if you need any assistance then definitely comment in the comment section down below I think this is already all good but the thing is is that there’s a lot of tutorials on how to use blender for different purposes and there’s actually Quite a few tutorials on how to use blender using the nodes to do a lot of really cool stuff so if you do want to you learn how to use the nodes better then I would recommend a better channel than mine one that’s specifically for blender I would recommend doing Something along those lines my I won’t probably be able to be I won’t be able to make a an advanced tutorial on how to use nodes because I’m not advanced enough to be able to show you the super crazy stuff that you can do using nodes especially when you’re Generating the terrain and stuff like that but for minecraft this is a great way of doing it right here very quick something you can definitely do in a decently short amount of time so yeah so if you want to check out some blender tutorials I’m gonna have some links in The description especially to blender guru so you can learn how to use blender in general because obviously if you want to learn how to do this you’re gonna need to learn how to gender for the most part so if you want to learn how to use blender you know there’s obviously Blenders blender gurus tutorial series I’m gonna have linked in the description I believe I’m also gonna have I don’t remember his name but there’s gonna be some other links in the description especially one on how to use nodes to do some crazy stuff I believe it’s something to do I’ll remember the exact Title I watched it a long time ago but there’s gonna be that link in the description there’s gonna be some other links and it’s also gonna be a link to my tutorial series on how to render your minecraft builds in blender so obviously I do go over a lot of the very very Basics of blender in that video and if you already have blender installed you should already know how to render but if you don’t then you can obviously watch that tutorial to learn how to render your builds and things like that so don’t be a lot of resources in the Description that you can check out that should save you a lot of time so yeah for the most part I’d recommend checking out other channels before check before asking me to do something because this video is already new tough enough to make and I won’t really have it I don’t Really have a lot of resources on how to do this because this is the only tutorial that I’ve ever seen on how to generate terrain in blender especially specifically for Minecraft but even in other videos on how to generate terrain in blender there’s not very many that Really go over all the topics that I mentioned in this video but there’s a lot of videos that go over some other stuff that that go over the things that I just went over it’s just not in the format that I just showed it to you especially for generating terrain for Height Maps because generally you don’t need to generate num height Maps now obviously an alternative of this is world machine now if you do want to check out world machine I would definitely recommend that I’ll have a link to that in the description if you’re a professional builder I would Recommend using world machine or if you’re trying to be a professional builder I wouldn’t recommend it because I would recommend using world machine when you can afford it don’t buy world machine and then try learning how to use it so then you can earn money use blender and generate some terrain gained A reputation for building high quality stuff then learn how to use world machine and sell high-quality maps to other people using world machine which is a lot more customizable than blender in my opinion though blender does a lot of really cool stuff too I’m pretty sure whatever you Can make in world machine you could probably make in blender however it’s gonna be a whole lot more difficult because world machine is a lot more specialized for that kind of task so I definitely recommend using world machine for most cases I just thought I would throw that out there for like five Minutes of me flying around backwards but anyway I hope you have a great wonderful sublime day I don’t really think there’s anything else that I need to tell you if there is and I’ll probably be in the comments section down below or the description great wonderful sublime day and God bless Video Information
This video, titled ‘Minecraft Custom Realistic Terrain Generation [Blender, World Painter] (Part: 2) Advanced’, was uploaded by MrJay on 2020-03-23 16:40:52. It has garnered 1074 views and 25 likes. The duration of the video is 00:38:47 or 2327 seconds.
This video describes my process of how to generate custom terrain for Minecraft using Blender, in part two I describe a slightly more advanced method than part one, in this method, I show you the basics of using nodes to create custom heightmaps that are very customizable.
P.S. Forgot to mention in the video but you can actually view your heightmap in Blender if you hook up your heightmap to the displacement using a bump node, it does not give you a very good preview however good enough to give you an idea.
also don’t forget to edit the terrain either in world painter or in-game
YT Links: Blender Guru https://www.youtube.com/user/AndrewPPrice Node tutorial https://youtu.be/C__h2q81Ej8 Water tutorial https://youtu.be/hC9W1PgMZJA How to Render https://youtu.be/YUmBpvHTDB0 Creative shrimp heightmaps https://youtu.be/hlh9rrjG29k
Links: https://www.blender.org/ https://krita.org/en/ https://www.worldpainter.net/ https://www.world-machine.com/


![EPIC Minecraft Adventure w/ Comandurr & Foxysans [Rathnir start!]](https://img.youtube.com/vi/Ky12-xSwseg/0.jpg)


![Minecraft Custom Realistic Terrain Generation [Blender, World Painter] (Part: 2) Advanced](https://newsminecraft.com/wp-content/uploads/news/minecraft-news-trending-8601.jpg)