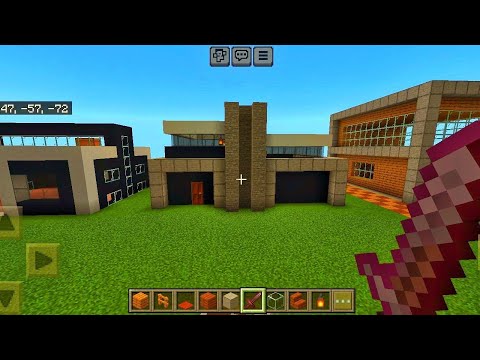
What’s up guys welcome back to part two for this tutorial on how to build this Mansion here in this one we should have time to bring up as exterior walls for the second floor of the house we’ll also be sure to do the roof for the second Floor and we should also have time to do the roof for the lower sides of the house I gathered up all the blocks we’re going to be using in this video so you can see here these are all the blocks you’ll need to grab we’ll start here at the front side make Sure you have your pillar quartz block and we’ll head on over here to this corner and we’ll bring it up by nine We’ll head on over to this corner and also bring it up by nine Now let’s head to the back to where this corner is right here we’ll bring this up by nine so this one is lined up at the front side and so I head on over to this corner which is also lined up with the front and brings this up by nine We’ll head back to the front and we’ll start filling in all these walls we’re gonna have the same windows that we did on the first floor here for the second floor as well so be sure to start with the white concrete we’ll go right on top of the Chiseled quartz and just place two layers Right up against this pillar we’ll fill in two spaces and remember we still want to leave two layers of smooth quartz blocks here at the top now let’s head on over here towards this corner we’ll fill in three spaces bring it all the way up and we’ll add the two Layers of smooth quartz again and then right down the middle we’ll do the same thing let’s fill in at the top with the quartz below is that will be a layer of white concrete And now we have the two windows here on the second floor marked out so what we just did here we’ll then do over on this side So now it’s just matched up let’s head to the back and we’re gonna do it two more times back here just like how we did it for the first floor So if this side is done just like the front got it one more time over here Now for the sides we’ll continue with the white concrete we’re just gonna go in between the pillars so we’ll start down here at the bottom just right on top of where these walls left off and we’re just going to completely fill in all the way from the back to the front With white concrete and then we still want the two layers of the smooth quartz at the top we’ll also be sure to do the same on that other side just in between those two pillars so we have just solid walls on the sides and then the four Windows here at the Front and four windows at the back now let’s focus on these middle sections let’s continue with the smooth quartz blocks we’ll be right on top of the chiseled quartz we’ll just fill in with the two spaces at the sides first we’re just going to bring this up until It’s one block higher than these walls that we just placed so here at the top you can fill in the three spaces so make sure it’s lined up here at this wall we’ll then head on to this side and do the same thing Now up against those on the inner sides we’ll have another strip of quartz and then right on top of the chiseled quartz here down the middle we’ll add another two layers here down the middle where I have this going all the way up here at the top we’ll add three layers Of smooth quartz And now with is the smooth quartz stairs we’ll place these upside down here at the top in these shapes so we have two windows there that are just one block taller than the rest of the windows now we’ll head to the back and we’re going to do the same thing Back here so with the smooth quartz blocks we’ll fill in at the sides until it’s one block higher than the rest of the walls okay Up against that we’ll have another strip going all the way to the top at the bottom we’ll add two more layers down here and then we’ll have a strip going down the middle all the way to the top and now it’s three layers here in between all those that And finally is the smooth Court stairs upside down in between the shapes for the windows Let’s start adding all the detail for the windows now so you can see how we have these windows on the first floor we’re going to be doing the same thing on the second floor it’ll be for the front as well so if you remember how we did it We’ll just start with the white concrete and we’ll have a layer along the outer edge And it has a space down the middle we’ll fill this layer in with black stains glass panes we’ll go on with the outside Have the upside down dark oak stairs at the top and the dark oak trap doors along the side We’ll have to grab the lever I’ll just swap out the smooth cord slabs for now and we’ll have two of these below the windows is that we’re going to have to kind of just go in here and Crouch at a trap door uh right there and another one is there And that is one window we’ll do this one and there we go so now we have to do that three more times so right here and then two at the front We now have all the windows done for the sides here on the second floor now we have to do the ones here in the middle we’ll switch to the smooth quartz blocks and we’ll place a layer just along the outer edge So make sure to go up above these stairs as well and then we’ll fill this in with Izzy quartz down the middle and then the black stained glass panes and if that’s all there is to these ones here in the middle we don’t have any of the wooden trim work We’ll do the same here at the back We have all those windows now done here on the second floor at the middle of the house let’s now head on back up to the front and we’re gonna have a rallying here on the second floor down the middle just right here at the bottom layer of the windows So we have the dark oak trap doors and we’re going to be placing them right here at the top edge of these blocks right below the windows and we want to make sure we’re just one block further than the edge so we’ll place a layer of the trap doors going across like that On top of this we’ll be sure to crouch and place some chains so that they’re facing straight up and down And now after that we’ll switch back to the dark oak trap doors and place these on top of the chains So now that we have the walls all marked out for the second floor let’s now start adding the roof here on this upper layer so we’re going to be using the smooth quartz stairs the smooth quartz blocks the smooth quartz slabs for the overhang and if they were going to be using some Dark oak wood slabs for the roof itself let’s start at the front we’re just going to Mark out where the overhang is so I’ll head on over here more towards this left side here on this lower part we’ll start with the smooth Court stair we’re going to place one upside down and We’re going to be skipping over a space and just continuing on just keep skipping over a space and we’re going to leave this one here so now you can see all the rest of the spaces starting at this pillar is going to be a full block of smooth quartz So we just have a pattern like that now switch back to the smooth quartz slab we’ll Place one right next to that full block and it will work our way back we’ll start here with a full block anything just skip over every other space with the full block and then all Those empty spaces will be filled in with an upside down smooth quartz stair oh so you always want to make sure the final block that’s lined up where the corner is is a full block of smooth quartz so you can see how it’s like that Here as well and it has the final corner here on the Outer Edge will be a slab and then once again just back to the full block and then it’ll be a stair let me just continue with the full blocks every other space and then we have the stair right here Like that so I head on back up to the front and we’ll do the same thing on this other side Now on top of all of that we’ll switch back to the smooth quartz slab and place a layer just right on top of it Now let’s look at the middle space and we’ll just start doing this next switch back to the full blocks of the smooth quartz we’ll start on the corner and place it on every other space once again the extra empty spaces will be an upside down smooth Court stair now Switch back to the smooth Court slab and we’ll place this next to the full block for the corner and I will have another full block right here and then we’ll be sure to delete this slab here and just have another full block we’ll do the same on this side so We have a full block here I guess you could just add another slab just right on top of that so it forms a full block but either way it’ll do the same thing and now on top of all of this will have another layer of smooth quartz slabs Let’s go to the back and do it again we’ll start with the full blocks start in the corner and just place it on every other space Upside Down Smooth Court stair for the remaining spaces slab in each corner a full block behind that and a slab here So a full block and a slab and it’s any layer of slabs on top of this So now we have the overhang all marked out here we can then start using the dark oak slabs to fill in the roof itself we’ll start here at the front I’ll just head on over to the left side where could it be just one like half a Space higher than where this overhang is so we’ll be right here on this block on this layer and we’ll just add some dark oak slabs going along the outer edge just right up against the edge of the smooth cord slabs so we’ll just follow right along that We’ll bring this over and we could just stop it right here this one was kind of just a temporary block so that we could get it started so we could just delete that now let’s head on over to the other side we’ll start in the same spot so it’ll be Right here we’ll Place one we could then just delete this temporary block and then just follow right along the edge of the smooth cord slabs foreign We’ll bring this over until just right there so we have that first layer now we’ll go up in the next layer so it’ll start right here on the same layer as this smooth cord slab so we’ll place a block here and another one behind it and now we’re just going to follow along The edge of the dark oak slabs So we’ll bring this over and back into those slabs we’ll then do the same on this side Now we’ll go up in the next layer so this time it’s going to be half a space higher than these slabs here for this upper level so we’ll just place a couple right there stack it up and then we’ll continue on And all we’re just going to do is wrap around the edge of all the previous levels So we have the first three layers like that looks good we’ll continue on so let’s do two more layers and we’re just gonna follow along the edge of all those dark oak slabs So now we have a total of five layers here uh this lower part and a total of three layers here and it’s the Middle where it’s a little bit higher so now here for the middle space we just want to add one more layer but we’re just going to completely fill all Of this in until it meets up with the edge right here so it’s just gonna be three spaces wide we’ll head to the back and do the same thing And now you can see the rest of the space we have to fill in will just be this rectangular shape and we want to bring it up until the top layer will be seven blocks wide let’s do three more layers for now and we’ll see where it ends up So this was the third extra layer so now we have a total of one two three four five six seven and eight going up on the lower parts so now yeah it looks like this will be the top layer so as I mentioned I want It to be seven spaces wide so this is one two three four five six and seven so now this is just going to be completely filled in on the same layer we’re not going to be bringing it up anymore Now we have the roof all done here for the second floor of the house in the middle I’m now back at the front side of the house we’re gonna start marking out the roof for the lower sides now let’s switch back to the smooth Court stairs and we’ll start marking out the overhang Will just be right above Izzy garages first we’ll head on all the way over here at the top layer of these walls we’ll start with a stair and just place this on every other space and then right here in this corner we’ll start with the full block fill in the remaining spaces We’ll then have a slab right here and then we’ll start a full block here and place that on every other space Is the stairs we’ll have a slab here in this corner and then start with a full block here We’ll have a slab lined up where this full block is and then start a full block here Another slab back to the full block Once again another slab and another full block And if they will continue on we’ll have another full block lined up here one here and the final one here is going to be right up against this wall So we have the overhang marked out here for the space where the garage is right here actually isn’t going to be one story this is going to be it’s technically two stories but it’s going to be a little bit lower than the main part of the house so it’s just going to Be a little bit of a lower level it’s going to add different levels to the house I think it’s a nice feature instead of having everything the same height and then right here this little space will be one story so we could go ahead and Mark out the overhang here so just Look at this corner and have a full block on each side with a slab and it will have a stair and a full block and then over here a full block another one and it’s another stairs now on top of this we’ll have a layer of the slabs We’ll be sure to do that for all of this here as well Now let’s head on here back to this part that’s going to be pretty much two stories you can see how we have these smooth chords here we actually don’t need that so we’re just going to replace this with white concrete Look we do the same for this wall here as well But that was just a little adjustment we have to make so now we have that good and then over here we’ll be sure to also replace all of this with white concrete foreign This is just going to be covered up with the porch that we’re going to have so we really don’t have to worry about that same with uh pretty much all of this this right here though this wall will be white concrete as well Thank you so there we go that’s what it’s looking like once again is this little section here will be covered up with the porch that we’re gonna have and now all of this is going to be one story as well so we don’t have to worry about that So let’s go ahead and actually start marking out the roof over here now we’ll start with the smooth quartz stair just right here at the front right up against the full blocks we’ll have a stair a full block there’s a slab anything just four blocks every other space and it’s in the stairs On top of this we’ll have a layer of slabs We’ll wrap around to the other side and do the same thing and then a layer of slabs on top of this now let’s do the part that’s just a little bit higher we’ll start with the full block right here on the edge Stairs in between this slab on each corner we’ll have another slab just right on top of this space and if any layer of slabs on top of this now we have the overhang Mark Dial on this side we did it on that side before we start doing the roof how about we Continue bringing up the exterior walls for that back corner there And for this space right here we’ll start on this side right behind where the garage is we’ll switch to the pillar quartz block so just right on top of the corner that we already have we’re going to bring it up by another six now let’s switch to the white concrete And we’ll look at this wall over here first we’re gonna go right on top of our previous wall and we’re going to add three layers of white concrete but we do want to be sure that this wall is one block further than the edge of this previous wall and this final block Will be a pillar quartz block so we’ll go ahead and just place that we’ll bring it up to the same height as that other pillar so it’ll be another one two three and four and five is that the same height yeah so I placed one two three four and five more And then in this block we’ll go ahead and just straighten out it will be covered up but we’ll just keep it anyway and now you can see this pillar is lined up with this block so we have one space of white concrete until we meet up at the edge of this pillar So this is just going to be a solid wall of white concrete here but now let’s continue adding the additional two layers so we already added the one more so we’re going to have two more so it’ll be three more like that let’s look at the back side We’ll do the same thing we’ll just start here bring this straight across into that wall we’ll just add an additional three layers so you can see how he has three layers of the pillar quartz now let’s go to the front and this is just going to be completely Filled in and we’ll have the two layers of smooth quartz at the top so let’s do that two layers of smooth quartz will bring it all the way into the wall and as I mentioned we are now just one space of white concrete away from this corner And then let’s go all the way down here at the bottom of the pillar and fill the rest of this in with white concrete So this is what the front wall is looking like we’ll go to the sides the reason we left these lower is because we’re going to have some little windows so first we will still have the two layers of smooth quartz at the top so let’s go ahead and fill that in And now here at the back we’ll switch to the white concrete we’ll place two right up against the pillar we’ll look at this wall we’ll place two we’ll skip over this space and fill in three and we’ll also be sure to leave that space so we have two small Windows Right here on this wall above them I decided to add an upside down smooth cord stair lined up at the bottom layer of Z quartz now we’ll go to the side we’re going to do the same thing over here we’re just going to have an additional window So we have the two blocks of white concrete on the sides we’ll skip over this space Place one skip over this space Place one and then we’re going to be left with one space in the middle so we have to place one more on each side so we have a total of three Now we’ll have the upside down smooth Court stair above that and there we go we have these walls all brought up here so as you can see it’s not one story and it’s not quite as tall as the center of the house now let’s start marking out the overhang so I’ll Just start here at the back we’ll have a stair starting off here every other space and then it’ll be a full block we have the slab into the corner start off with the full block Slab again and starting with the full block again And now on top of that we’ll have a layer of smooth quartz slabs So is this side is all marked out as you can see we now just have to fill in the actual roof itself with all the dark oak slabs but first let’s head on over to the other side We have to bring up this part right here so be sure to start with the pillar quartz block and we’re going to be doing pretty much the same exact thing we just did on the other side so we’ll start in the corner and bring it up by six Now with the white concrete we’ll go down here at the bottom we’ll look at this wall first and we’re going to add three layers for now what I’ll do is just stop it here on the edge we’ll just go ahead and add our three layers so now after the edge Right here on this bottom layer we want to be sure to add two more so we’ll fill this in and so we’re going to have one more which will be the corner so that’ll be the pillar quartz block and this once again will be six so That’s two three four five and six we’ll straighten out this bottom one so we have this wall marked out for now we’ll look at the front and just lined up where this pillar is you can switch to the white concrete bring this all the way into the wall We’ll bring it all the way up until we have two layers remaining which will be oh hold up I went up too high so we have the two layers remaining which will be the smooth quartz blocks so this front wall won’t have any windows we’ll look here at the side at the top Again we’ll just continue with the smooth quartz blocks with the two Now you can switch back to the white concrete we’ll have two layers up against the pillar on each side We’ll skip over one space on each side and then we’ll Place another one right next to that so we’re left off with these three windows we’ll have the upside down smooth chords there above them and now let’s look at the back wall back to the white concrete we’ll have Three layers on top of where the previous wall left off at we’ll have the two layers of smooth quartz blocks here at the top Switch back to the white concrete two spaces on each side and then just one space down the middle so we’re gonna have two windows like that we’ll have the upside down smooth chord stair again and now the walls are marked out here for this space we can then Mark out the overhang So we’ll start at the front start off with an upside down stair up against the wall and just the same pattern we did everywhere else And for these windows I just had the black stained glass at the same Edge as the exterior wall so I didn’t push it in like we did for all the other windows so we’ll fill all these in on each side Now we have that done and as I mentioned here at the back where these smooth quartz blocks are this will be covered up with the porch but I am just going to go ahead and fill it in with the white concrete just in case if you decide that you don’t want The porch you’ll at least have all of this solid white concrete so you won’t forget about it so I’m gonna go ahead and just replace it all with the white concrete but I do recommend the porch here at the back because it really does tie the house together for the back side Without it it does kind of look a little bit Bland So now it’s just all cleaned up it looks a little bit better we will go ahead and fill in the roof for all of the sides of the house how about we just start right here on the space why not so we have the dark oak slab We’re going to be half a space higher just right along the edge of the smooth cord slabs for the overhang so just place this wrap it around over to this side we’ll go up in the next layer just follow right along the edge of the dark oak slabs And then we’ll have one more layer and this is just all gonna be filled in at the same layer so it’s right underneath the overhang for that upper level So it’s going to stop right there we’ll head on over to the other side we have the lower space right here so we’ll just follow along the chords again and it will go up in the next layer and just fill in these two spaces so that space is done And I just noticed this block of smooth quartz we’re gonna get rid of that’ll just be white concrete yeah that’s a much cleaner look now I guess I almost forgot to remove that now let’s go up on this section we’re going to do the same thing we did on the other Side I believe it was just three layers and that third layer is just completely filled in So this is now filled in just like the other side now let’s fill in the roof above the garage and then above is this space over here let’s head on over to this side and we’ll fill this in first so we’ll just start half a space higher than the Smooth cord slabs we’ll just bring this over right into there we’ll go on the other side and do the same thing so we’ll just start right here we could then just delete that temporary block that was a little bit laggy right there but yeah then we’ll go ahead and Bring this along towards the back and fill this in right into that wall we’ll go up on the next layer just follow right along the edge of the dark oak slabs and we’ll bring this right into Z chords here we’ll do the same on this side just bring this straight back Until we are lined up with the corner here so we’re just lined up with it now with the next layer we’re going to go into this wall and just wrap right around the previous layer of the dark oak slabs there and now you can see we are just Following right along the edge of this upper level continue this along And this is then going to curve into the wall here next layer this will just go straight across to the front Wrap it around right into there let’s do another layer Bring it into there and then the final layer will just be completely filled in so it’s three blocks wide here and then it’ll also be three blocks wide there at the front So now that this side is all done we’ll head on over to this side above the garage this is the last part we have to do so you can see how this shape is a little bit unique not quite like the others where it’s more of just a perfect Rectangle this has a lot of zigzags but it’s still the same concept So that’s the first layer we’ll go up on the second layer just right along the edge of the previous layer And now we’ll go up again so right here it’ll just kind of curve right into the house and wrap around like that This will bring over until it’s lined up with the pillar and that will start here and wrap around that previous layer So that’ll just go right into the wall this is the shape we have so far so we have just this single space remaining right here so what I’m gonna do is just fill that in and then we’ll go up on the next layer and just bring it straight across Next layer again we are almost done So we could actually just make this the final layer let’s see how it would end up looking I know at the other build I brought it up one more right here and filled this in with a extra layer let me see how it’ll look if we just fill it in At the same layer here so so if you guys like how this looks then you can just leave it as it is this is pretty much how it’s looking so I just checked the other side and I think I actually do like the original version more so what we’re going to do Is just add an extra layer right on top of this so here at the back it’s just going to be a single strip and we want to push this back until it’s one block further than the edge of the previous layer so I’ll bring this across you can see How we just have a single space around the edge still we’ll bring this towards the front and this will just be brought straight across so this is all still just filled in and then this will be brought over still just a single space brings this across to the back We have a little corner space here so it’s all just one Edge again anything will fill in the remaining space right here down the middle So now this is what the roof is looking like I think this looks a little bit better I’m just going to leave it at that here for part two I was thinking about doing the porch at the back side of the house but I don’t want this video To be too long Alright guys I’m gonna leave it at that here for part two in part three we’ll be sure to finish the rest of the exterior of the house we just have the porch at the back side also in part three we’re going to be doing all of the Landscaping Video Information
This video, titled ‘Minecraft: How to Build a Mansion 9 | PART 2’, was uploaded by Brandon Stilley Gaming on 2023-06-09 20:30:00. It has garnered views and [vid_likes] likes. The duration of the video is or seconds.
Here in part 2 for this step by step minecraft tutorial on how to build a mansion, we will be continuing the exterior of the house.


![🟢 EPIC SLIME BATTLE! "Not Giving In" - Minecraft MV [Exit From Darkness E26]](https://img.youtube.com/vi/dJ8vyNIsP_4/0.jpg)