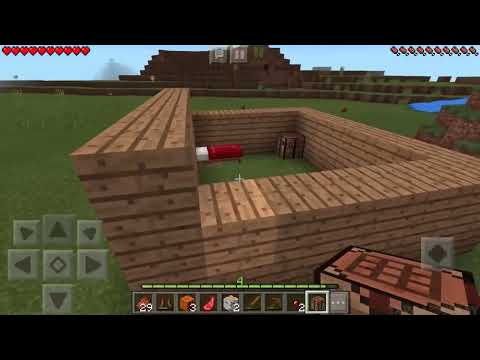
This is my home server. You might remember it from this video that I made last summer, and it’s pretty cool. It’s cheap, doesn’t consume a lot of power and has enough storage for system backups, Youtube footage and Linux ISOs. Unfortunately, after around a year of use, one of the backplane connections on the case failed, which prompted me to look for a new case. I had some parts left over from my previous builds, and it kind of spiraled out of control from there. So this is my new home server. It has 18TB of hard drive storage, a 1TB SSD for fast backups and 8 SATA ports in total. It also has a 10 Gbit SFP+ LAN connection, Raspberry Pi-based KVM for remote access and all of this is installed, provisioned, deployed and managed automatically using Ansible and cloud-init. This might be one of the most overkill computer builds that I’ve done in my life, And if two of my previous home server videos focused on practical setups that don’t break the bank This build went a little bit off the rails. As I mentioned, I used some parts that were left over from my previous builds, So I wasn’t really concerened about the price of those parts, But I will definitely mention sensible alternatives later on in that video. That being said, if you need a file server for torrenting, media streaming and backups, You probably don’t need something like that, and my previous server build would be just fine for you. Oh, and one more thing before we get started – This video is going to be about the hardware side of things. If you want to know about the software setup – what OS it’s running, How I deploy and configure it, what services I’m using – check out this video right here It should be out in about a month if you’re watching this video the day it came out. First off, let me tell you a little bit about how I use my home server And what I need from it in terms of hardware and software. First of all, I need my server to be small and quiet, And that eliminates both rack and ATX tower form factors. Rack cases often have industrial cooling fans in them That are optimized for maximum airflow with no consideration for noise. And ATX tower cases take too much space in my opinion. So that’s why I decided to go with a miniITX enclosure and motherboard. Even though you are limited to one PCI express expansion card for most miniITX boards, That’s not really a deal-breaker for me. Second, I want my server to be performant enough. I don’t run any virtual machines and don’t do any crazy computational stuff, But it should at least be able to handle media encoding in Plex and Jellyfin. I also run Nextcloud, Bitwarden, Unifi Controller and many other services on my server, So I need something that could handle that. That’s the reason I didn’t go with an off-the-shelf solution Like HP Microserver, Synology or QNAP. They’re great products with their own use cases, but I needed something beefier. Third, despite going with a small form factor, I want to have enough SATA ports. Many cheap miniITX motherboards have 4 or even 2 SATA ports, Which just isn’t enough for a storage server. Last but not least, I want my home server to be as power efficient as possible, While still fulfilling all of my other requirements. And I think I’ve found a platform that is the perfect balance between those four factors Size, performance, SATA ports and power efficiency. This is ASRock Rack C236 WSI. It’s an Intel Skylake miniITX workstation motherboard That has 8 SATA ports and supports DDR4 ECC memory. It’s an old motherboard, and it’s still pretty expensive even today. I bought it for 185 euros used, which is about 210 bucks, And that’s a lot of money for a used Skylake motherboard. But it’s pretty much the only miniITX motherboard in this price range that has that many SATA ports. I paired the motherboard with an Intel Core i3-6100 And even though it’s a pretty old CPU, The performance is still more than enough for home server tasks. And yes, the i3 Skylake CPUs do support ECC memory just fine, And you don’t need a Xeon CPU for that. As an added bonus, i3-6100 also supports QuickSync for hardware video decoding. Now, the fans of AMD might want to ask me Why I went with a crappy Intel CPU, instead of a glorious AMD Ryzen. And the reason is pretty simple As I already said, Asrock’s C236 WSI was the only miniITX board that had 8 SATA ports, And apart from that, Skylake CPUs are dirt cheap and feature hardware accelerated video encoding and decoding, Which is good for Plex and Jellyfin. Now RAM is where this is where the whole “I had this kicking around” gets a bit weird, Because it just so happened that I had two 16 gig ECC RAM sticks Literally laying around in my basement. I bought them for my desktop ITX build Since those were the only RAM sticks that would fit under the CPU cooler. Now that I have a different case and different RAM sticks, I’ve been trying to sell these, but to no avail. Which is good, because now I can use them in this server. If I didn’t have 32 gigs of ECC memory laying around, I’d probably just buy something like this. 8 gigabytes is more than enough for a server like this and 30 to 40 euros is a pretty good price. Hard drives are probably the most important part of a NAS build, And here you have three options. If you want cheap drives, get these. These are 6TB WD Elements external drives Which you can just take apart and use in your PC just like any normal SATA drive. The problem with those drives is that they’re based on the SMR technology, Which makes them slower and probably less reliable in the long run. You should definitely stay away from SMR drives if you plan on using ZFS Because the resilver times are incredibly slow with those. That being said, they’re pretty good for casual use And go for as little as 90 euros on Amazon Warehouse. I’m cheap, so that’s what I went with. I’ve been running these drives for 1 year pretty much 24/7 and they haven’t failed yet. If you want good and inexpensive drives, get these. These are the same WD Elements drives, but 8TB instead of 6. Those should be CMR drives, which is the good stuff, But they’re also harder to get. Also, depending on when you’re watching this video, Western Digital might have made them SMR as well, so do your research. Now, if you want to go balls to the walls, need maximum reliability And don’t care about the money, get these. These are WD Red Plus, flagship prosumer drives that are made for the use in storage servers. They also cost almost twice as much as the WD Elements CMR drives, But for that price you get the NASWare firmware and a 3-year limited warranty, so there’s that. Now, if you’re gonna be using MergerFS and Snapraid like me, You don’t have to go for the same size drives and buy all of the drives at once. You can start with just one or two drives, And then gradually buy more and more drives as time goes on. There is only one thing that you need to consider: Your parity drive, the one you’re going to be storing the SnapRAID data on, Should be as large as your biggest data drive. So in my case, I got three 6TB SMR drives, Which will mostly be used for backup and media storage, And I also got a 1TB SSD for Time Machine backups. I pulled that SSD out of my Sandisk Extreme and stuck it into an M.2 to SATA adapter, And so far it’s been working out pretty well. I’ve also got a 128gb SATA SSD as my boot drive. It’s the same drive that I used all the way back in my first NAS build And it still chugs along just fine, although it’s far from being fast. Next, we’ve got the case. I decided to re-use Streacom DA2 that used to house my workstation build, But you can definitely get a cheaper case like this Fractal Design Node 304 With six 3.5″ hard drive slots. Because of its modular rail system, Streacom DA2 can fit up to six 3.5″ hard drives AND up to twelve 2.5″ drives. That’s 18 drives in a system that can easily fit in a large backpack! Obviously, my motherboard doesn’t even have that many SATA ports, but the option is there. I’ve also ordered some extra rails from the Streacom shop To mount the additional hard drives at the bottom and 140mm fans at the top. Remember I said that Noctua’s 140mm fans suck? Well, apparently they suck so much nobody wants to buy them, Which is once again good, because now I can use them to cool my home server. I’m also going to be using Noctua’s smallest CPU cooler, L9i. This case can fit coolers that are way beefier than that, But I need the space for hard drives, And the L9i is way enough to cool the i3-6100 installed in there. In my previous NAS I used a power supply called PicoPSU. It’s a passively cooled super small 150W power supply, Which would absolutely not cut it in my new build. So instead I went with Corsair SF450, Which is a small form factor 450W power supply with a platinum efficiency rating. It’s also modular, which makes cable management a little bit easier. And there’s going to be a lot of cables to manage. For the network card, I got this. You might wonder why I need another network adapter if I already have two LAN ports on the motherboard itself. Well, that’s because it’s not just a regular network adapter. This is Mellanox Connect-X3, a 10 gigabit SFP+ card. This will let me have a 10Gbit link to my home server and take advantage of that 1TB SSD I have installed in it. I’m going to make a separate video on my 10Gbit home network by the way, So make sure to subscribe if you don’t want to miss it. One thing that I really wish my old server had is some kind of a remote management system. Sure, SSH is fine for most things, but it only works if you can boot into your OS in the first place. If your operating system doesn’t boot, or if you need to change the BIOS settings, You need to take the server out of the shelf, put it on your desk, Connect it to the monitor and the keyboard, and then bring it all the way back. Which is really annoying. A lot of server motherboards have a separate LAN port for remote control. It gives you access to a web UI where you can change the BIOS settings, Change the boot order or reinstall the OS Without connecting the computer to a monitor and a keyboard. But this motherboard is a workstation motherboard, so it doesn’t have a remote management port. Plus, even if I did find a miniITX server motherboard With 8 SATA ports and a remote management port, it would probably cost three times as much. So instead, I use this. This is a Raspberry Pi with a USB-C splitter and an HDMI capture card running PiKVM. The capture card connects to the HDMI port on the board, And the USB-C splitter is connected to a USB port on the server. PiKVM gives you a nice web interface where you can see the display output, and the keyboard And even upload ISOs and boot from them, Since Raspberry Pi can also pretend to be a mass storage device. As you’ll see in the next video, I also use it to automaically mount the Ubuntu Server installation ISO, So the only thing I actually need to do is reboot the machine and boot from USB. This thing saves lives. It can add remote management to any motherboard and it’s also very cheap Compared to a server motherboard with built-in IPMI. The whole setup looks pretty clunky But you can just hide it somewhere in the case and forget about it, if you have the space. There’s also a Kickstarter for PiKVM hat, which is an All-In-One solution That doesn’t need a USB-C splitter or an HDMI capture card, so make sure to check that out. So since I’ve done my fair share of ITX builds for the past 3 years, Building in this thing wasn’t too difficult. I used the vertical brackets to put a couple of Noctua’s NF-A14 fans at the top – I think two 140mm fans are more than enough for this 17L enclosure, And the components seem to be running pretty cool. I also had to use some standoffs for the PSU and the drive bracket in order to clear the fans, and the 2.5″ drives just barely clear the 3.5″ drives at the bottom, Which is oddly satisfying. I used rubber grommits between the vertical rails And the hard drives themselves to minimize vibrations, And I also put some rubber bands between the drives themselves. Now I also wanted to hide the Raspberry Pi somewhere in the case. Since you need a total of 4 cables for it to work, It could create a pretty bad cable mess in the case. So I decided to separate the server part and the PiKVM part using the stock dust filter. I think it worked out pretty good, But I can tell that accessing the Pi in case I want to use it for something else Would be a real pain in the butt. I might find another way later. Overall, I’m really happy with this build. It’s a tight little box, but there’s still enough place For 3 more hard drives and 10 more SSDs in here, if I ever need more storage. It also looks pretty cool. Now we’re coming to the cost. And well, all I can say is when it comes to Wife Approval Rating, This thing doesn’t score very high. My first build was focused on cutting costs and getting a viable home server setup for cheap. It costed me 256€ My second build costed quite a bit more, but was still mostly budget-friendly. I paid 481€ for the whole build, including the hard drives, and that’s still pretty ok. This built cost me almost twice as much, WITHOUT the hard drives. I’m obviously still including the prices for the parts that I had laying around, So 755€ is about as much as you would have to spend, If you were to build something like that from scratch. Is 755€ a lot of money? Well, depends. In and of itself? Yes, it is. But for a small form factor NAS with 10 gig networking and 8 SATA slots? That’s actually pretty cheap. Synology,’s 8 bay NAS costs 1000€, and doesn’t come with 10 gig networking. That would cost you 200€ extra. And QNAP’s 8-bay NAS is 1300 euros, which is almost twice the price is of this build. They do have their advantages of course. You don’t have to set anything up – stuff just works out of the box, With no need for manual configuration. At least in theory. The drive bays are also much easier to access than on my build And if a drive fails, the NAS will tell you which bay it’s in, which is pretty neat. There are also a lot of refurbished enterprise solutions that can be cheaper – HP MicroServers, Dell PowerEdges, and so on, and so forth – If those solutions work better for you – that’s great! Just because I built something else, doesn’t mean your option is somehow worse. Unfortunately, can’t go over each and every one of the potential alternatives And tell you exactly why my solution works better for me, But rest assured, I did go through pretty much all of the popular options, And ended up with building my own NAS instead. It might not be the most cost-effective, or the most performant, or even the most future-proof home NAS. But I think it’s perfect for me. It’s small, quiet, powerful enough for media server and NAS use, Has 10 gig networking and plenty of room left for additional hard drives and SSDs. And I seriously hope that this is going to be the last NAS that I will ever have to build. Video Information
This video, titled ‘The Perfect Home Server Build! 18TB, 10Gbit LAN, Quiet & Compact’, was uploaded by Wolfgang’s Channel on 2021-10-03 11:54:00. It has garnered 1270192 views and 22997 likes. The duration of the video is 00:13:35 or 815 seconds.
Another year, another home server build! This time I’m reusing some parts from my previous builds and cramming 18TB of storage into a 17 liter Streacom DA2 case.
PiKVM: https://pikvm.org/
Parts: Motherboard: Asrock C236 WSI (Buy it used) CPU: Intel i3-6100/i3-7100 (Buy it used) Recommended RAM https://amzn.to/3amfcCa Hard drives https://amzn.to/3iMAX2J Case https://amzn.to/3FuglGa Recommended SSD https://amzn.to/30coKOq
Support the channel: Patreon https://patreon.com/WolfgangsChannel PayPal (one time donation) https://www.paypal.com/donate/?hosted_button_id=S46R487SBMJZ8
Follow me: Twitter https://twitter.com/notthebeeee GitHub https://github.com/notthebee Twitch https://twitch.com/notthebeee
Music: Vladislav Kurnikov – Saturday Morning Hale – Moment Gvidon – Body in a Half Light
Video gear: Camera https://amzn.to/3gfcQYo Main lens https://amzn.to/3cvCozn Microphone https://amzn.to/3pAARgI Key light https://amzn.to/2TK374E Softbox https://amzn.to/3v6mBxt Secondary light https://amzn.to/3w7KLJg
Other stuff that I use: Monitor https://amzn.to/36zNekk Monitor arm https://amzn.to/3ASFKXD Laptop stand https://amzn.to/3eahdDJ Keyboard https://www.amazon.de/HHKB-PD-KB401W-Tastenkappen-Professionelle-Mechanische/dp/B082TXQD1S Mouse https://amzn.to/2Vp6NcU Audio interface https://amzn.to/3AS6Jmm Screwdriver https://amzn.to/2YdbmJj
As an Amazon Associate, I earn from qualifying purchases
Timestamps: 00:00 Intro 01:35 What I need from a home server 02:53 Motherboard 03:27 CPU 04:09 RAM 04:43 Storage 06:45 Case 07:21 Cooling and PSU 08:05 10Gbit NIC 08:31 Remote Management 10:14 Build considerations 11:21 Cost 12:10 Alternatives 13:03 Outro