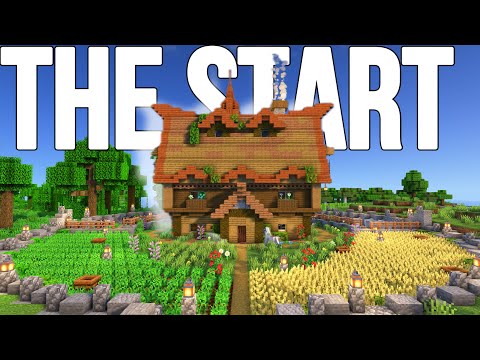
Hey what’s up youtube in this video i’ll be showing you how to make a halloween costume store for all of your city building needs if you enjoyed this tutorial please do remember to hit that like button as it really helps me and the channel out very very much so this Is the amount of space required to make our build a 15 by 12 block area as represented by the white concrete grid on the ground which you are more than welcome to make if you do feel as though it will help you out here are all of the Materials that we are going to be using for the first part of this tutorial this will make us our entire building please do make sure that you have access to all those materials and enough of them as well and now that we have all of that stuff we can get started Begin by coming to the front right hand corner of your grid if you’ve made it from the front right hand corner of the grid i want you to count backwards by one and place six white concrete on top of each other one two three four five six I then want you to place nine brick stairs going left one two three four five six seven eight nine place a white concrete on the end and extend that white concrete backwards by nine using brick stairs one two three four five six seven eight nine place a white concrete on the end And repeat this process extending across the back of the build by nine using your brick stairs and then ultimately we will be once again doing the same thing connecting to the front of the build to make a square we want to join the white concrete blocks Down to the ground in each one of the four corners so we will have something which should look like not quite like that like this perfect so this is going to help frame our building i then want you to place two rows of black concrete below and inside the rows of brick stairs So the two rows of black concrete are going to allow us to make the banners which are of course going to spell out what this build actually is which is going to be a halloween costume store or if you like just a costume store it doesn’t necessarily have to be for halloween Although that is what the sign is going to indicate so that’s what we want to have grab your brick slabs and on the front right and back sides of the build only i want you to place brick slabs underneath and outside of the rows of black concrete so again front right and back Sides i want you to place brick slabs just like this you don’t have to do the left side when it comes to the front of the build we have to make the entrance however that’s going to come a little late a little bit later but the entrance will be where we have the Front left hand corner of the build here it will extend inwards diagonally by one i want you to destroy two blocks in the ground going right and then place a vertical row of white concrete right of the two destroyed blocks in the ground place two upside down brick stairs Extending through from the row of white concrete and then place another row of white concrete on the right side of this then place three upside down brick stairs one two three extending right of the window frame and then extending towards the back of the build i want you to place two more Upside down stairs one two you can then proceed to extend those stairs backwards using brick blocks to join to the back corner of the build and then extend the bricks across the back of the build leaving a gap of two this gap of two wants to be filled using two upside down stairs And then extending through the small gap that we now have i want you to place a brick block and then right of this a furthermore four bricks one two three four extend that fourth brick towards you by one and then up by three one two three like this and then if you Like you can even extend it back on itself so just like this essentially when it comes to the left side of the build we actually have something that’s a bit interesting we want to take this bottom brick and place seven bricks in front of it one two three four five six seven Now in front of that seventh block we are going to place three upside down polished black stone stairs one two three just like this that first stair we want to extend across and we want to place a regular facing stairs kind of like towards the right i guess a sideways stair Then we want the opposite stair to the right of it and upside down stair to the right of that we want two polished black stone on the left and right side so that’s one and two and then one two we then want to have the reverse of the Bottom which is sideways facing stairs on the left and right upside down stairs extending inwards and then uh polished black stone slabs along the top of this just like that to create this shape and then inwards from this we’re going to place polished black stone At the top and the bottom just kind of like this and you can place polished black stone on the left side and we can have the stairs as well and then up here i’m going to extend it back a little bit too but we’ll probably just Install like a regular wall in at some point in time so we have um so this will probably just get filled in when the rest of the ceiling gets filled and so quite honestly you can kind of leave it like this or perhaps extend these slabs backwards So that they kind of fit the rest of the shape of the cauldron um we can fill this left wall in here using brick blocks just like this and then when it comes to filling it in we’ll sort that out a little bit later as well This area has to have glass too so the glass is going to the glass pane is going to just sit inside here just like this along the inside we can add we you know what we can probably just have can we place this stair here and then we can Have like uh black stone just like this um the front of the build also needs windows too so the windows are where we have the upside down stairs so you can feel free just to add a row of glass on top of the upside down stairs wherever Wherever we have them just like so here and then the rest of the area pretty much is just going to be bricks so um wherever we don’t have the glass panes or these stairs we just want to have the bricks so they want to be here as a matter of fact On the back of the build you may remember we have the two stairs so we want those to also be glass pane just like this and this area here actually also wants to be glass as well so if we convert these bricks into upside down stairs i Never thought of that to be quite honest and then we can have two rows of glass pane just like this and then that will be perfect and then along the inside you know we might do something else but um we can have like a row of white concrete or perhaps we’ll Use something else for the interior material but we we can definitely shake that up when we actually get there so uh the next thing that we are going to do now that we have kind of accomplished a good base shape for the build is we are going to install where Lanterns are going to hang around the build so for instance on this middle window on the front of the build i’m going to place two brick slabs here and here left of the left and right of the window on the right side of the build i’m going to place brick slabs here next To the window and then i’m gonna leave a gap of two and then here so that’s quite in the that creates like a gap of two and then a gap or two between the window and the back part of the build we want to do the same sort of thing on the Actual back of the build as well so uh on the left side here if we leave a gap of two place a slab a gap of two place a slab and that’s quite evenly placed and i’m quite happy with that and then what else can we do before we Have to start whipping out signs and such so i guess not too much um let’s install the door warped planks glass block dark oak doors lanterns we’ll be using a bit of cobweb and we might also be using uh i’m using polish diorite for this because i never Use this stuff a lot of people find it ugly and i do too but i’m using it anyway so the doorway is already marked out by the fact that we have these two empty blocks i’m going to place warped planks on them dark oak door on top and Then glass above the door just like this lanterns are going to hang off of all of the areas that we just marked out using slabs so just like this along the back of the build i’d recommend just adding like cobwebs and stuff to the actual outside of the build It just it just makes it look a little bit for a lack of a better term spookier i suppose and um i just recommend it i i think that it certainly adds a little something to the builder like here and here for example and here and here the Only downside is it makes this next part annoying in the fact that i want to destroy the floor and i want to replace it with polish diorite so i’m using polish diorite because i am not in the city right now right i’m not building a city or at least not one that makes Sense i’m building a street probably the longest street that has ever been built in minecraft actually i doubt it i’m sure people have built bigger streets in this game i’m sure they have but anyway the point is that i would use whatever flooring material you’re using For your city so let’s say that you are replacing this in a city and predominantly your city’s footpath is just regular old stone then i would use that if it’s smooth stone your smooth stone if it’s you know whatever it is it doesn’t matter where it is light gray concrete whatever You’re using i would use the same material um i’m tempted to i i guess i’ll replace underneath the stairs just to create a contrast but i was tempted to use a contrast material um underneath them but i’ll i’ll just leave it as is just got this side to do As well right here and then we’ve done it all and then that looks pretty good it just looks a little bit different from what what one would usually use so what do we have to do next in terms of outside we’ve got to add these signs We’ve got two of them so they’re the same sign but it’s used twice this is my least favorite part of most tutorials ladies and gentlemen we’ve got to make some banners so um loom purple balance orange dye purple dye let’s go let’s do this chuck the Loom on the ground crack that bad boy open and then let’s place a brand new banner in there we’re going to be using some orange dye and we’re going to make the letter h that’s a vertical row of die on the left side vertical row of die On the right and then a horizontal one straight through the middle boom h nice and easy we now have a not completely dissimilar to the h so we need that same horizontal row straight through the middle that’s good horizontal row across the top that’s where it differs vertical row on the right Vertical row on the left boom we have a half hour a we need two l’s so that’s going to be a vertical row of orange of the left side and a horizontal row along the bottom you may have to make two of these or even four of these if you’re not in Creative i’m in creative so haha we’re going to put a brand new banner in the loom and we can stick with the row of orange across the bottom let’s add a row of orange across the top across up the right side and up the left side and that is oh so hello We now have to make w this is a tad bit more complicated we have to begin by placing an orange triangle at the base of the banner grab that chuck the orange dye out put the purple in and then we have to do this set of teeth at the bottom of the Banner and that will actually give us exactly what we need it kind of sort of looks like a mustache or something anyway the point is we want to grab that banner chuck the orange dye in and here it’s easy vertical row of orange up the left vertical row of orange up the right I think i said that in reverse order but it doesn’t matter and then we can chuck a brand new banner in here so here we have ian we actually need two of them start off with a vertical row of orange dye on the left side and then the rest Is putty in your hands horizontal rows of orange dye throughout every single plane of the e boom there we go and now we have hello we have to make n now this is very simple vertical row of orange diamond the right vertical row of orange knight on the Left what could be simpler diagonal row top left corner to bottom right corner boom we have a halloween or hello n when is halloween hello when anyway the banners you will find as long as you can spell this correctly and i would not be ashamed if you don’t know how to Spell it i had to google this it’s h a l l o w e e n easy peasy once you’ve done it once hopefully we can do it twice if you have to google it twice don’t be ashamed so did i so we can have halloween and then You can even have it on the back as well if you like so um depending upon where you place this um i didn’t actually have the banner along the back of on the back of my build because it seems redundant to me to have a sign for the Build on the back of the build unless there’s foot traffic back there so feel free if you have the banners if you have the time if you have the patience to place it if not then don’t bother it’s as simple as that so i’m actually Going to get rid of all these and i’m now going to focus work on the inside of the build a little bit so on the inside of the build i’m going to be grabbing warped planks first of all i want to rip up the floor why am i using Warped appliances because it looks like a sort of cool so now we’ve ripped up the floor and replaced it using warped planks we’re going to do some more things around the inside of the store that will help to shape it and make it look a little bit better so for instance I want to use white concrete and i want to place a row of white concrete next to the door here extending just from the left of the door towards the outer corner of the store i’m going to add another white concrete extending backwards and then a row of Brick blocks extending up to just underneath where the sign will be as a matter of fact it might even be really helpful to add a ceiling at this point the white concrete is going to be used as a ceiling because it counter balances the darkness of the inside of the stall There are three rows of space between the ceiling and the floor this is basically just up above the windows we can destroy some of the black concrete that we have in the ceiling here on the right side the build although we can’t destroy too Much of it as i found out but we want to extend the white concrete across and we want to have a smooth ceiling pretty much so all the way over to the left side of the build like this i’m gonna add what can i have this white concrete Doesn’t have to be here white concrete doesn’t have to be here that looks fine when it comes to the top of the build here i mean it’s kind of up to you you can if you want just kind of like fill the top of this in using black concrete or Again it sort of depends on like what you um what you kind of want to look at for the top of the build it might not be a big deal to you but you could just leave it black or you could add something else to the inside perhaps uh some black Stone or we could use the diorite or something like that it’s really up to you when it comes to the roof it’s it’s not really a big deal anyway coming back inside the store now that we’ve kind of that’s that’s helped a lot hasn’t it that looks a lot better So we want to add brick blocks um right next to the door like just behind the frame here and we want to add some here as well so again kind of reducing the amount of space that we have inside of here i want you to place a row of bricks in The back right corner of the build top to bottom um i want you to add a row of two white concrete extending across the back of the build at the bottom and then a vertical row of brick brick blocks on the opposite side two white concretes Again just to create kind of like again just some like shelving gaps and stuff like that it just looks kind of cool um we have the doorway here as well so i’m going to extend the doorway in a similar manner as a matter of fact i’ll place Two entire rows of white concrete like right at the doorway and where we have the uh the black cauldron and then i’m going to place two rows of two brick blocks as well so this is basically just a space in between the window and then the entrance so this actually feels Pretty good we’re almost at a point where we can fill this in now uh the only thing that i do want to do with the materials that we have is along this back wall here i’m going to place a polished black stone on the left and right sides with upside down polished Black stone stairs just in between and then joining kind of like the left side of the entrance front to back i’m gonna have on the right side here polish blackstone and then one two three upside down stairs polish blackstone on the end and then this is Kind of going to be the till area and we don’t really have too much outs that we are going to be using in the construction so ladies and gentlemen we’ve kind of hit the point where we need a brand new set of materials a lot of which are going to be survival Unfriendly but give me a moment i can grab them all for you and we can go through them one by one here are all of the materials that we are going to be using on the inside of our store and we are going to be grabbing more later on As well as we exhaust these materials a lot of these are considered to be very survival and friendly so if you have to substitute them for something else feel free we’re going to be starting off with crimson trap doors flower pots with a rose crimson fungus warped fungus red Mushroom smooth quartz stairs weighted pressure plates and arm stands i want to make a till area this is quite easy to do by the fact that we’re going to place a trapdoor just here on the left and we’re going to just flip that up and down to get in and out of this Area we’re going to make a tilt over here towards the right side of the counter so that’s a stair with a weighted pressure plate to the right i want to stick a couple of flower pots on here and i’m going to stick a river rose and a red mushroom in here just as A little bit of decoration so i want to have in the window i’m going to place an armor stand and we can kick that out later along the back along the back wall here i’m going to need i’m going to need some different stuff already so along this back wall i Don’t know why i have all of these mushrooms out right now we’re going to be using them at a different point we’re going to along this back wall use the skeleton skull carved pumpkins jack-o-lanterns sea pickle soul lanterns white banner we’re going to need the White carpet as well and we are going to use cauldrons and we’ll grab brewing stands so along this back wall left to right i’m going to stick a skeleton skull with a soul anton above it to the right a jack-o-lantern and by the way i kind of Want a jack-o’-lantern here as well in this window um if i complete there there we go uh i want a jack clients in the window that armistance holding one that’s kind of really irritating me we’ll sort that out a little bit later though um next to this jack-o-lantern there is along this Back display i’m gonna have a white banner um that could easily be turned into a ghost banner but i’m just using a white banner for laziness i’m going to stick a soul anton to the right of this uh carved pumpkin with a c pickle on top that makes it look like an actual Pumpkin and then i’m gonna stick another jack-o-lantern just because i really like these things very very halloweeny uh i want to chunk a couple of cauldrons just here just behind the counter to the right as well because once again it just feels like something that should be back here White carpets in front of the entire till area i really like that that looks pretty cool now i’m i’m quite happy with that um feel free to again you know feel free to stick some like scores on the wall and stuff if uh if you feel as Though that it’ll uh it’ll kind of like liven things up a bit i certainly think it does and you can use of course other heads uh to achieve this effect as well but i mean skeletons are pretty synonymous i think with halloween um in the corner of these saw so like Pretty much the opposite corner of where we just were i’m going to stick a cauldron where this white concrete once was i’m going to have a brewing stand and then probably once again a jack-o-lantern because i love these things i think that they look so cool destroy the brewing stand They just look so cool i really like them in this little window here i’m thinking that we can use um flower okay i think i’ve got to do it manually no okay jack-o’-lantern doesn’t want to go away that’s weird i guess that’s a glitch gonna grab a flower parts crimson Fungus warped fungus and then what else are we gonna need throughout the store well we’re going to need armor stands again um we’re going to be using some end rods we’re going to be using some cobwebs and plenty of other stuff as well so in this uh in this window here Just a couple of flower parts and then a crimson fungus and a warped fungus oh we should be using the item frames too so that’s looking pretty cool and from the outside i think that it looks quite nice so from the outside it looks very spooky i really like that This will look a lot better as well once we actually kept that arm standard out too so um what are we doing in here we want to add some armor stands these are going to just have costume items on them so pretty much like we’re going to place One here and here so that we can walk around each individual armor stand and then we’ll leave a gap arm stand gap armor stand just like this so that we’re able to walk around them or if you like you can even have like a a gap of two Just like this it doesn’t really matter it’s completely up to you i want to add a couple of rails at the back here so this is basically going to be three and rods kind of just stuck together one row off the floor in this alcove of brick And i’m going to chuck a couple of cobwebs just up here and where else can i have cobwebs maybe like one here or so maybe like one here again just to kind of like fit the atmosphere and uh i want some item frames so item frames are going to go above these Alcoves here not here and they’re going to go here and maybe we can have like maybe instead of like loads of scores we can just have like one there and i want to use all of the all the mob heads and stuff so basically like the skeleton scores the kind of like just Regular head the zombie head creeper head dragon head with a skeleton head um we can use never right so the nevrette sword and some carved pumpkins and stuff and um basically we’re just going to be placing the heads on top of the white whoops my bad um the heads on top of the White concrete areas um just to kind of like they’re just supposed to be masks and you can place them on the wall and you can place them on top here you can place alternate heads kind of like just in the item frames just to make it a bit more Interesting um and you can do the same thing for the never right swords by the way because you know how you can always get like play swords and stuff um and whatever else you might have so like swords and bows and different weapons and all sorts of fun stuff you can grab um At halloween so like you know you can give these uh give the armor stands like elytra you can come to tridents you can give them different armor so you know whatever armor that might be is completely up to you like i it it’s up to you whether you want to give the the Mannequins like different um different costumes but it did just occur to me that it’d be kind of cool if say like you did give one of them like um blue leather and then maybe like a white hat and then maybe like an iron sword to make him kind of look like mike Myers or something you know it’s uh it’s up to you though you like um it depends how much effort you really do want to put into it um the only one thing that i’m kind of like missing in the store here is below the end rods i would just appreciate a Little bit of like i’m gonna grab purple blue and oh no yellow and i want it to look as if we’ve got some like hanging costumes um i don’t know what is up with this jack-o-lantern i can’t get rid of it and i just want them to look like they’re on Like a clothes rack and you can grab these and they’re kind of like those bags that contain like cut full costumes and stuff um i like the idea as well of just hanging a soul lantern perhaps just like here uh maybe even chucking a head There as well so i why not grab the zombie why not grab the zombie perfect so we can have that there you could even have another item frame like these stores are usually very cluttered and i think i’ve achieved that effect but if you feel as though you could play some More stuff then you know you absolutely feel free and i’m gonna see like okay can i chuck this jack lantern away what’s happened oh okay so it’s possible to get rid of it and then can i yeah then i can okay well that was very weird but yeah ladies and Gentlemen that is the halloween costume store complete i’m very very happy with how it’s turned out and hopefully you are as well so this is what your halloween costume store will look like once it has been 100 fully completed ladies and gentlemen i really do hope that you have enjoyed this tutorial if You have please do remember to hit that like button as it really helps me in the channel out very very much if you’re new around here please do consider subscribing to the channel and clicking the little bell next to the subscription button that’ll ensure that you get all My videos sent directly to your sub box if you would like to make any more builds by me city bolts or perhaps one of my house tutorials or maybe you’d like to try checking out my survival series you can find all of that in the card system and the description below Thank you so much for watching everybody i love you all very much and i’ll be see you seeing you guys in the next one good bye Do You Video Information
This video, titled ‘Minecraft Tutorial: How To Make A Halloween Costume Store “2020 City Build Tutorial”‘, was uploaded by TSMC – Minecraft on 2020-10-23 13:13:38. It has garnered 109141 views and 2010 likes. The duration of the video is 00:29:07 or 1747 seconds.
In this video i show you how to make a Halloween Costume shop! In this tutorial i show you how to make the interior as well!
How To Make a CIty Playlist – https://www.youtube.com/playlist?list=PLVfyBBWTXosBc2X7FdAzrdKffZoY1ZzZG
#tsmc #tsmctutorial #citytutorial
Want to Support the channel? 🙂 – https://www.youtube.com/channel/UCIui-Mt1PmcJYpoBATftj7g/join
Check out my merch 🙂 – http://tee.pub/lic/uCgw3hVWL6c Check out My Instagram! instagram.com/tsmcyt/