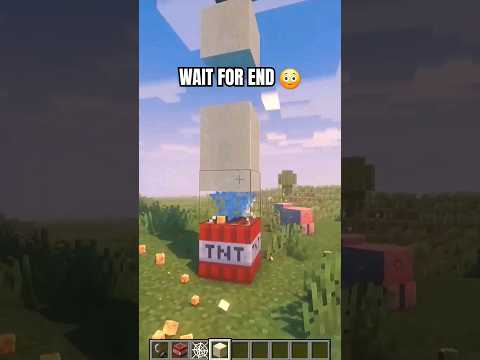
Hello everyone this is redstone chief today I’m excited to present to you the fully automatic brewing station this machine will automatically brew a potion that you choose and then continue to prove that potion forever until you turn the Machine off on the left you can Select your potion you can see a list of ingredients which each create a potion with a different effect simply adjust the pointer in the center that choose the ingredients that you want once you are done head to the right where you can add a few more ingredients to modify Your potion to slip these levers on to add that ingredient once you are done all you have to do now is turn the machine on by flicking this main lever while on the potion brewing machine will start to create your potion and when finished we’ll move the potion into this Chest after this is done the machine will automatically start up another batch of potions and will repeat this cycle forever when finished just turn off the main lever also this machine will remember the number of times that you flicked the main lever so view instead want a certain number of Badges such as 4 you just need to flick the lever four times after the fourth batch finishes the machine will automatically stop the final thing that you need to know in order to use this machine is how to refill the ingredients if you head on up the slider you were Led into a room where all of the ingredients are stored in dispensers when you run out of a certain ingredient just open the dispenser and you can refill it before explaining just how exactly this machine works I wanted to point out that this machine was designed To be easy to use and easy to build and survival I did the best I could to use as few resources as possible but also make the Machine compact and easy to build in order to make the machine easy to build and survival as possible I managed to fit almost all of the Redstone circuitry at floor level although this decision did make the machine less compact than it could have been it does make it much easier to build in survival also in order to transport the ingredients to the brewing stand I decided to use water currents instead of a long line of hoppers Although using a long line of hoppers is completely fine I felt that using water current to transport the ingredients would save a lot of iron which is not always easy to combined survival mode finally I made sure that the water bottle chest brewing stand potion chest and ingredient Storage were all located in one convenient area so that you can easily check on the progress of the machine without having to walk among all the redstone circuitry hidden away in the back this machine also handles errors very well for example if you accidentally tried to make a potion that Doesn’t exist or ran out of water bottles the machine will halt and wait for you to empty the incorrect ingredients in either of the brewing stand or the hopper just above the brewing stand and that’s it if something ever goes wrong while brewing you can just empty the ingredients and try again Okay here you can see all the redstone making up the potion brewing machine with all the decorative blocks removed to start I will explain how the machine knows which ingredients you have selected when you select an ingredient such a sugar using the item frame selector the redstone torch powering the Sugar dispenser in the back turns off this is also how you choose your additional ingredients here when you select ingredients such as gunpowder the redstone torch powering the gunpowder dispenser also turns off now to explain what happens when the machine turns on when the machine is Turned on with the main lever it simply sends a redstone pulse all the way to the dispensers storing the ingredients in the back since most of the dispensers have a redstone torch sitting directly beneath them this pulse doesn’t do anything however since you have turned off the torches for the ingredients you Have selected the dispensers do end up dispensing their ingredients into the water current where the ingredients are transported to the brewing stand once the ingredients have been carried over to the hopper that sits directly above the brewing stand these ingredients simply wait their turn in the hopper While the brewing stand brews each of the ingredients one at a time when the last ingredient has finished brewing a redstone pulse is sent to the hopper located beneath the brewing stand to transport the finished potions to the finished potion chest another redstone pulse is also sent to the dispensers That store the ingredients to start this cycle all over again but only if the machine is on or has a few more batches to finish first otherwise the redstone signals blocked so the machine stops brewing potions in the cycle ends finally this fancy mechanism here in the Corner acts as the brains of the automatic potion brewing machine it counts how many times you afflict the main lever and also keeps track on whether the machine is on or off if the machine is on or a few more batches of potions need to be made first this Mechanism starts up the next potion when the current batch finishes before getting started with building the fully automatic brewing machine you will need the following supplies here you can see that you’ll need seven stacks of a building material of your choice it is fine to replace the glass and Lowe’s Don’t scene here with your building material instead but I like to use glass when I’m working with water and a redstone build so I don’t accidentally break a block that I shouldn’t and then cause the water to flow into the redstone and ruin all of my hard work Also you will need all of the redstone supplies seen in here you do not have to use zombie flesh like I did but you will need to have 54 of some item which will be used in a hopper timer also you will need nine of any non stackable item of Your choice I just chose to use stone swords since stone swords are easy to make finally you are going to need 30 item frames along with the 30 different items that go in them I recommend renaming these potion ingredients so that their name matches the potion it Will make if you don’t know which ingredients make which potion simply copy the same names that I have done here when the renamed ingredients are placed into an item frame their name will be displayed making it much easier to make potions later when you are using the machine alright now we can get Started the first thing you will need to do is Mark off a 17 by 15 by 7 area where the automatic rig machine will be built once you have designated your building area start off by building a 17 block wide and six block tall wall this will Be the front of the brewing machine where you select your ingredients once you have finished all that is left to do now to the wall is add on the item frames levers redstone lamps glowstone and chess so that it looks like this wall here as I said earlier the Glowstone is optional but I think that was done does a great job at completing the brewing station look now that the front of the brewing station is complete let’s build the atom frame selector head to the back of the item frames and place two blocks right here then place a comparator on top Facing away from the wall make sure that this comparator is placed directly behind the item frame containing the redstone torch so the comparator is outputting a redstone signal based on the rotation of the redstone torch when you are done place some redstone dust and two comparators like this from here Form a loop of redstone wire that goes eight blocks out when you get to the end of the loop place two comparators and a redstone torch right here and then make sure that you set this comparator in to subtraction mode now take your redstone repeaters and place eight of them along The edge of the redstone loop you just made then take eight blocks and place them in front of the redstone repeaters on top of each of these blocks place a redstone torch when you are done you will need to place eight more blocks above the redstone torches and then put Eight more redstone torches on top of that to finish things off place one final row of blocks on top of these redstone torches above these blocks you can now place the dispensers that will be used to hold your ingredients make sure that each of these dispensers are Facing out you have now completed the item frame selector for the automatic brewing machine and can test to make sure everything is working currently one redstone torch should be on as you rotate the redstone torch in the item frame a different one of those redstone torches should turn on now to build the Selection circuitry for the five additional ingredients you can add to your potion to start place five redstone torches on the wall right here these torches should be directly behind the levers on the other side of the wall then we place a line of redstone repeaters and redstone dust across this Open space for ten blocks once you are done we are basically just going to build another wall of alternating blocks and redstone torches like we had done before when you finish place the rest of your dispensers on top and make sure that dispenses are also facing out the next Step in building the automatic brewing machine is to build the brewing station area start by placing a hopper facing into this chest on top of this hopper place your brewing stand and then another hopper on top of that from this hopper place two more hoppers going this Way facing into it now place four blocks here and at the ends of each of these blocks place a redstone torch place some redstone dust here and a comparator here facing out of the hopper moving to the left place three blocks in a pattern like this and then some redstone dust on Top finish this area by placing a redstone torch right here and then a redstone repeater next to it facing into this hopper now if you head on over to the front of the machine you can now place a hopper entering into the brewing stand here and another hopper Here these are the hoppers that will transport your water bottles from this chest into the brewing station moving again to the back of the brewing machine we can now start to place all of the redstone circuitry starts by setting up a pulse extender right here then place Another pulse extender here and a third pulse extender next to it this third pulse extender will need a block placed here and two redstone repeaters heading into this block now let’s build the hopper timer from this pulse extender place a redstone repeater and in front of it a piece of redstone Dust and a block place two hoppers facing into each other here and finish the timer with a piece of redstone dust and a redstone torch here now you can place fifty four items of your choice into this hopper the reason you need fifty four items is because a brewing Stand can brew one ingredient in the time it takes fifty four items to transfer from one hopper to another the next step is to place a redstone torch here coming out of this redstone torch throw the monostable circuit in front of it which looks like a repeater face Into a sticky piston positioned in the floor with a block on top of it place a redstone repeater here and set it to two ticks now that this is done place a comparator coming out of this hopper and in front of the comparator a block with a Redstone torch on it here now we are going to build another monostable circuit heading into the third pulls extender you built start by placing a redstone repeater facing into a sticky piston positioned in the floor like this put a block on top and then another redstone repeater here set to two ticks Before we get any further make sure you place another redstone repeater here also set to two ticks which we will use later now we need to build the brains of the automatic brewing machine which counts how many times the main lever has been flipped and controls the rest of The machine based off of it start by directing the redstone current from the main lever down this path make sure to place three redstone repeaters here so the redstone wire doesn’t interfere with the pulse extender you built earlier now place a block here with redstone dust on top a resident Repeater here with redstone dust behind it and another redstone repeater here both of these repeaters should be set to two ticks now place a block here and monostable circuit here and a redstone torch here place to droppers facing into each other here and now you can place your nine Non-stock able items into the right dropper next to the left dropper place two comparators this comparator needs a monostable circuits in front of it and this comparator needs a block with a redstone torch place some redstone dust and repeaters set to two ticks and then another monostable circuit in front of It next place a comparator and some redstone dust here and in front of this monostable circuit a repeater set to two ticks in a torch tower leading all the way up to the dispensers like you’ve done before now place some redstone dust on all of the dispensers you have built earlier You will need to place a block in the corner when you get there when you finish you will need to place one more dispenser on the end with a redstone dust on top this is the dispenser that will hold your nether wart the final step is to build a water current pathway Along all of these dispensers I recommend using glass blocks for this part so that you can see the water that we will be placing in later to start place a glass block here and here and then form a line of glass blocks all the way down Once you have built out to eight blocks you will need to start a new line of glass one block lower this is because the water current only travels a maximum of eight blocks when you have made it this far you’ll need to build one block lower again when You have finally built to this wall directs the current along the wall until you finally reach the hoppers now that you are done with the glass head on back to the top of the dispensers this is one you can finally place the three water source blocks All right now to add on the final touches we now need to make the refilling room which is just a matter of placing down a bunch of blocks to form the floor and walls when you have finished placing all of the blocks for the room make sure you Take the time to place a roof over the water stream you built earlier this prevents some of the dispensed items from escaping when you turn on the automatic brewing machine now that you have finished the room just add the item frames and ingredients that you know what each dispenser contains make sure That each ingredient is located in the corresponding dispenser as the selection wall in the front if you don’t know the order just place your ingredients the same way I do and you will be fine alright the only thing left to do until the entire machine is complete is to Fill everything up start by filling up the dispensers in this room with any ingredients that you have I will just fill up the nether wart blaze powder and redstone dust for this example now head to the front and you can now fill up your water bottle test with as many Water bottles as you can also don’t forget to power your brewing stand with blaze powder and now you are done let’s test out the machine I will select a potion of strength and also select redstone dust to lengthen my potion now I can turn the machine on if everything Is working properly the automatic brewing machine will now produce a continuous supply of extended strength potions all I have to do now is wait and as you can see the fully automatic brewing machine is successfully working also to make sure that the brewing machine is counting memory is working I will now test to make sure that it will brew exactly 3 potions if I flick this lever three times and just as I expected the machine stops brewing after making three batches of potions well everyone that is all I have I hope you have enjoyed this video and Can use this fully automatic brewing station in your own worlds good luck building and I will see you next time Video Information
This video, titled ‘Minecraft Tutorial – Fully Automatic Potion Brewing Machine – Survival Friendly’, was uploaded by Redstone Chief on 2016-01-26 17:07:19. It has garnered 2127 views and 42 likes. The duration of the video is 00:18:19 or 1099 seconds.
In this Minecraft tutorial, I will show you how to build a survival friendly fully automatic potion brewing machine. This machine will make the process of brewing potions not only much easier, but also automated. You literally don’t have to do anything other then select your potion and then turn it on.
Key features of the Fully Automatic Potion Brewing Machine: – Simple interface for selecting your potion – VERY survival friendly to build – VERY survival friendly with minimal resources – Brews your selected potion 1-9 times, or indefinitely (you choose) – Brews your potion in front of you, so you can check on progress – FULLY automatic, meaning it brews with no user-interaction needed