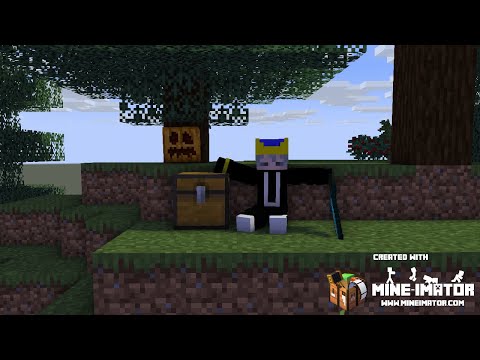
Hey what’s up YouTube in this video I’ll be showing you how to make the largest biggest and longest to make McDonald’s exists on YouTube Buckle in This modern McDonald’s has an outdoor play area um where we have a jungle gym and a sand pit inside on the first floor that’s right this has two stories we have some self-service machines Some wonderfully mannered employees we have a second story which has plenty of seating some more service machines but more importantly toilets which if you’re anything like me you will need in a McDonald’s Now most importantly the star of the show we have the indoor play area this thing is huge and it’s actually hard to see so to make it a bit easier Here is the play area this is a multi-level play area with all sorts of hamster cage tubes that take you all over the different areas of the playset We have a giant water slide that takes us all the way back down to the bottom foreign we have a giant sand pit that has a mini water slide this is honestly more like a mini indoor Beach And opposite we have a bouncy ball pen We also have a mini parkour course that takes us all the way back up to the top of the playset and most importantly all the way back to the top of the water slide I’d really appreciate it if you guys could like this video And subscribe this Was a real interesting one to build and make thank you so much in advance I hope you enjoy building this and without any further Ado let’s get started this is the amount of space required to make the McDonald’s and here are all of the materials that we will Use throughout the build or at the very least this stage of the build we will need some more things later however we will address that when we get there Begin by placing a light blue concrete Underground leave a gap of one going right and then Place another light blue concrete it’s Actually easier to build this from the sky we want to place two light blue concretes placed backwards and to the right diagonally one two extend back by two one two then place two back left diagonals one two extend left two one two place two front life diagonals one Two extend forwards by two one two and then extend and connect back to the build in a circular shape we then want to place two light blue concretes on top of every single light blue concrete block that we have placed we want to join the entrance together at The top like this and then place a layer of light blue concrete directly on top of the empty space above and inside of the circular shape the end result should be this well igloo we then on the front two Corner diagonally place blocks want to place a contrast block so I’m using Some magenta concrete for this we want to place two of them on top of the diagonals in total the purpose of this is to then Place yellow concrete on top of this join the yellow concrete together extend up by three one two three and one two three join together across the top We then want to extend the corners backwards by four one two three four extend across join forwards do the same with the bottom turn this entire thing into a box now we are going to fill the left right and back sides of this in using yellow Concrete we also want to fill the Basin as we do actually want to be able to get up into this point however we will need to access another part of this build as well so on the right side right in the middle we do have to make enough room so that we are Able to get in and out of this we want to destroy these magenta guiding blocks like this we want to fill the top of this in also and we should actually make the mechanism for getting up and down so right in the back center block here Inside of the Box we want to be able to create a ladder so if we place a layer of light blue concrete here extend or place a yellow concrete here and then we can use a little bit of glass surrounding this area like this so it’s Nice and subtle so if we take a look at this we can create a little tunnel and we can use ladders here so that we can actually get up and down I think that that is actually enough ladders jump never mind there we go so beyond this we also want To have a part that sticks out on the front so we want to place magenta Concrete in front of the three middle blocks at the bottom and at the top extend the center blocks forwards and we then want to use black stained glass to join these blocks together bottom and Top just like this we then want to grab blue concrete and we now want to create a tunnel which will take us to the next part of the build which we have yet to build so extend this yellow concrete here outwards by free using blue concrete one Two three extend backwards by eight one two three four five six seven eight and then up by five one two three four five and then extend to the right by five as well one two three four five we then want to extend inward so extend inwards about as far as where the yellow Concrete is here so we also want to extend another row this is above the doorway here Place three blue concrete extending outwards one two three and then extend backwards by six one two three four five six and then up by five one two three four five and then right By two one two across by five one one two three four five and then we want to extend inwards and line up with the previous row so if we take a look at this these two rows of blue concrete basically just sit parallel to each other and that’s kind of the point Because this is a tunnel that will lead us up into the next part of the build there are two ways to get to the part that I am hinting at but and also by the way it’s up to you whether you want this to connect together on the corners or Whether you want a more rounded appearance so connected rounded it’s up to you it really doesn’t matter either way it’s more of a personal preference but once you have done this on one side of these two thank you we then want to apply the exact same thing to the opposite side so With this tube as well we are going to have to add some stairs into it and this is just going to be in this section here where we start to climb up so if we just apply these here all the way up to the top this is Looking pretty good so now that we have this we can now move on to the next part so for this next part we actually have to shave a row off the blue concrete slash Blue Glass we want to leave a gap of one between this tunnel and the Yellow concrete reason being is because we want to place a lime concrete at the bottom of this tunnel and at the top of this tunnel we then want to extend the concrete left and right by two so one two one two one two one two like this we then want To place a row of lime green concrete extending outwards diagonally from the bottom and the top and then extend forwards by four one two three four one two three four we then want to do a similar thing we want to place a lime Concrete in front of and to the left of These two rows and extend across by four one two three four one two three four and then we want to join these two rows together diagonally so this might sound a little bit complicated maybe but if we take a look at it it’s fairly simple we’re kind of making a circle but it’s More of a square we then want to fill the bottom of this in using lime concrete we actually want to fill pretty much every side in with lime concrete but on every single side we want to leave two rows in the middle so that actually applies to every single side of It so the end result should look like this we then want to add a roof to this and to do this we are basically just going to place a layer of black glass block all the way around the top inside above the lime concrete here and then we are Going to add another layer of black glass and then perhaps the final one just on top or maybe we can just leave that as it is I think that that’s cool then it kind of looks a bit more domey rather than pointy and now that we’ve Done this we are going to add some glass adjust to the front here as well in this hole on the left side we are going to place five orange concrete extending outwards from each one of the four sides of this hole here so one two three four Five like this and we are essentially just making an orange concrete tunnel just like so so if we take a look at it like this that’s looking really good and that will actually connect to something a little bit later but that is in a while so on the right side of this we Want to grab our red concrete and we want to place a layer of red concrete all the way around the outside of the hole like this in kind of like a circular shape we then want to add two more layers like so we then want to add glass to the front And back middle of this and then we are going to destroy the red concrete blocks that correspond with this and place red concrete above and below so it’s a tunnel that we can kind of just see through a little bit kind of in a bubble shape From here we now have to make a water slide this would be a regular slide but you know Minecraft so from this red concrete block the bottom one we want to place three yellow concrete extending right one two three we then want to extend backwards by seven one two three Four five six up and then down by six one two three four five six we then want to extend right by five one two three four five we then want to extend forwards one down forwards down forwards down forwards down we’ve hit the ground we want to extend forwards by three so One two three like this we’re then going to extend left by seven one two three four five six seven and then we will extend a few rows forwards until we are kind of like even and level with this light blue concrete we’ll probably even extend a bit more forward than that but The end result of this should look like so this next part is really simple but it can get a little bit tricky if you don’t know how it’s supposed to look but luckily I’m here so all we do here is place a layer of yellow concrete that Are parallel to each other that sit above and outside the row of yellow concrete that we’ve already placed the only difficulty comes with this part so as you can see from the sky we want to have these two rows like this and they ultimately want to Leave a gap on this side of the yellow concrete as we drop down into this next portion so we would then extend these rows down like this just like so and then they just wrap around the slide really logically just like this so we are essentially just following the yellow concrete I have Found myself included to sometimes get a little bit confused with those parts in particular with what direction the yellow concrete should be facing but hopefully I’ve made it very very obvious and logical hopefully but there we go perfect so we’re just going to leave it like that for now we’ll add The water effect and we’ll have you a little bit later on next up we have to make the final part of the play area itself so we are going to come all the way to the igloo and in front of the left and right side of the entrance We’re going to dig in the ground two rows one two one two and then outwards by three on both sides one two three one two three fill these in using blue concrete like this and then on the ends of these rows we want to place a row of Five polished black stone wall extending Up From the Block so one two three four five one two three four five we can join these together at the top just like this and then we are going to start extending towards the left by four one two three four and then we can connect downwards As we do it we then want to continue extending left by another four one two three four and then extend all the way down like this we now want to follow this pattern we want to extend the black wall block backwards by eight this is the top one One two three four five six seven eight and then extend that down to the ground we then want to do that one more time one two three four five six seven eight and then extend that down to the ground just like so now extending across the back we first Of all want to place a row of four extending left across the back of the build one two three four and then extend this and join it down to the ground and then Place another row four one two three four and then extend it and join It down to the ground and then we simply want to place rows of eight we want to do three of these in total and then connect them down to the ground so one two three four five six seven eight connect down one two three four five six seven eight connect down One more time one two three four five six seven eight and then connect down to the ground we then want to extend forwards and we want to do the same thing as we did on the opposite side so that is two rows of eight one two three four five six seven Eight and then connect down one two three four five six seven eight and then connect down once more and now we should be able to connect all the way back to where we first started by doing the exact same thing one two three four five six seven eight and then connect down One two three four five six seven and there you go that would be number eight as we connect back there so we kind of have a cage around the lower half of the play area next we have to make a mini parkour course featuring The Blackstone Wall so we want to come all the way over to the front left hand corner of the build and you will notice that we have a few rows of Blackstone wool so we want to follow not this corner row here but this row of black stone wall backwards And line it up with that middle row of wall here the significance of this is that we want to place a wall so that we create a rectangular shape we then want to extend this wall up and join it and connect it to form the rectangular shape just like this We then want to add another layer of black stone wall on top of each one of the four corners of this and we want to place a row of six extending up so one two three four five six which would then extend across and down or extend up and Across depending which sort of way you’re feeling and it will connect to this little tunnel here but that’s okay we can just intersect it and then extend across up all the way around we want to do this one more time one two three four five six on each one of the Four corners and these will once again connect at the top so we will have something which should look like this so this looks pretty cool now the only downside to this is that we have to fill it in with black stained glass paint which for me is not Particularly easy I have a I have a difficult time of black stained glass paint but we essentially just want to fill each one of the four sides of this top to bottom in with glass pane leaving enough room to enter this at the bottom so somewhere about here you can leave Either a double wide Gap or a single wide or maybe just leave the whole panel off it’s completely up to you but we want to be able to get inside of this Foreign I don’t know how I managed to move on to that side before completing this one but this is probably easier to make from the inside foreign Foreign There we go that’s perfect so the next stage of this would be to add some ledgers that we can slowly climb all the way around like this in kind of like a spiral and get up to the orange tube so we would place these in kind of any sort Of way that you wanted so I’d start half her off the ground kind of like here and if you leave a gap of one between these slabs and kind of like leave a half block between these depending upon like how difficult you want this to be then You know you can make a kind of like fun way to get up to the top here but it’s kind of up to you to customize a little bit as long as you’re happy with the end result of it you can make it as difficult or as simple as you like just Make sure that you can actually do it as as you’re placing it I’m just play testing this as I’m going along so up here and then actually do remember that so it would be here and then I guess here that actually worked out perfectly there we go that’s absolutely Fantastic and we don’t need to add any more but you could if you wanted to like be a little bit cheeky and actually get up on top of here and kind of like you know mess around on the play area but I know that that works as I was testing That as I was doing it and that is fundamentally the actual structure of this complete but we do have to add a couple of more for a lack of term attractions to the play area the first of which will be in the form of a sand pit so basically come all the Way to the front right hand corner of the build here extend inwards diagonally by one destroy the spark and then one two three blocks to the left of it dig All the Way backwards and kind of like extend back and join diagonally to the opposite end so we’re going to dig out This area and then another row down afterwards and fill this with sand all right and it has occurred to me that we could actually extend the sandpit if you wanted to so I’m thinking maybe we’ll line it up with here like this middle beam of the play area and we will Probably have it in kind of like an L shape like this so something like this would be good you could shave a bit closer to the slide if you wanted to so it doesn’t necessarily have to be even everywhere so it could be a bit bigger on the back so you could Probably put more fun stuff in here so maybe you could even make like a little slide that went into the sandpit we might even augment that a little bit later on foreign but for now I’m quite happy that this is just marked out and we will sort out the Rest later so coming on to the opposite side of the build here we are going to add a kind of just like sponge pit essentially so this is made from the opposite corner literally the exact opposite diagonal corner of where we started over there dig out this block And then it will actually dig so that we are one row away from this cage here and then we want to dig across and we we want to maintain a little bit of a distance here so why don’t we actually why don’t we dig here so maybe we’ll have a small pit I think that this is probably appropriate because I think that I want to put like a slide and stuff in here and make this call so we’ll have a small foam pit it’ll kind of just sit within the boundaries of these black stone wall like this we can extend it if you do Really want to but we could also make like a little parkour thing so that we can like jump in here and we can bounce because inside of this pit we are going to place slime block which is of course bouncy and we then on top of the Slime Are going to place various colors of carpet so that it looks like you know different uh different balls and such so we can place all of these in here kind of like in a randomized pattern usually this drives me absolutely crazy like trying not to place uh plugs too close To each other I’m kind of like doing it now I have a bad habit of like just bunching all of the colors next to each other so I’m trying my absolute best not to do that but also don’t get don’t go too crazy just try and just try and Randomize it a bit and that that’s great so what I’m thinking here is we place maybe like a row of red concrete extending from this pillar here or maybe just like leaving it alone so a couple of rows of red concrete just on the outside of this like so and if we add Some stairs to the side of this uh maybe we place them a bit more strategically just in the middle something like this so that’s nice and balanced and we add a bit of red concrete just to the side so we can climb up here jump in and boom we Can bounce I think that that’s pretty cool we could even have it like span the length of it but the only thing is I don’t like it clipping into the wall so we’ll just leave it like that so I’m thinking about adding just a tiny little mini water slide maybe like in this Corner here so if we place some lime concrete block just extending up from the corner of the little man-made sandpit that we have here and if we place a row of line just in between them behind like so and this is where the water will flow so we can just like just Straight down here so the water can just drop from here all the way down we can extend like maybe a line forwards just so that we’ve got like a little bit of a Splash Zone like this fill in the dirt surrounding this using lime so that’s absolutely perfect and Then extend the top of this backwards a couple of rows like this and then I’m thinking actually we could probably do with some fence or something of the like so maybe like just fence to connect down like this ladders up here so we have ladders a lot Of tiny little mini water slide moving all the way into the sand pit which I think is pretty cool and then we can make this like little tiny Beach we can add some little mini sand castles in the form of some Sandstone walk kind of like Clumped together in fours we can make it seem as though some kids are buried I guess and we can lay some flower parts with some item frames with shovels in so nice little mini beach perhaps even a shorter box maybe colorful one like a blue one with like a yellow carpet on it Something like that to look like a little ball so just make it nice and fun we could even add something around the edge of the beach but I’m not sure if that would interfere too much like if we were to add say like a row of white Concrete perhaps you know kind of like around the edge I don’t know if that would ruin it or not or if it would frame it like with uh over there I think that we’re just gonna do it I think we’re going to add some foreign and whilst we are playing with water We’re going to come all the way up to the large water slide here and we are going to place a smooth quartz stairs here in this position one water which will flow all the way down here and it will actually take us most of the way to Where we need to go but at this point right here we’re just going to add some more water just like the sprattle about this point and this will flow down but you will notice that we will have to actually place the edge of the slide just like this that should slowly Dissipate maybe into the ground like so place these here to stop that okay cut it off here give it a second there we go so that’s perfect and then if we just destroy some of these surrounding blocks we’ll play some with yellow concrete that’s looking really good and that’s That’s an awesome play area we have actually pretty much completed it at this point with the play area pretty much 100 complete we are now going to build around it so from each one of the four corners of the play area which are the four polished Blackstone wall posts We want to find the third diagonal extending outward so it might be easier for you if you dig in the ground one two three and then replace that third block with a red concrete and we want to do this on every single side so one two three place a red concrete here One two three red concrete one two three red concrete and we already have that one over there so all we have to do now is dig in the ground and connect these together we don’t strictly even have to dig in the ground for this it’s just that it’s probably Easier to do this on the front and the right hand side specifically as we have Windows although we could add Windows to multiple sides of this particular part of the Builder we won’t even experiment with that perhaps on the back of the build a little bit we could probably Make this look really cool but specifically on the front and right side here but then we want to on the front right hand corner of this place two red concretes extending up from this corner one two and then a double oak door extending backwards and then two red Concrete extending up behind it we then want to play seven black stain glass extending back one two three four five six seven and then a row of red concrete extending back like so and then I just want to work on the front a little bit so extending left of the corner red Concrete here we want to place two black stained glass red concrete and then five glass one two three four five extending left and then we want a row of red concrete extending all the way to the left and then back and then across the back there we go and we actually want to Double up on this row of red concrete as well so it wants to be two rows high in total let’s go And we also want to have an entrance into this as well just on the front left hand side here it actually corresponds with the entrance of the igloo so the only reason I’m mentioning this is because the floor is going to want to be blue concrete which we won’t have on us Later so we just kind of want to have a free row wide entrance you could even make it a little bit wider if you like it could be five it doesn’t matter too much but the point is that we have this area marked out and now we want to dig up foreign foreign Foreign Foreign foreign there we go that is the play area officially complete that looks so sick the next thing that we have to do is make the building surrounding it so the easiest way to do this is come all the way to the front right hand corner of The build and place a row of 11 smooth quartz block on top of this corner one two three four five six seven eight nine ten eleven we are now going to extend this row of 11 all the way around the belt and we are going to join it down to the opposite corners Foreign this area out what we will then do is extend the glass areas up to meet the smooth quartz area this also applies to where we have the double door as well we want to treat that the exact same so now that we have done that we can now Fill the remaining part of the building below these smooth Quartz in with smooth quartz so we are going to literally every single space in between all of the glass fill it in using smooth quartz this is quite a task [Laughter] [Laughter] [Laughter] [Laughter] foreign foreign We now want to place four more layers of smooth quartz all the way around the top of the building one two three four [Laughter] foreign [Laughter] foreign with those four additional layers of smooth quartz added on top of the building we now want to add a final two layers of red concrete One two and now we have to fill the top of the roof in using black stained glass foreign thank you [Laughter] foreign filled in that is the structure of the building pretty much complete next we have to add some branding to the building in the form of signs and also a Big giant Yellow M so throw down your loom open it up and stick a white Banner in there with some black dye the first letter we have to make is M so we have to apply the inverted chevron pattern remove the Black die put white in there and then apply the chief indented Pattern grab that put that back in place black dye in there and apply the pale Dexter followed by the pale Sinister pattern that is m next we have to make C so fresh Banner black dye G pattern pale Dexter black base then we will have to make D so this is a Little bit more complex so the Bell Sinister pattern White die in there lozenge pattern put the black dye back in then we apply the chief tail Dexter base pattern next is O So G Bass pale Dexter pale sinister so next is n fresh Banner pale Dexter pale sinister Bend next is a So pale Dexter pale sinister page or black chief and then blackfest I guess the black part is relevant because we’re using the black dye but you guys understand which patterns we’re applying anyway grab that put that in the inventory so next is L so we have to apply the pale Dexter pattern The bass pattern and that’s it for l so next would be D but we already have one so we will reuse it we have to make an apostrophe so this is simply the chief Sinister cantum pattern which will replace right here last but not least we have to make S so That’s the chief pattern bass and then we have to apply the bend and that’s it so we’re actually going to work from reverse in placing the McDonald’s sign and what I mean by that is this so that’s so satisfying that it fits in the hot bar perfectly we want to come all The way up to the top front right hand side of McDonald’s and just underneath the red concrete here we want to apply the S left of it the apostrophe and then D and then l a n o d c m and there we have all spell out nicely McDonald’s then grab your Yellow concrete come all the way up to the sign and place yellow concrete left of the M like this leave a gap place the same pattern of yellow concrete leave a gap place the exact same thing again then Place yellow concrete diagonally and above the three rows in the middle Like this and extend the left and right sides down like so so what we will have is a giant sign that is borderline unmissable McDonald’s and there we have it that is the entire indoor play area complete but wait there’s more next we are going to make The McDonald’s that the play area is attached to although going by size it’s kind of like the McDonald’s that is attached to the play area come all the way to the bottom front left hand corner of the building and count and find the fourth block into the right so this Would be the first second third fourth from here we want to place a row of 10 gray concrete extending outwards one two three four five six seven eight nine ten we then want to extend up by 11. one two three four five six seven eight nine ten eleven We then want to extend to the right by seven one two three four five six seven then Place seven red concrete still going right one two three four five six seven we then want to place a row of ten gray concrete one two three four five Six seven eight nine ten and then we can extend down by two so one two and then we can extend all the way to the back wall here so we end up with a pretty weird shape we should have this so now that we have this shape right Here we are now going to add some windows so underneath this corner block that we just extended towards the play area we want to place it to black glass paint we then want to extend the glass pane to the left by two one two but also simultaneously backed by two one two we Then want to place a layer of great concrete and then we want to place a row of five glass extending backwards from these two blocks so one two three four five just like this we then want to extend the glass down around like so and We actually want to do the same thing on the opposite side so we want to apply a layer of gray concrete and then five glass one two three four five add a row on top here and then underneath just like so so just before we have a little Look at this that is absolutely perfect so from here we are going to extend this corner block all the way down to the ground using gray concrete like this that’s perfect but we also want to extend the red concrete that we placed earlier all the way down to the ground Like so and there are quite a few of them and then when we go all the way up to the top here we actually want to extend upwards by an additional two rows so we extend up and out from the gray concrete frame but we also want to extend Forwards and backwards by two rows as well just like this and to save yourself some time you can just extend at the outer blocks around instead of extending the whole thing we can just extend two rows completely around and in front and around and behind like this and then we can just Leave the middle out so it will save a little bit of time and the back as well foreign and then we just have to fill the top in also And the end result should look like this next we are going to come over to the left side of the build come all the way over to this wall and extend this gray concrete up here by three one two three extend across by three one two three and then down We want to do a similar thing over here except we want to leave a gap of two and then one two three and then extend out so we will have essentially the exact same thing on the left and the right we want to fill in between these In using gray concrete we want to add red concrete above each one of these windows by the way these are drive-through windows and then we want to fill above these in using gray concrete and we also want to fill the front of this in with gray concrete as well Next we want to work on the right side of the restaurant so come all the way down to this bottom row of gray concrete gear and extend left by three one two three we then want to extend up by three one two three and then extend right and Left to create a horizontal row like this what we then want to do is extend the gray concrete inwards here and here and the purpose of this is to then add a row of glass connecting the top of this row down to the ground like this With then a layer of black stained glass paint inside of this and then an End Rod a suspended in front of the glass pane in the middle horizontally we then want to fill this little window in here using glass block and then we can kind of proceed to just fill the Rest of this in using gray concrete on the front and the side foreign and now that we’ve done that we want to come all the way to the corner once again and we want to build up a row of three one two three smooth quartz blocks extending outwards Directly from this corner add a slab on top and then extend backwards and across the front to give us this shape what we then want to do is create an entrance by leaving a gap of two here on the right side and then destroying a two by two square like this And this is actually we’ll move it one row along so we’ll leave a gapper free and then we will have the side entrance here and this will lead to a small playground that we will have so yeah I think that that works out a little bit better I’m even considering making this A little bit more of an Alcove by placing an additional row of gray concrete here filling the top of this in a little bit and maybe just across the top of the entrance even more also whilst we’re in here we are going to dig up the entire inside of the Restaurant and replace the floor using iron blocks foreign now that we have made the first floor we now have to make the second floor the second floor is positioned just underneath the window line that we have on the right side of the build as we look at it from the outside So just underneath these windows we also want to position some block of iron and this wants to extend through the entire foreign for so long inside of the restaurant we also have to add the Golden Archers to the red concrete area on the front so to position this it’s a little bit weird But if you find the mill of this large window here follow it across move to the left inside of the red area one row place a yellow concrete extend up by one two then leave a gap of one place a yellow concrete gap of one yellow concrete Extend down two extend the middle block down one and place two yellow concretes positioned diagonally above and in between the rows of three yellow concretes like this next we are going to Mark out a lot of the outside area so to do that we are going to dig in front of The smooth quartz area here seven rows one two three four five six seven and then dig to the right 19 rows 1 2 3 4 5 6 7 8 9 10 11 12 13 14 15 16 17 18 19. we then want to dig backwards And we want to join up in front of the play area window here we can Mark out this entire area using cyan terracotta and then we can actually just continue to dig it all out and replace this entire sort of squary rectangular shape with cyan terracotta foreign foreign Now that we’ve filled in the entire playground we can work on the car park just behind it so first of all we have to add a couple of rows of smooth Stone running along the back so side of the play area and then this is super simple we want to Place leaves along the cyan terracotta here and along the opposite side just at the end of the pass so they want to be equal in length I think that that’s right I’m not sure if there’s an extra one no that’s perfect and then we want to have This sequence of blocks so just starting from the edge of this path here a white concrete powder three yellow carpet white concrete powder so on and so forth connecting both sides together and they should just connect together nice and evenly perfect so from here what we would do is Extend the concrete powders all the way to where we have removed and then fill in between these spaces in using gray concrete foreign next we are going to add leaves to the right side of McDonald’s here where we also have an entrance to the outside we Should probably add a door to this just so that it’s not open on the front of McDonald’s also we want to have some problems just extending around this corner here and also just here and then we can place a cap in between these so this is using smooth Stone And then we want to extend this across here and we also want to extend the smooth Stone pad in a straight line here on the left next to the poppies all the way here and join to the cyan terracotta so if you can imagine all of this will Be pathway and in addition to this we will have two rows of path directly in front of the playground area as well and then we also want to have two rows of path leading left in front of where we have the red concrete area here and It’s going to come all the way over to the left and as far as the end of the restaurant so this will all be smooth Stone as well which I guess we might as well fill in because it’s only a couple of rows and then on the opposite side of this we Will have oak leaves poppies in front we want to create a wall just here I don’t know whether to actually extend it from this window because it makes more sense or whether to place it like here just on the side I think that we’re gonna go with the Side so we’ll Place terracotta here and we will extend it all the way and line it up with the smooth stone that we have over there and we want to make this two rows high in total and then on the inside of this wall here we want to place one two three yellow Carpet white concrete powder three carpet powder free carpet powder free carpet powder just like this and these spots are a little bit smaller than the other ones but they will extend out to the screw and these are of course car parking spaces as well and they are built in the exact same way So we want to dig out the middle of these and replace them using gray concrete just like this and now whilst we are filling things in we brought us remove all the compress from the area inside of the smooth Stone and replace it using smooth Stone foreign I was today years old when I realized that I made a slight problem with my own personal grid don’t worry this will not affect you as long as you followed the instructions at the start of the video in terms of the size of the grid and the Start position I just did a big oops for myself though next we are going to place a row of four red concrete extending up in front of the terracotta wall one two three four we then want to extend left by five one two three four five and the next end down like this We then want to dig in between the archway here and backwards towards the building and then fill all of this in using gray concrete and then Place oak leaves in between all of these windows like this we then want to have a pathway that runs along the left side of this drive frame But we also need to leave enough space so that we can actually like get out of the drive through so like one two three four here rows of gray concrete and then just smooth Stone either side like this there we go perfect we want to install a Terracotta wall here just on the end or alternatively we can have like waiting Bays as well so like if you guys have been to McDonald’s which I’m I’m sure you have like sometimes you can just get your food whenever but sometimes you have to wait unfortunately to my dismay And they will often make you wait and Obey so one two three four five so if you were to make a bunch of Base just like here on the outside then you could like have these all the way along and that and then eventually the employees Would get your food to you would be the idea so that’s also a good idea too I think so we could make a bunch of these so each one of these has five rows in the middle so they are seven rows long in total so one two three four five six Like this and we could just make a bunch of bays and hopefully one two three four five six this kind of like evens out so not really but kind of so we can have the Bays here but then we can also just have like a we could just add a bit of a Drive out here as well so like we could have the bays and then we could just have like this and then add a wall on the side of this it’d probably not be positioned here would it we’d leave a couple of rows so that the employees could actually come and give you the Food and this wall could stem from like here and maybe we could even extend a wall from here as well so we could like have a wall and extend this little walkway or it this this doesn’t necessarily have to even exist here but you know something like that extend this outwards so we Could either get our food and drive off or get off or just patiently Park up and wait and we could have some smooth Stone on the side here but it depends whether or not you’re a little bit crazy like me and kind of like want to round everything off but Um something like this would look good foreign I actually think that that looks really cool so another feature that we just have to add to the side here is an order board which we are going to place right about here opposite on the uh on this pathway here and essentially we will Just place a two by three area like this place a bunch of one by one paintings in this and then we’ll leave a little Gap and then we’ll have a speaker box in the form of a Polish black Sun wall and a note block and that can either be placed Here or against this wall and that is absolutely perfect so that is where we would order that’s where we would pay slash pick up our food or wait for the food or drive straight off so to tie all of this together a little bit further we Have to create a road in front of and on the right side of our McDonald’s essentially it is four rows on the right one two three four and four rows in from one two three four and they will connect here and then extend across the front of The build and towards the back of the build foreign thank you foreign now that is looking a lot cleaner and what we can also do is just add a wall here on the right side so this will extend all the way across the side the Road all the way to the back here and run around the back of the leaves you could even leave this open if you wanted to and just have the wall kind of like end here or furthermore go across the back it doesn’t really matter I’m considering installing some more windows On the back of the build but we’ll talk about that a little bit later but I think that a wall will look really really nice and ignore the fact that the grid has more room on this right side it shouldn’t be this far over so I think That that looks there we go does that not just frame this in nicely this is looking so good already next we are going to make the outdoor play area so to position this we are going to come to the right side of the outer part of McDonald’s and locate this Middle Bush here on the left we want to leave a gap of one and then place four one two three four yellow concrete’s extending up from the cyan terracotta extend right by five one two three four five and then extend down by one forward spawn down to the ground We then want to extend right of this yellow concrete here by placing a blue concrete five more yellow one two three four five extend down to the ground then extend this yellow concrete backwards by two one two and then up by three one two three back by five one two Three four five we then want to extend down by three one two three and then we can join back on ourselves towards the front but more importantly across the side here and what we essentially want to make if we get a good look at this is a platform which we Then want to fill in using blue concrete just like this And then we are going to make the front of the little playhouse that we have here so we want to extend this yellow concrete across the top by four one two three four and then extend down we then want to leave a two wide Gap so that we Are able to actually walk in and out we then want to connect this together at the bottom so we have a door and a window and then we can see all this left side up coming towards the back and then we can seal up across the back just like this On the side here we want to have enough space that we are able to step out onto a water slide so the water slide stems from here this yellow concrete we’ll actually exchange this for a blue and then Place one two three lime concrete’s extending out we then want to extend Down forwards down forwards and then dig into the ground like this and we will build up the yellow concrete on the side of this house and lime Concrete in such a way that we are able to build up the sides of the slide so very similar to What we did inside we just want to place lime concrete parallel to each other so that we extend down into the ground here we’ll exchange some of these blocks here for lime and water will eventually stop flowing here so we also have to place a smooth quartz slab in this position so That we don’t get any splashback and this is looking pretty good so far so before we pop the roof on we also want to be able to get up onto this platform so we just extend this blue concrete forwards and down like this we take the middle of this swing bar and We place a couple of chains a couple of couple of chains like this with then iron trap doors underneath them and there we have a swing we can now get up here we want to add water to this so I actually didn’t include a water bucket In my little list of materials I bought with me but we just want to place that here and then that will just flow down nicely into the ground we’ll just expediate that a little bit and we want to add a roof so the roof just sits on The side it’s made out of red concrete we’ll have it on both sides it wants to extend forwards and back a row like this and then we’ll extend the red concrete inwards and upwards until they eventually meet in the middle like this with then a yellow concrete just on top of The center block like this and we want this on both sides until we eventually have this and then we want the red concrete to join front to back you don’t necessarily have to have the inward blocks of the red concrete join together like these ones but the out ones are important so that We actually do get like a nice looking flat roof kind of like this that’s perfect so from here what we now want to do is add a little bit of a bench and also a sand pit so let’s move upstairs and Rod red carpet cauldron Oak trapdoor sand And then things to customize the Sam pit so like you know item frames flower parts Sandstone wall golden shovels stuff like that so a little seating area here we’ll just start from the corner and extend inwards directly and place a smooth quarter stair one next to it and Rods in front carpet on top stairs on the opposite side we then want to leave a gap of one and then we want to place a cauldron Oak trap door and then we kind of want to mirror this so we’ll leave a gap of one smooth quartz stairs and rods In front carpet on top and then smooth Court stairs again so a little bit of a seating area whilst uh kids are playing on there that’s absolutely perfect and then in this corner there’s not too much room but you could add just a little bit Of a sand pit and if we were to just make sure that we were at least like a row away from everything if this makes sense so a row away from this edge here run away from here and then a railway from here I mean we could even extend it A little bit further just like this if you did want to then we can stick some sand in this we’ll have to dig one row down over and then we’ll customize it similarly to the center video inside of the McDonald’s but as it is a lot smaller we don’t need To add much and all in all this will be the outside of McDonald’s complete wow with the entire outside complete it is now time for us to head inside of Van McDonald’s and make the actual restaurant so we are first of all going to come all the way over to this left Side and just next to this red concrete area we are going to install a drinks machine so this is made by placing one two three four light gray concrete on top of each other extending across one two three all the way down and then join Back and on here we’ll have a couple of flower parts a lever trip by hook a couple of item frames up top some different potions to represent drinks and we’ll also have a couple of buttons on the side also now along this back wall here we have a bunch of stuff to Add so in between the drive-through windows we are going to have some cooking stuff so we’ll have a couple of furnaces here and then a couple of gray concrete stick some blast furnaces on top with more gray concrete on top of this and then we’re actually going to Extend the gray concrete up and cross like so and we are going to create kind of this faux wall which will help to add depth to this area we also want to add an iron trap door in front of one of the blast furnaces and we also want to add Some Stone buttons like so above the furnaces themselves we’ll have some polished deep slight stairs and some detect rails on these may be one detectoral and maybe one item frame on one of these so these are all different various cooking implements and we also have to actually add in some some Counter space so this is going to extend from this red concrete here so we actually want to leave a gap of one and then place a row of red concrete that extends all the way over to the right I’m thinking that we’ll actually reduce the entrance way into the play area here So we’ll just have a free row white which corresponds to the actual width of the igloo anyway and then inside of here we are going to place a layer gray concrete that extends all the way up this wall and we are going to place a composter item frame and we’ll need The horn coral fan steak cooked card oh and also some white candles so a couple of composters here at the back a few few item frames with horn Carl fan steak cooked card so um wait it was to be placed in the item frame not on the counter so this looks like Chips or fries this is of course some sort of beef uh that could be a Patty or what have you and we can have this in the item frame as well um cooked Cod you know fish fillet and we also want some white candles that those look like actual like drinks cups And we can even stick say like a lantern on the end here and you can create more you can also like create shelves and such to place even more stuff on if you did want to so you know if you if you wanted to go a little bit crazy and have All sorts of stuff like um we can have that but the composters are also by the way like takeaway Banks so uh but I’m pretty happy with this I think that that looks pretty good and I am happy to leave that as it is so for this counter space here we are Going to have a couple of tills in the form of smooth quartz stairs with heavy weighted pressure plates beside them and we want to space them far enough apart that they don’t Clash too much so if you leave them to rise apart like this I think that that’s pretty good and above This we want to Stack a couple of rows of red concrete like this just above like so and then that’s perfect and then that is pretty much the entire kitchen next to the kitchen we are going to have some self-service machines so leaving the Gap we’ll place a white concrete Here Gap white concrete Gap white concrete and on top of these we want to place smooth quartz stairs and a one by one painting in front of these stairs and then buttons in front and they vaguely look like order machines so of course use the touchscreen you pick out What you want you pay for it and then you wait nice and easy so for the opposite side of the restaurant we are going to have some tables but more importantly we have to find a way upstairs the entrance to the play area is how we Are going to position this so we want to find not the first not the second but this third red concrete here and we want to place smooth quartz stairs extending outwards we want two smooth quarters like this and you will find that this lines up with the End Rod here of the Entrance so the glass and glass pane so just in case say like your entrance is wider you’ve decided to keep it a bit wider um it also coincides with the glass pane area here so we then want to extend smooth quarter stairs up and backwards of course until we eventually break into The next floor so just like this and we should have a two by two square up here which is perfect and then we actually want to carve out around these stairs so to the left of the stairs like this and then all the way down we want to place a Row of red concrete that extends all the way up like so so we want to destroy these iron blocks here and around this red concrete so we’ll extend it up in this framework like this and then we will fill Behind these stairs using red concrete and we want to extend all the Way up through the floor so here and all the way up here and we want to connect all the way to the where well where the ceiling would be which is actually something that we don’t have uh that we haven’t added yet but the ceiling is eventually going to be made Out of glass uh black stained glass specifically and if we just extend a row here it the ceiling will be right at the top of where this gray concrete is so we can preemptively place a row of glass just so that we don’t kind of like overshoot ourselves and we just want to Add some red concrete here just kind of like all the way around this staircase and see there we go that’s perfect so now we will be able to extend up and down into our McDonald’s we’ll probably have to add some lights as well we could even drop the ceiling Aid a little bit So like we’ll still be able to get up and down if we do drop the ceiling but I do also like the height of it as well maybe we could even add some cheeky sea lanterns just like here like I don’t want it to be too crazy but Um I do want to have nice amount of light you see I definitely don’t like okay there we go that’s better I perhaps we will just have to add uh some strategic lanterns about the place anyway let’s add some seating so right next to this double door we want to have Two smooth quartz stairs like this and rods in front of them and then uh double smooth quote stairs on the opposite side heavy weighted pressure plates for a table and then we want to divide this area up with a row of gray concrete like this cutting this area in half in which We then want to place another set of tables just like this so in the same fashion as the previous and I think that we will just leave it like this I would like to add a a painting I’m thinking Pinocchio and maybe even double Pinocchio that’s perfect or I would have also accepted The other one as well being man in the black but I think that that’s pretty good and we can even add a little a couple of see a couple of lanterns just like this originally I did have like this above the tables but as I’m placing It now it just doesn’t seem right but do feel free to add that I think that if we add some lanterns above where we have these order machines I think that that will work out well and we can also add a sneaky bit of sea lanternidge just Behind the actual kitchen as well and that’ll probably keep the area um lit up sufficiently and we haven’t made too much of a mess and just one little thing as well just in this window here we are going to have another table so a couple of a couple of stairs couple Of M rods couple of uh pressure plates and there we go and honestly ladies and gentlemen this is pretty much the entire downstairs made with the ground level of our McDonald’s complete it’s now time for us to head upstairs and begin work here step one we Want to place a seating area against the staircase so a couple of brown glazed terracotta extending from both sides with Oakleys on top smooth quartz stairs against the inside of the Terracotta with end rods pointed upwards and heavy weighted pressure plates on top and finally a two by one painting that is Absolutely the perfect one will 100 fully complete this little seizing area we want another seating area that is parallel to this against this window so we’ll have a double uh a double stair here with n Rods in front pressure plates on top and then opposite this we Will have stairs again but facing the opposite way with end rods in front but then opposite face there so we’ve got like a single table and a double table so we just want to place pressure plates on this and then that is perfect and then we want to create well we Actually have to make a wall to partition uh the bathroom here so against the red concrete here we want to place a row of gray concrete that kind of just splits this area up and along this back wall we want to place Brown glazed terracotta so it feels like nice and roomy and Natural in here and then against this we want to have some like stall seating so we’ll have white concrete tables that are basically if we leave a gap or two between this wall and then each other and then this one and then we have end rods on one side with weighted pressure Plates to act as seats and there we go that will work nicely so some store seating against these tables feel free to decorate these with item frames with food in them we also have to half this area here so this gray concrete wall that makes up the wall to The bathroom we want to split it so that we have two separate ones you’ll be able to have floras on that side and four is on that side the entrances will just be here just opposite the middle row and we want to build these up to be as high as The actual ceiling level foreign and we can stick doors on these and then build up just above these using gray concrete like this and now that we’ve done that we are also going to add some self-service machines so leaving the gap of one from the red Concrete here we want to place a white concrete Gap white concrete Gap white concrete smooth quartz stairs on top one by one paintings for each one of these and then a stone button below and funnily enough we have a similar color palette painting and a duplicate for Each one of the three of these which is kind of coincidental and weird next we want to work our way into each one of the toilets and in the corner on the far wall we want to place a cauldron Oak tram door and then create a small partition using gray concrete cauldron Oak trap door on top small partition and then on this remaining part of the wall we will have an upside down smooth Court stairs tripwire hook next to a white concrete lever Gap block of iron Stone button so toilet partition sink and then hand dryer and we want to do this in Both of the toilets so all the way over here this far Corner we want to have a cauldron with a no trap door partition cauldron trap door partition and then Upside Down Smooth stair trip wire hook white concrete lever Gap block of iron Stone button and there we go that’s absolutely perfect And then last but not least we have to fill the roof in using black stained glass and with the roof complete we have finally finished this tutorial I hope that you have enjoyed this video please do remember to like subscribe and I do hope that you check out some more of my Other content thank you so much for watching I hope to see you in the next one good bye Video Information
This video, titled ‘Minecraft Tutorial: How To Make A Modern McDonalds PlayPlace “Mega Mcdonalds”‘, was uploaded by TSMC – Minecraft on 2023-05-06 13:44:00. It has garnered 588049 views and 2531 likes. The duration of the video is 01:41:50 or 6110 seconds.
In this tutorial i show you how to make a Modern McDonalds Restaurant PlayPlace with a giant indoor play area, 2 Floors, an Outdoor Play Area and a drive thru!
Mcdonalds Showcase 0:00 Space and Items Required 3:33 Indoor Play Arena Tutorial 3:50 Restaurant Building Tutorial 52:49 Car Park, Drive Thru, Outdoor Play Arena 1:04:12 The Inside of The Restaurant 1:28:40
How To Make a CIty Playlist – https://www.youtube.com/playlist?list=PLVfyBBWTXosBc2X7FdAzrdKffZoY1ZzZG
#tsmc #tsmctutorial #citytutorial
Want to Support the channel? 🙂 – https://www.youtube.com/channel/UCIui-Mt1PmcJYpoBATftj7g/join