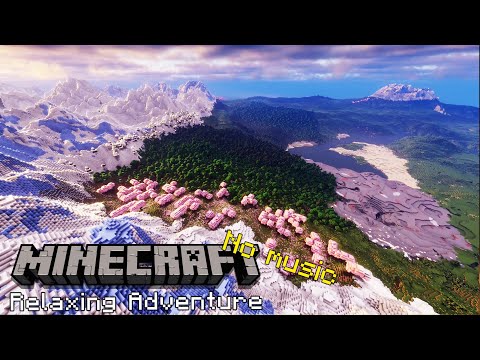
What’s up guys and welcome back to WBC builds and welcome to this little tips and tricks video on how to use brushes in world in it to help build roads and railways in your towns and cities so let’s get into it and I’ll show you guys What to do and how I use them in my game so brushes are really useful tools to use with worldedit they give you the ability to paint areas and also just build big large structures straight away so we’re going to start off with the basic one that I like to Use and that is the brush also the sphere and we’re going to set it just to a block of one which is stone and that can also be a size of let’s say free so now what has happened here is I’ve attached this brush to this tool if I Right click now we’ll get a sphere of stone in the shape of free so you can scale this up to I believe 7 in the base game might be a bit too much no Maxo configuration is 6 you can change that in your config files so if you place it Next to it you can see obviously it becomes quite a lot larger now spheres are really handy if you want to do a lot of landscaping quite quickly but they are also quite annoying if you start destroying landscapes with them especially if you do this command here Which turns your brush into a destroying brush and like that and now we’ve made a massive hole in the world so there are better ways to do that let me introduce you to the cylinder tool so we’re gonna use the same brush again here and we’re gonna type in the Command B our cylinder so you can do the whole tabbing to get your commands in there that’s a really useful thing to do now the cylinder has a depth associated to it because it’s just about using one layer of the ground so we’re gonna select here for a cylinder of block type 1 going to give it a size of 4 but we’re also going to give it a depth of 2 it has now created a cylinder of 4 by 2 on this brush so we’ve placed it there and there we go so we have it on the layer Below and the layer above now this is also quite useful for when you want to do the whole removing of layers as it only removes one layer at a time so if we set this to 0 0 being air and a natural one being just one slap we can Now remove one bits at a time about making huge holes in the ground so that’s a really useful way using brushes to help terraform stuff quite quickly now the idea of this video was help you guys understand how I do roads and railways but this is the sort of Starting point I like to show off because these are really useful little tips so let’s get into showing you how I paint the roads and the railways so there are two ways I like to make my roads one way is to use a brush just to paint a layer of material Onto the ground so if I do this command here so I’m gonna attach it to this axe this is a PR sphere again now I’m going to do a little bit of texturing to this one so it’s gonna be stoned it’s also going to be and the site as well so in Order to do that you do one number which is Stone here so you can type Stone and you do a comma and then you do your second block ID and that gives you a 50/50 split between stone and andesite now if I wanted this to be greater Towards the stone I can type in 60% and then over the other side of the comma I can type 40% for the andesite and that now gives me a brush at size 2 because that’s the default size and I set it to if you don’t put a number after the Block IDs and this now is is what we’re looking at so what we want to do is in order to paint the ground rather than the actual surface there we need to type in the command G mask so is a / G mask or / / G mask and that allows you to Type in what blocks you wish to globally mask your brush to so here you can see we are looking mainly at grass so that for me is blocking our type number 2 and with that we can now just right click and hey presto you’ve got yourself a Painting tool so you can run around painting as much as you want if you look over there you can see that’s how I did the leaves roads along here my tutorial series but this is quite a nice way of doing it if you want semi organic Looking roads now the other way of doing it is a little bit more complicated and it’s if you actually hand build your roads so what I’m going to do is show you how you need to carry on using world in it after doing brushes but obviously You have a gmask attached still so in order to disable the gmask you need to just type in the command G mask again nothing afterwards press enter at the Sables it so you can now carry on using welder there in your world about actually affecting you know just the Mask so there is one more tool I want to show you that isn’t technically a brush but it can be used as a brush and this is the replace tool so we type in slash repeal pan n space and then type in one afterwards I always just choose one Because it’s then easier to change Trey away and that now binds to my stick here a brushing tool so what happens is every one every block I right-click with it now turns to stone if I want to change that block type I just left-click and now I’ve got a second different type on There and you right click again so the reason I chose this it’s because I sometimes actually hand build my roads if I want a certain angle to them so here we’re gonna grab up some blue wall with that I’m going to right click like that and we now have Blue wall attached to this stick with this I’m going to come up and do a little bit of a diagonal like that and now we can also carry on and fill this out a few more so this is giving you a bit more of control over how many blocks You’ve change you can also stack it if we go I want to do it if you were doing it higher above the ground but with this you can now come in and type in on your tool so we had it on this iron statistic here gmask blue so blue being the Command for the block ID for blue wall so what that does is that now only affects the blue and obviously doesn’t affect the grass around it that’s really handy if you are designing hat roads by hand and you just want to get in there and change the colors now this obviously Moves on as well to how I do railways let’s jump into that I’ll show you guys how I do railways okay so for the purposes of this video I have just gone for stacking a nice long track bed along here made out of blue wool in later Parts of this series I will show you guys how to use the convex tool and actually plan out nice curves for your railway track beds and then handcraft them so you get a nice sense of pride when you actually built them and they look really nice and realistic so for This we’re gonna be using a tool to give you a nice level underneath here because obviously if you have any gravel or any sand or anything like that in here it’s gonna fall through from here to the ground so we need to put a level underneath this track bed in order to Give you a bit more security a bit more safety so we don’t lose all that material through here what I’m gonna do is type in the command V R again gonna give it a sphere that spheres gonna be shape sorry block type 3 which is dirt And it’s gonna be shape of five so that now gives us a sphere we can use to paint the underside of this so in order to paint the underside of a block you type in G mask and then using the lower lesser or greater than tool buttons you Can type in lesser then blue and that now gives us a gmask to play stuff underneath here so this is just a great way of filling in voids underneath a block once you’ve done this sort of bit of world editing so along the top now we can paint This blew into an actual track bed type do I tend to use for my world of all Hampton at the moment a block type of this so it’s a br a sphere now just for ease we’re going to type in all the command names so it’s a granite mixed on With brown concrete powder which is why we want to do the base level because the concrete powder will just fall straight through Brown mushroom block because I like the texture of it and also some coarse dirt just to give it a nice bit of a look of dirt on there so that now Sets this too and we’re gonna set it to size 5 so we’ve now got a brush of that which can be used on here so we just need to change the gmask from under blue to actually blue and we can now go along and paint the town by this lovely sort Of orange e ready color so that is really the basics on how I use world edit rushes in order to paint different textures onto the ground for roads and for railways so thank you guys for watching I’m gonna do more of these in later weeks mainly on how to use convex Tools and curves in order to make some realistic looking roads and railways so figure your for watching and I will see you next time with another video on this series you Video Information
This video, titled ‘Minecraft World Edit Tutorial – How To Make Roads – World Edit Hacks’, was uploaded by WBC Builds on 2020-07-01 11:17:21. It has garnered 61456 views and 1988 likes. The duration of the video is 00:08:32 or 512 seconds.
How to make roads with world edit in Minecraft, here are some World Edit tips & tricks. This video will show you how I like to randomise paths and roads with the World Edit brushes.
This will help create realistic looking roads in Minecraft using any blocks you choose. If you feel that there is a better technique then please let me know in the comments below.
This video will show you; minecraft world edit tips minecraft world edit tutorial brush minecraft world edit hack minecraft world edit tutorial 1.15.2 minecraft world edit tutorial 1.16.1
▬▬▬▬▬▬▬▬▬▬▬▬▬▬▬▬▬▬
►Check out all the episodes so far https://www.youtube.com/playlist?list=PLWrfjub2v_7m4gBoOo2Y7qlX8cdQL-pf7
▬▬▬▬▬▬▬▬▬▬▬▬▬▬▬▬▬▬
Follow us on
►Twitter https://twitter.com/BuildsWbc
►Twitch https://www.twitch.tv/wbcbuilds
►Pateron https://www.patreon.com/wbcbuilds
►Discord https://discord.gg/zBGkNva
▬▬▬▬▬▬▬▬▬▬▬▬▬▬▬▬▬▬
Shaders used :
►BSL – https://www.curseforge.com/minecraft/customization/bsl-shaders
Promotions
►Check out Tube Buddy and get help with growing your Youtube channel – https://www.Tubebuddy.com/WBCBuilds