
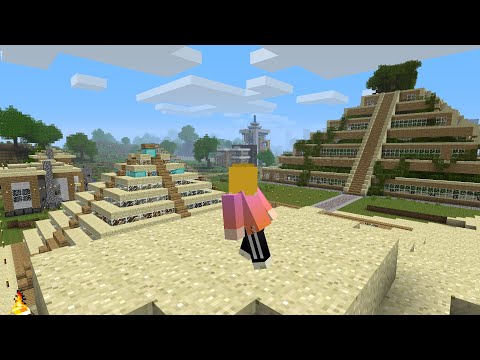
Hello this is Vaughn tom with 2020 MC with a video tutorial for an automatic brewing station that is simple inexpensive make small batches and can handle up to five ingredients a perfect addition for your minecraft survival world there are a few really good designs out there for automatic brewing Stations that are absolute genius however many of them are very large complex and expensive builds that are possibly more suited to either late-game or for larger more technical servers other designs produce large batches meaning that once started they tend to continue brewing potions until they run out of ingredients so this bring station Was designed to meet the needs of a smaller server or a single-player world to brew small batches of potions with complete automation at the lowest cost and materials while only filling a 3×3 block area in addition this design is also capable of brewing enhanced potions like splash potions or lingering potions For those who have acquired dragon’s breath in the end so with that let’s go ahead and get into the tutorial now this brewing station is extremely survival friendly it’s gonna require only a brewing stand a single bit of redstone dust two redstone repeaters three redstone torches six or eight droppers Depending on which model you want to build two hoppers are four again depending on which model you want to build and at least one chest and a few blocks of your choice now these materials are relatively easy to acquire except possibly the blaze rods necessary to build and fuel the brewing stand Itself but otherwise you know most players are going to be able to afford to build this basic design within a few game days now to start with we need to you’ll notice I have pads built here where we’re gonna build the brewing station now the the orientation or the Direction that the brewing station faces north or south versus east or west is important so these stations right here they’re facing east to west now the reason that’s important is the droppers fire the ingredients into the or up there and they fire according to the setting on the redstone in the back Here and also according to the direction the brewing stand is facing so depending on whether things facing east to west like this one or north to south like these will be it the ingredients will need to be and placed in the dropper is in a different order now notice on my Debug screen we’re facing south right now that means the bring stands we built are gonna be facing north these ones right here they’re facing east so this is gonna be really important to us when we’re deciding how to load the droppers and later on I’ll show you some Tricks on how to make sure that they actually fire correctly into the hopper that is going to load the brewing stand and that will help to ensure that when you build it in your world you’ll be able to load everything correctly the first thing we’re gonna do is separate Pads just like these three by three one block missing in the middle one block is missing on the right to the front very very easy so the first thing I’m going to do is I’m gonna switch isn’t a survival mode to show you how easy it is To build in actual survival mode so here we have all our ingredients we’re going to move these bits and pieces into our inventory one at a time and you’ll notice that there’s a couple of extra hoppers and chests here we can use them later so first things we’re going to put The redstone that is going to be in the pad now the the first bit here this dot of redstone dust goes right there and a redstone torch goes right there and now these are going to allow us to lock the hopper so is that it will drain into This chest that we’re placing right now so hopper goes in the back there now that redstone torch is going to lock that hopper so that when the brewing stand is actually brewing the ingredients and water bottles don’t slip out now it’s very important to put a wooden button right here Because this is going to give us the appropriate pulse length to actually unload that hopper into our chest when the brewing is done if use a stone button right there it will not work okay so we’re gonna place a block here and a stone button this will actually start The brewing process and you have to use a stone button here or the pulse length will be inappropriate and it will start to mess with the brewing by adding extra ingredients so remember stone button on the left okay we’re going to place a couple of blocks here in the back and a Couple of redstone repeaters now the second one here we’re going to change the setting to three then going to put a redstone torch here and here and we’re going to place blocks on top of them now we’re gonna place the droppers now the top row is going to be for the brewing Ingredients so we’ll need one right there one right there and another one on this side now the next row the lower row is going to be where the water bottles go so we’ll place them underneath now the next step is to put the brewing stand in its gonna go right there in the Middle on top of this hopper and a hopper on top to get all the ingredients and put them in the brewing stand and we’re done alright so the next step is to load up our ingredients and make sure that they’re going to get fired into the brewing stand in the correct order so We’re going to going to get the ingredients out now the ingredients are going to come out of those droppers go into that hopper in the middle and be funneled down into the stand while these other hoppers in the lower level are going to you put water bottles in the brewing Stand so let’s get our let’s get our ingredients okay so when it’s facing north to south the nether wart is usually going to go in the top back dropper right here so we’ll put another ward in there now the dropper to the upper-left is generally going to take the main ingredient in This case it’s going to be a healing potion and the next dropper is going to be where we place the glowstone Dutch dust which in this case is going to turn it into a healing potion stage 2 so now we push the button to give it a little Bit of a test and there we go another warts in the brewing stand and our ingredients are in the proper order in the hopper so that went right so now what we do is we unload these ingredients and put them back where they belong and now what we’re gonna do is we Are going to put our fuel in our brewing stand and we’re going to get some water bottles there we go now is Philip enough water bottles to fill up our inventory and it’s ready to go let’s go ahead and push the button and start brewing a batch There we go brewing action taking place so while that’s brewing up what we’re gonna do is build the second one the second one is gonna be the five ingredients this is what it looks like when it’s fully completed now the five ingredient one is going to be almost Exactly the same as the first one so the process that we’re going to walk through is going to be very very similar the only difference is we’ll be adding a couple of extra droppers and a couple of extra hoppers at top and that’s where we’re gonna put the dragon’s breath and The gunpowder to make splash potions and lingering splash potions so let’s get our ingredients out and we’ll start the construction process now this time I want to bring in the extra hoppers and chests to increase the capacity of our water bottle droppers and I want to move A little bit faster through the build so let’s place a block there my tower right there put some redstone torches and there’s our chest and we’re gonna place the hopper and now let’s put some blocks on top there and we’ll place our droppers our repeaters now are the Droppers has I’m all facing inwards like this and now for the first row alright now we’re gonna put our brief stand in place put a I’m gonna hop up on top of it now I’m gonna place that hopper on top and now that we’ve done that we place The dropper right here for the other ingredients the last dropper right there and there’s our last two hovers okay now we climb down and the process here is same as the other one wooden button on the rights stone button on the left and now let’s go ahead and put our extra capacity for Our water bottles here so we can actually keep this thing going now the thing about water bottles is they’re going to be the limiting factor you’re gonna run out of water bottles before you run out of anything else primarily because they don’t stack and all your other ingredients will this will Increase your capacity for water bottles quite a bit and it should work out pretty nice so let’s get our ingredients and we’ll get some extra water balls this time so for this one placing the ingredients is going to be a little bit more complex because we’re working with Two extra ingredients gun powder and dragon’s breath so the nether wart is gonna go in the back now this is where it gets tricky we’re gonna put the glowstone here and the top one in the back is where our glycerin watermelon is gonna go for our healing potions now Right here we’re gonna put either the gun powder or the dragon’s breath I always get this one confused but we’re gonna test it we’re gonna figure it out for sure okay so it’s all in there we’re gonna push the button we’re gonna see how these ingredients load up into our Brewing stand and our hopper so they’ve all fired in there now let’s see what happened okay so we got another Ward in there yeah and we got the watermelon we got the glowstone Dragon’s Breath and gunpowder are in the wrong order so we got to switch those two out real quick There’s the dragon’s breath Dragon’s Breath actually goes in here let’s take the Gunpowder out and put the Gunpowder in here and there we go now let’s unload the thing and try one more time there we go and there’s our another wart there’s a watermelon on the closed-down we got the gun powder or The dragon’s breath it’s all in the right order all we gotta do now is put the fuel in the well let’s unload the thing first you know put it back where it goes got to keep this place neat hi there we go nice now let’s put some Fuel and the brewing stand and now water bottles let’s just fill it up all the way this time alright here we go let’s fill up this chest and see if it drains down in those hoppers correctly yeah okay I’m on this side see though they’ll keep these droppers all I’ll keep these Droppers all full of water bottles so we can just walk over and push a button at any time it’s gonna drop a pushin for us and derecho is it’s loaded up nicely so let’s go ahead and check our supplies here and let’s kick it off let’s see what happens So that’s brewing let’s see what happened over here okay we got got a brewing stand it’s full now one thing you don’t want to do is push this button while you’ve already got a brewing process started where you while you still have potions in the stand because it it could start stacking up Ingredients for you which which could cause a little bit of a problem here so you want to make sure that you check what potions got in there either take them directly off the stand or unload them into the chest before you push the start button again now let’s see we got Here we got the watermelon coming in okay so as you can see it’s a fairly easy build now if you want to keep your ingredients straight you can actually put signs on the side put the ingredients and the item frames and that’ll tell you where things go like the you know those war Goes there the bottles go there or watermelon goes there and this unit right here would be like say dedicated to making stage 2 healing potions of Lingering splash potions right so yes at anytime you need them you go there and you push that button and that wouldn’t be the regular drinking type right so pretty easy and very very few very very few materials we’re gonna load up a creative world so I can show you like Yeah this is what you might do like this is a base I did in a creative world I’m just gonna walk over here to where the wing is where all the potion brewing stands are you know we got pretty decorations everywhere these are the six brewing stations they’re each dedicated To a certain type of potion so it’s like it’s like on demand you know lingering regeneration potion and of course that right there is a splash potion so any time you wanted any of them you just come over here you push the button and there they go it kicks it off for you And we’ve already got three in the chest so you know six dedicate stations now here’s the utility room this is where we go to load the ingredients and do the maintenance fill the water bottles up and you know this is uh always loaded up there’s always ingredients in there you can restock Them anytime you need you got chests over there on the corner where you can store the extra ingredients hey you know you just go back go back there and fill the stuff up anytime you need to so I got here and you check on the potions and there we go Potion of regeneration and here comes the glowstone so you know in the survival context you know you might have a room set up like this with a couple of different brewing stands yeah for the ones that you use the most in your world so anyway this is what this is this is How you might use this particular brewing station in a survival context you know built into your base alright so that’s it for this tutorial I hope you enjoyed it and if you did please subscribe and like and remember you can find future videos coming out on this Channel and you may be able to see some videos in the future of some of our builds on freely a spate Rhian server and base tour of our own server so thank you very much and have a great day Video Information
This video, titled ‘Minecraft Tutorial: Automatic Potion Brewing Station [1.13.2 and current snapshot] (2019)’, was uploaded by 2020MC Gaming on 2019-01-10 22:30:43. It has garnered 2952 views and 59 likes. The duration of the video is 00:17:58 or 1078 seconds.
A block-by-block with full explanation of an automatic potion brewing station that is: – completely automated for small batch potion brewing for on-demand potion brewing – simple and inexpensive to build, survival friendly with a 3×3 footprint – capable of brewing with 2, 3, 4, or 5 ingredients for simple potions, extended or enhanced potions, splash potions, or lingering splash potions
Subscribe to our channel for more great tours and builds, up-coming tutorials, and more! https://www.youtube.com/channel/UCMskcTJzdCzVWfZ3jFuGjNQ?sub_confirmation=1
Follow us on Twitter: @2020MC_gaming!
2020MC Gaming is: Wa2020 VonTom2020


![Minecraft Tutorial: Automatic Potion Brewing Station [1.13.2 and current snapshot] (2019)](https://newsminecraft.com/wp-content/uploads/news/minecraft-news-best-38.jpg)